Working with Mule Server Instances
Use the Servers tab to view and manage the following:
-
all Mule ESB instances (servers) containing the management console agent.
-
all Mule ESB instances (nodes) belonging to a cluster. (For additional information on working with cluster nodes, see Managing Mule High Availability (HA) Clusters).
The Servers Tab
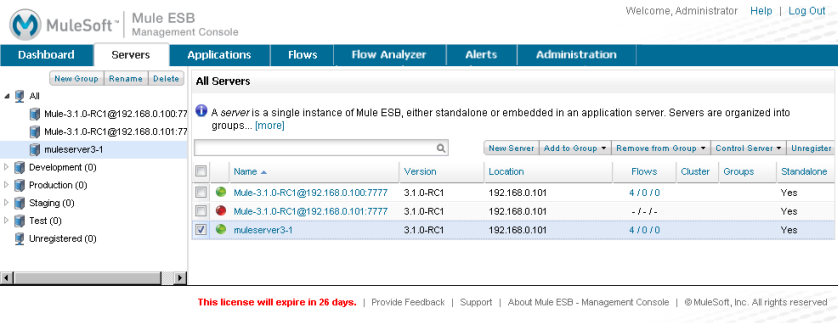
The Servers tab lists all servers:

Clusters, which function as single virtual servers that happen to incorporate multiple nodes, also appear in the list of servers.

The navigation pane on the left displays all servers organized into groups. You can click All to see all servers, or click a specific group to see servers just in that group. In this context, a group is simply a logical grouping of servers, such as by functionality (for example: development or production).
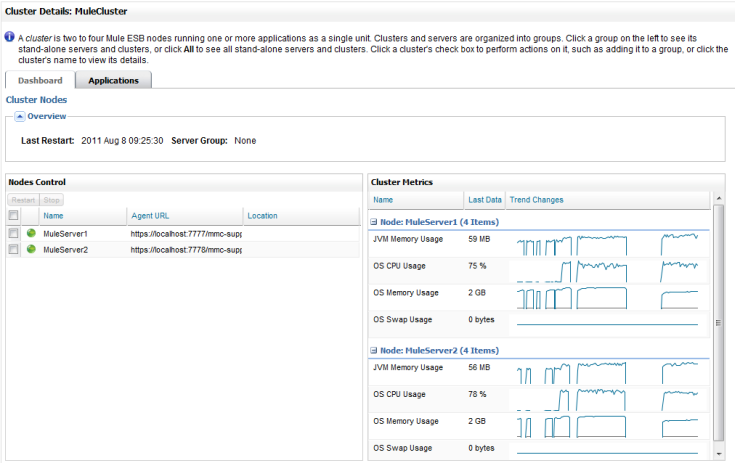
Click a cluster in the list to get details about that cluster.


The groups that you see in the navigation pane when you first run the console are provided by default. Click the Rename button to rename a group, or click New Group to add your own group. Click Delete to remove a group from the tree.
The Server summary pane lists all the servers known to the console. A green circle to the left of the server indicates that the server is running, whereas a red circle generally indicates that the server is stopped. Since a red circle may appear for reasons other than a stopped server, you may need to delete the server trust store file, truststore.jks, to correct this condition. You can find instructions for deleting the trust store file in the Unable to Register the Console AgentTroubleshooting Tips section.
In addition, the pane displays the status of the server’s flows (shown as "x/y/z" where x is the number of running flows, y is the number of paused flows, and z is the number of stopped flows), and more. Note that a stopped flow does not mean there has been a failure, as some flows start only when needed.
To perform actions on a server instance, click the check box next to the server name, then click the action (such as Add to Group) that you want to perform. Click the server name to see details about the server. See Monitoring a Server for details on monitoring individual servers.
For information on monitoring the nodes in a cluster, see Monitoring a Cluster.
Registering a Server
You must register a server to manage it with the console. If you are using the bundled distribution (that is, the distribution that includes both the Mule ESB server and the management console), the server is automatically registered with the console. If you do need to register the server, the simplest way is to use the console’s auto-discovery feature, where the console automatically senses that a Mule server is running and makes it easy to register any "discovered" servers. (See the section Server Auto-Discovery for New Servers below.)
To manually register a server, click the New Server button.

You then enter a name for the server and the server agent’s URL, such as http://localhost:7777/mmc-support, replacing localhost and 7777 with the correct host and port as shown in the Mule startup screen:
* Agents Running:                                                    *
*   Mule Management Console Support (0.0.0.0:7777)                   *
*   JMX Agent                                                        *
*   Wrapper Manager: Mule PID #1792, Wrapper PID #5216               *
**********************************************************************
A server is registered initially using a plain http port as the agent binding port. During the registration process, a secure pairing occurs and the port changes to https.
By default, newly added (or registered servers) appear within the All group in the navigation tree. A server can also be added to a specific group and the same server can be added to multiple groups. This is explained in the section Working with Server Groups.
A server can also be added as a node to a cluster and the same server can be added to multiple groups and clusters. This is explained in the section Working with Server Groups.
Server Auto-Discovery For New Servers
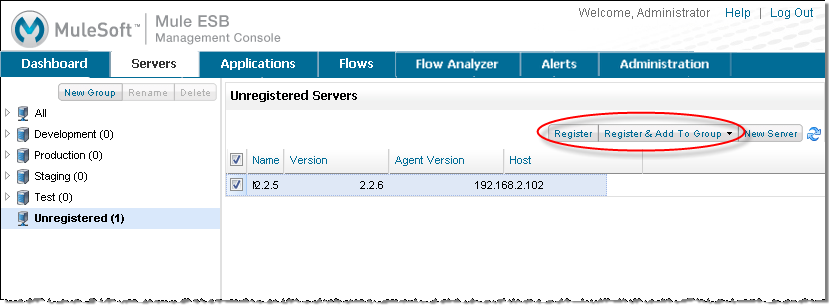
Notice that the navigation pane includes the Unregistered group node. If there are Mule ESB servers that have come online with the management console agent, then these servers appear beneath the Unregistered node until they are registered. To register one of these servers, click the Unregistered group or node, then select the server from the list and click one of the register buttons (see the figure below). You do not need to know the URL for the server; the console uses auto discovery to discover the server and get the URL.

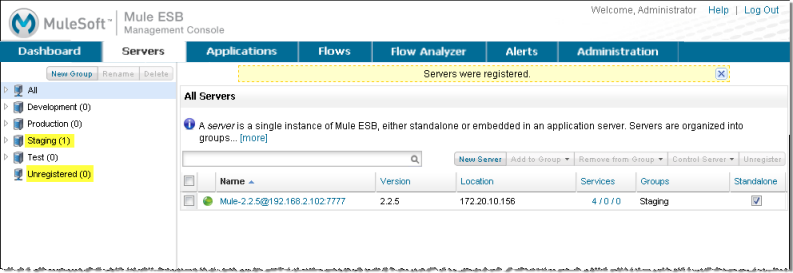
Click the Register button to simply register the selected server. Or, click the Register & Add to Group button, then from the pull-down list select the group to which you want to add the selected server. The selected server is simultaneously registered and added to the selected group. The figure below illustrates the result of registering the selected server and adding it to the Staging group. (The Working with Server Groups section explains groups.)

Stopping or Restarting a Server
You can stop or restart a server by selecting its check box, then clicking Control Server and choosing an option from the pull-down list. You can also stop or restart a server when you are viewing its details. Once a server is stopped from the management console, it must be restarted directly. That is, the management console does not have the ability to start a server that is not running.

You can stop or restart a server by selecting its check box, then clicking Control and choosing an option from the pull-down list.

Working with Server Groups
A server group is simply a logical grouping of servers. For example, if you have some Mule instances in production and others in the testing phase, it can be helpful to group them accordingly in the management console. The All group lists all registered servers.
You can also add one or more clusters to a group.
To create a server group:
In the navigation pane on the left side of the Servers tab, click New Group. Then, in the dialog, enter a name for this group, and then click OK.

To add a server to a group:
-
On the Servers tab, select the check box of a server you want to add to a group.
Or select the check box of a cluster you want to add to a group.
-
Click Add to Group, and select the group from the drop-down list.
-
At the confirmation screen, click Yes to add the selected server to the group.
Or click Yes to add the selected cluster to the group.
To rename a group:
-
Select the group in the navigation tree and click Rename.
-
Enter the new name and click OK.
To remove a server from a group:
-
Select the check box of a server you want to remove from a group.
Or select the check box of a cluster you want to remove from a group.
-
Click Remove from Group, and then select the group from the drop-down list.
-
At the confirmation screen, click Yes to remove the selected server from the group.
Or click Yes to remove the selected cluster from the group.
If you no longer need a server group, you can delete it from the system. Deleting a server group does not delete the servers in that group but simply deletes the grouping.
Neither does it delete the clusters in that group.
Finding a Server
There are several ways to find a server in the management console:
-
Type a server’s name in the search box at the top of the Servers tab and then select it from the list that appears.
-
If you know which group the server is in, click the group’s name in the navigation tree on the left, and then browse through the list of servers in that group.
-
If the server is not a member of a group, click All in the navigation tree to see all servers.
You can find a cluster using the same methods as finding a server.
Unregistering a Server
If you no longer need to manage a server in the console, you can remove it.
To remove a server:
-
Select the check box of a server you want to unregister.
-
Click Unregister.
-
At the confirmation screen, click Yes to unregister the selected server. You will no longer be able to manage that server with the console.
When you unregister a server, it no longer appears in the groups to which it was assigned or in the All group.
To unregister a server that was added as a node to a cluster, you must first disband the cluster. The server is then be returned to the All group, at which point you can unregister it. For information on how to disband a cluster, see Creating or Disbanding a Cluster.
If the console becomes unavailable and you want to unregister its servers so that you can register them with another console, you must manually delete the truststore.jks file under each server to unregister it. This file is located in the mule agent directory beneath the .mule directory under the location where you started Mule. When you delete this file, the server becomes available again for registering in another console.


