Defining a Data Mapping Flow with Input and Output Metadata
-
#DefiningDataMapperInputandOutputMetadata-Step1:NamingtheDataMappingFlow[Step 1: Naming the Data Mapping Flow]
-
#DefiningDataMapperInputandOutputMetadata-Step3:DefiningInputandOutputMetadata[Step 3: Defining Input and Output Metadata]
-
#DefiningDataMapperInputandOutputMetadata-Shortcut:CreatingOutputMetadatabasedonDefinedInputMetadata%C2%A0[Shortcut: Creating Output Metadata based on Defined Input Metadata ]
-
Go Further
Defining a data mapping flow is the first step to working with Anypoint DataMapper. You will create a data mapping flow, then run the wizard that guides you through setting up the input and output metadata for the flow.
After you complete this step, you will go to the Data Mapping Flow Editor, where you will map source to target data.
Assumptions
This document assumes the reader is familiar with the Anypoint DataMapper Transformer. If you are not, start from the beginning: DataMapper User Guide and Reference.
Adding a DataMapper to a Mule Flow
Adding a DataMapper building block to a Mule flow is like adding any other building block.
-
Drag a DataMapper from the palette into the flow, and drop it between the blocks that supply its input and output.
-
When you select the DataMapper in the flow, the Data Mapping tab opens.
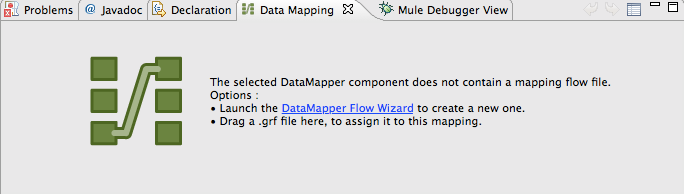
However, since the DataMapper has not been defined yet, you are prompted with two options:
-
Drag an existing .grf file into the tab, to configure this DataMapper to use that mapping flow definition;
-
Start the DataMapper Flow Wizard to cretae a mapping flow definition.
Starting the Data Mapping Flow Wizard
There are two ways you can create a Data Mapping Flow:
-
You can drag a DataMapper transformer into a flow, then click the Data Mapping Flow Wizard link to start the wizard;
-
You can create a Data Mapping Flow directly in the Package Explorer, by right-clicking Mappings and choosing New→Mapping Flow.

In either case, the New Data Mapping Flow wizard opens.
Step 1: Naming the Data Mapping Flow
In Step 1 of the New Data Mapping Flow wizard, you specify general information—the name of the DataMapper building block in your flow, the .grf file that will store the definition, and a description.
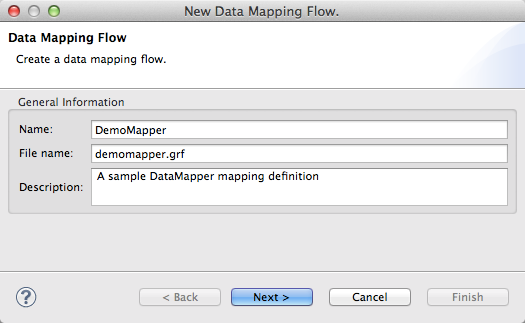
The name you enter will be used for the DataMapper transformer in your Mule flow, and will be the basis of your .grf mapping flow file name. The name need not be unique across your project—if the name is used elsewhere in your project, Studio will generate a unique filename for the mapping flow file to avoid any name conflict.
When you have entered this information, click Next.
 |
Editing and Managing .GRF files.grf files should only be created in the mappings folder, and can only be edited in the DataMapper Mapping Flow Editor. Editing a .grf file directly, as with a text or XML file editor in Eclipse, or with an external editor, can cause unpredictable behavior in Studio. |
|---|
Step 2 Selecting DataMapper Input and Output Types
Next you select the input and output types for the data mapping flow.
The available input and output types include:
-
Flat data: CSV (delimited file), Microsoft Excel, or fixed width file data
-
Structured data: XML, JSON, POJO (Plain Old Java Objects), Map<k,v> (key-value maps)
-
Data from Mule Connectors: accessing SaaS applications or any other source or target for which Mule has a connector. Data is typically in either Map or POJO format, depending upon the connector.
Step 3: Defining Input and Output Metadata
Once you have selected the input and output data formats, you must populate the specific metadata, such as data elements, types, and attributes, for the input and output data for this mapping flow. There are three principal ways to populate this metadata:
-
For many input types, metadata can be automatically derived from sample input files.
-
Metadata can be entered manually, or edited manually after being inferred by one of the automated methods.
-
For Connector inputs and outputs, metadata is automatically populated by Mule.
For cases where you are manually defining metadata, there is a convenient shortcut for copying input to output metadata, or vice versa, depending on which one you already have. See Shortcut: Duplicating Metadata between Input and Output for details.
In the wizard, from this point, the behavior depends on the selected input and output data types. The variations are described in the following sections:
Once you have defined metadata for both input and output, click Finish. Studio saves the metadata definitions to a mapping flow file, and opens the Mapping Flow Editor where you actually map input data to output data.
|
Post-Metadata Setup The New Data Mapping Flow wizard and metadata editing screens expose logical metadata definitions, such as names and datatypes of fields, that describe your inputs and outputs. However, there are other settings for input and output, related to details like character encodings, rows to skip in input files, and error policies for handling bad input data. These may also need to be reviewed and set as part of your job design. These settings are available through the Properties dialogs on the input and output panes in the DataMapper Mapping View. The following discussion will call out cases where there may be such additional parameters to set, and link you to the relevant documentation for those settings. For full documentation on these properties, see Mapping Flow Input and Output Properties. |
|---|
Defining CSV Metadata
In the New Data Mapping Flow wizard, you can define the basic metadata for a delimited input file, including:
-
The column names and types
-
The delimiter used in the file
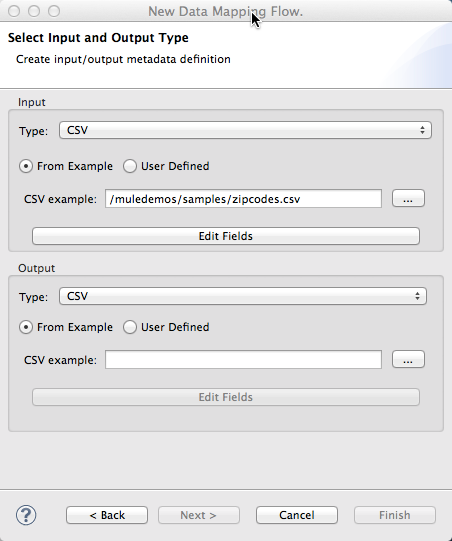
To define a CSV input or output, select CSV in the Input or Output dropdown, as shown:
Click the ellipsis to select an example file from which to infer metadata.
To define the columns directly, select User Defined, then click Edit Fields.

In the Edit Fields dialog, you can:
-
Define columns by name and by type
-
Set the delimiter for your file
Defining a Custom Delimiter for a CSV File
Anypoint DataMapper offers the choice of several common delimiters for a CSV file: the default comma (","); pipe ("|"); semicolon (";"); colon (":"); or space (" "). The dropdown illustrates typical columns separated by the delimiters.
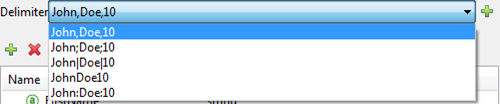
To add a custom delimiter, click + and enter the new character—for example, a tilde ("~"). The new delimiter now appears in the dropdown among the available choices:
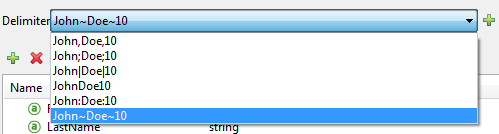
Select the new delimiter from the list to finalize your choice.
|
Additional Properties for CSV Files CSV files have additional properties that can only be configured from the Properties dialog in the Data Mapping View, and that affect how input data is parsed and how output data is generated. You should review these properties once you have the mapping flow open in the mapping flow editor. See "CSV Input and Output Properties" in Mapping Flow Input and Output Properties for details. |
|---|
Defining Connector Metadata
For Connector metadata, the DataMapper can take its metadata from the connector input or output.
|
DataMapper, Connectors and DataSense With Mule Studio’s Perceptive Flow Design, DataSense-enabled connectors retrieve from the connected source system full metadata for supported operations and objects, including any custom objects and fields. If you model a flow to include a connector as an input to or output from a DataMapper, Mule uses metadata retrieved from the connected system–a SaaS provider, for example–and feeds that data into the DataMapper to automate correct input and output metadata setup. See Mule DataSense and Using Perceptive Flow Design for more details. |
|---|
When a connector already defined in a Mule flow is input or output for your DataMapper, the operation and any associated object classes are filled in for you.
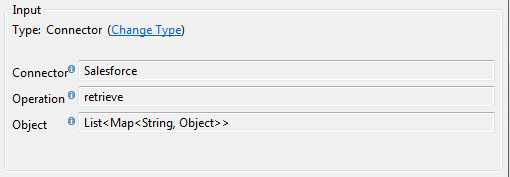
If necessary, you can override the provided metadata by clicking Change Type.
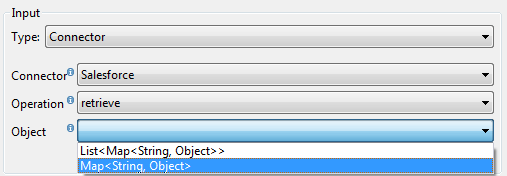
In this case, the retrieve operation can return a single Map<String, Object> for only one result, or a List of Map<String,Object> for a retrieve operation that fetches multiple results.
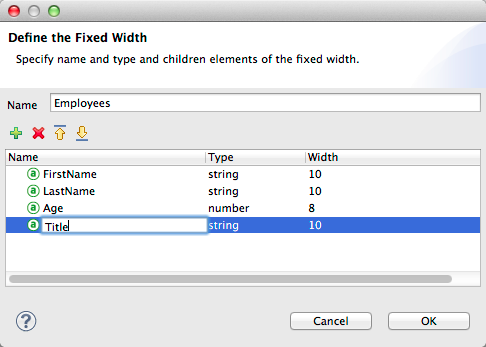
Defining Fixed Width Format Metadata
For metadata for fixed width data, you can select a sample input file:
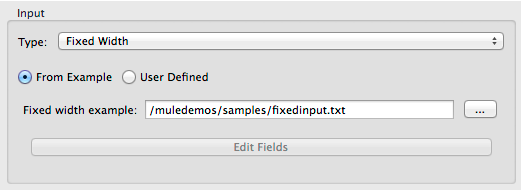
Column formats will be inferred from the input file.
Alternatively, you can select "User Defined" and manually define name, type and column width metadata:
|
Additional Properties for Fixed Width Data Fixed width data files have additional properties that can only be configured from the Properties dialog in the Data Mapping View, and that affect how input data is parsed and how output data is generated. You should review these properties once you have the mapping flow open in the mapping flow editor. See "Fixed Width Input and Output Properties" in Mapping Flow Input and Output Properties for details. |
|---|
Defining JSON Metadata
There are two ways to define JSON metadata:
-
By selecting a sample JSON file;
-
By manually creating a JSON file definition.
Using a JSON Sample
To define JSON Metadata using a sample JSON file:
-
Select Type JSON.
-
Choose From Example.
-
Click the ellipsis "…" and browse to or enter the path to the sample JSON file.
Using User-Created JSON Definition
To define JSON Metadata directly:
-
Select Type JSON;
-
Choose User Defined;
-
Click Edit Fields.
The Define the JSON dialog opens.
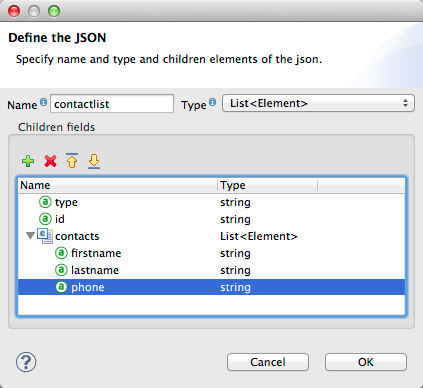
Here you can specify:
-
the name and type of the parent, which can be a single Element or a List of Elements;
-
the names and types of child elements that make up the structure inside the parent, which can be strings, numeric types, dates, Booleans, Elements, or lists of any of the above.
|
Additional Properties for JSON Data JSON data has additional properties that can only be configured from the Properties dialog in the Data Mapping View, and that affect how input data is parsed and how output data is generated. You should review these properties once you have the mapping flow open in the mapping flow editor. See "JSON Input and Output Properties" in Mapping Flow Input and Output Properties for details. |
|---|
Defining Key-Value Map Metadata
There are two ways to define key-value map metadata:
-
By manually defining the key-value map structure;
-
By providing Groovy code that constructs a Map object of the desired form.
Using Direct Key-Value Map Definition
To define a Key-Value Map Definition directly:
-
Choose Input type Map<k,v> and select User Defined.
-
Click "Edit Fields". Enter the name for your Map, the Type (which can be Element or List<Element>).
-
Then add child fields for your Key-Value Map, setting name and type for each.
Using a Groovy Map Sample Script
To define a Key-Value Map using a Groovy script as an example, create a Groovy script that constructs and returns a Key-Value Map object of the desired structure.
For example, this Groovy script defines a single key-value Map representing one person’s contact information:
return [name:"John",lastName:"Harrison",address:"4th Street",zipCode:1002]
This Groovy script defines a List of Key-Value Maps representing contact information for multiple people:
     return [

        [name:"John",lastName:"Harrison",address:"4th Street",zipCode:1002],
        [name:"Dan",lastName:"Tomson",address:"6th Street",zipCode:1003]
To use a Groovy script to define Key-Value Map metadata:
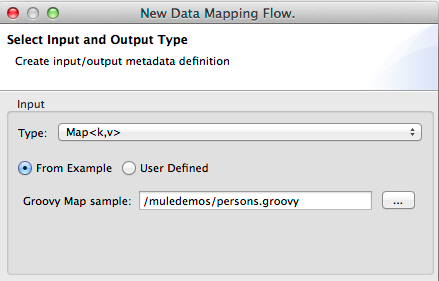
-
Select Type: Map<k,v>
-
Select From Example
-
Enter the path to the Groovy script file in Groovy Map Sample, as shown:
Additional Properties for Key-Value Maps Data
Key-Value Map data has additional properties that can only be configured from the Properties dialog in the Data Mapping View, and that affect how input data is parsed and how output data is generated. You should review these properties once you have the mapping flow open in the mapping flow editor. See "Key-Value Map Input and Output Properties" in Mapping Flow Input and Output Properties for details.
Defining MS Excel Metadata
To define metadata for an MS Excel spreadsheet:
-
Select type "MS Excel";
-
Enter a path to a sample Excel spreadsheet, or click the ellipsis "…" to browse the filesystem for one;
-
Enter a value for Name, that will be used to reference the input spreadsheet in DataMapper expressions.
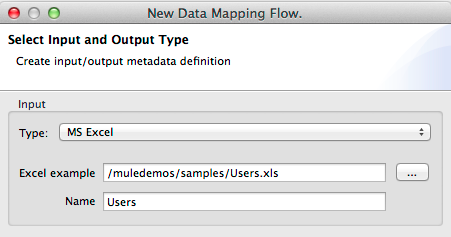
There are no user-modifiable metadata definitions for Excel spreadsheets. DataMapper will infer column names and data types from the contents of the spreadsheet.
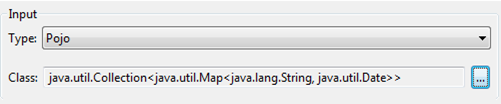
Defining POJO Metadata
Metadata for a POJO (Plain Old Java Object) as DataMapper source or target consists of a definition of the class of the Java object. This can be a single class, or a complex structure consisting of nested Collections and key/value Maps containing any Java class in your project.
To define metadata for a POJO:
-
Select Type Pojo;
-
Click the ellipsis … to open the Object Introspector dialog;
-
Construct the needed structure in the Object Introspector.
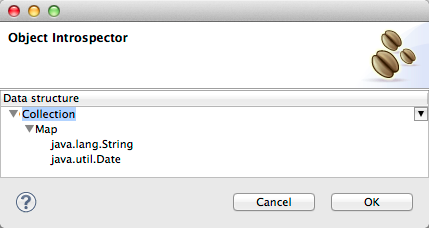
Once you have a complete description of the desired class structure, click OK. The New Data Mapping Flow wizard shows the Java class definition constructed.
|
Additional Properties for POJO Data POJO input and output data has additional properties that can only be configured from the Properties dialog in the Data Mapping View, and that affect how input data is parsed and how output data is generated. You should review these properties once you have the mapping flow open in the mapping flow editor. See "POJO Input and Output Properties" in Mapping Flow Input and Output Properties for details. There are also two specific situations in which you need to make changes when using POJO as an output format: * When the class of a POJO is an abstract class or an interface, and you need to specify a concrete class for use at runtime; * When you need to use a factory class to instantiate the POJO, instead of calling the class’s constructor. The properties required are accessed through the Input and Output Properties dialog in the DataMapper mapping view. See POJO Metadata: Bindings and Factories for details. |
|---|
Defining XML Metadata
There are three ways to define XML metadata:
-
Provide an XSD schema definition;
-
Provide a sample XML file, from which Mule can derive an XSD file;
-
Directly enter user-defined metadata
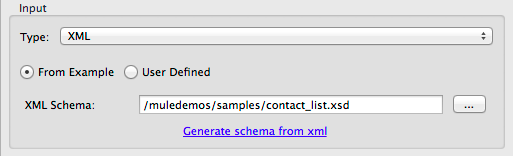
Using an XSD Schema Definition
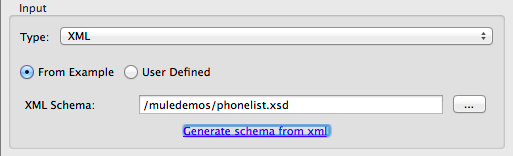
To define XML metadata using an XSD schema definition:
-
Select Type "XML";
-
Choose "From Example";
-
Click the ellipsis "…" and browse to an XSD file, or enter the path to the XSD file directly.

Using an XML Sample
Studio can use an XML sample file to generate an XSD schema, which it can then use to define XML metadata.
To generate an XSD schema definition file from sample XML:
-
Click Generate Schema from XML.The dialog below opens.
-
Enter or browse to the path to the sample XML file, and the path to the directory where the XSD will be stored. (In general, this directory should be inside your Mule project.)
-
Click OK.
Studio generates an XSD file in the specified schema directory, and fills in the XML schema path with the full path to the XSD file.
From this point, behavior is the same as if you had originally selected an XSD file.
 |
Review the Derived XSD While you will see the structure in the Data Mapping Editor, it is also prudent to review the generated XSD file to ensure that the derived definitions fully match your expectations. |
|---|
|
Additional Properties for XML XML input data has additional properties that can only be configured from the Properties dialog in the Data Mapping View, and that affect how input data is parsed and how output data is generated. You should review these properties once you have the mapping flow open in the mapping flow editor. See "XML Input and Output Properties" in Mapping Flow Input and Output Properties for details. |
|---|
Shortcut: Creating Output Metadata based on Defined Input Metadata
When defining the input and output metadata, often the output metadata will be very similar in structure to the input metadata (for example, a contact name with a list of addresses), even though the underlying format will be different (for example, Pojo vs. JSON). In such cases, there is a shortcut for quickly populating the output metadata, reproducing the structure of the input. If the structures are not exactly the same, you can then edit the output or input as needed to account for the differences.
For example, we can recreate the input metadata structure created by sampling this JSON input file:
The goal in this example is to create a Maps/List of Maps output metadata structure that corresponds to this JSON input structure.
-
Save the above text as contacts.json in a convenient directory.
-
Create a new DataMapper, then start the Mapping Flow wizard. Enter a name for the flow and click Next.
-
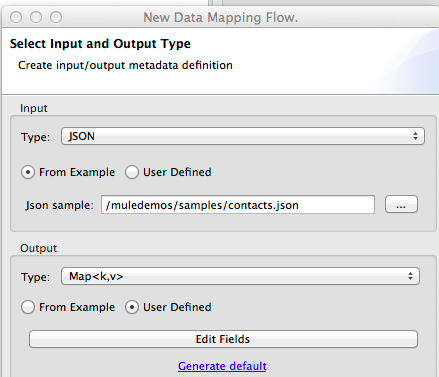
In the Input section of the the Select Input and Output Type pane, select Type JSON, select From Example, and for Json sample, enter the path to your contacts.json file.
-
In the Output section, select a different structured format for Type—for this example, Map<k,v> . Select User Defined , and click *Generate default * under the *Name * field.
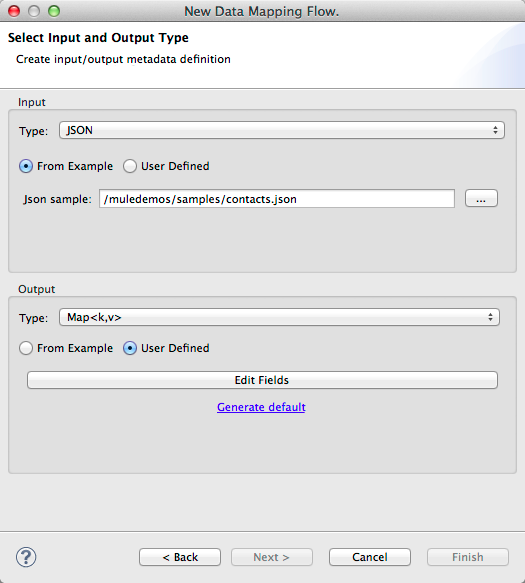
DataMapper duplicates the structure of the JSON file as a key-value map.
-
Under Output, click Edit Fields to see the result. The generated name object has been inserted, and the Type is Element. The structure of the input is reproduced, as a starting point for the output metadata definition.
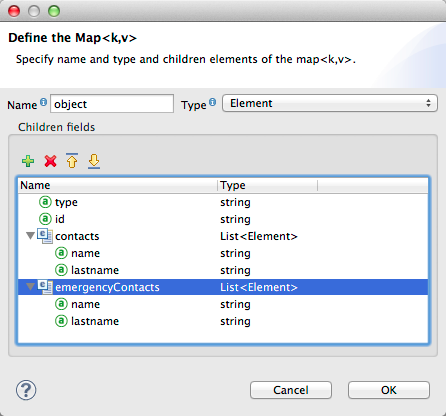
You can edit the resulting structure further, adding or removing elements as needed. The use of this editor is described in Defining Metadata Using Edit Fields. When you have finalized the structure, click OK.
Reusing a Mapping Flow Definition in Multiple DataMappers
You may need to reuse a single mapping flow definition in multiple places in a Mule ESB solution. For example, consider a solution that uses the content syndication formats RSS and ATOM, calling many web services that respond in these formats and translating them to and from a normalized representation used in your application. In such a case, you can define a small number of reusable mappings in standalone .GRF mapping definition files, and reuse them throughout your application from multiple DataMapper instances.
Assigning a .grf Mapping Flow Definition to a DataMapper
A mapping flow file can be re-used in multiple DataMapper transformers, even in different flows in your project. For example, you might do this if you perform the same transformation between well-defined input and output data structures in multiple places. To associate an existing mapping flow file with a DataMapper:
-
Select the DataMapper in your Mule Flow (or drop a new DataMapper into a flow). The Data Mapping tab opens.
-
Drag a .grf file from the Mappings node of your project to the Data Mapping tab.
The DataMapper will take its data mapping definition from that file, and the Data Mapping tab will refresh to show the Graphical Mapping Editor.
|
Any edits you make to the mapping definition affect all DataMappers that reference the .grf file. |
|---|
See Also
Once you finish the wizard, the mapping flow definition opens in the graphical mapping editor. At that point you will define the element mappings and transformations for your data, as described in Building a Mapping Flow in the Graphical Mapping Editor.
You can also:
-
set additional properties that affect the handling of input and output, as described in Mapping Flow Input and Output Properties
-
revise your metadata definitions, if necessary, as described in Updating Metadata in an Existing Mapping.