Mule Expression Language Examples
This document walks through a few simple examples that introduce most of the basic implementations of Mule Expression Language (MEL). Each example includes a step-by-step guide for creating the flow in Mule Studio’s visual editor or in XML. You can also jump straight to the complete code for all six examples, which you can copy and manipulate further in your own applications.
Assumptions
This document assumes you are familiar with Mule Expression Language’s basic syntax and are comfortable building and running Mule applications using Mule Studio or XML.
If you aren’t yet familiar with how to access information about the Mule messages that pass through your applications, consider following this tutorial, which walks you through both examining your Mule message and its data structure and writing simple MEL expressions.
Example 1 – Accessing Properties
This example creates a simple web service that takes an HTTP request that includes a username parameter and returns a greeting using that username.
In this example, you use MEL to:
-
Access an inbound property
-
Dynamically set the payload
Studio Visual Editor
-
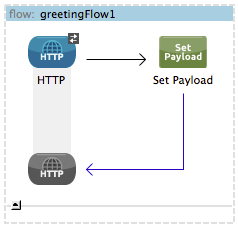
In a new flow, drag an HTTP endpoint and a Set Payload transformer.
-
Open the HTTP endpoint’s properties editor and give it the path
greet1. In this way, the endpoint can be reached via thehttp://localhost:8081/greet1URI. -
Open the Set Payload’s properties editor and set the value field with the following MEL expression:
Hello #[message.inboundProperties['username']]
This expression captures the inbound property "username", which is passed as a query string parameter when calling the service.
-
Save and run the project.
-
Through a web browser, access the
http://localhost:8081/greet1?username=yourNameURL.The response displays
Hello yourNamein your browser.This method of accessing query string parameters does not escape URL encoded characters (such as spaces, which would be read as
%20). If you want to access the escaped values of these parameters, you can do it through a special inbound property provided by Mule namedhttp.query.paramswhich contains a map, where keys are property names and values are escaped property values.In this example, you can get a user name with escaped characters through this expression:
Hello #[message.inboundProperties['http.query.params']['username']]
XML Editor
-
In a new flow, add an
http:inbound-endpoint `and configure it with the pathgreet1`.<http:inbound-endpoint exchange-pattern="request-response" host="localhost" port="8081" path="greet1" doc:name="HTTP"/>Attribute Value exchange-pattern
request-responsehost
localhostport
8081path
greet1doc:name
HTTPIn this way, the endpoint can be reached via the
http://localhost:8081/greet1URI. -
After the endpoint, add a
set-payloadtransformer, configured as shown:<set-payload value="Hello #[message.inboundProperties['username']]" doc:name="Set Payload"/>Attribute Value value
Hello #[message.inboundProperties['username']]`doc:name
Set PayloadThe MEL expression used in
valuecaptures the inbound propertyusername, which is passed as a query string parameter when calling the service. -
The full code of your flow should look like this:
<flow name="greetingFlow1" doc:name="greetingFlow1"> <http:inbound-endpoint exchange-pattern="request-response" host="localhost" port="8081" path="greet1" doc:name="HTTP"/> <set-payload value="Hello #[message.inboundProperties['username']]" doc:name="Set Payload"/> </flow> -
Save and run the project.
-
Through a browser, access the
http://localhost:8081/greet1?username=yourNameURL.This displays
Hello yourNamein your browser.
Example 2 – Dynamic Routing by Evaluating a Condition
In the previous example, if your call to the service doesn’t include a username parameter, it results in an error. You can prevent this from happening by adding some flow control components. This example includes a Choice Router that verifies if the required parameter is being passed.
In this example, you can use MEL to:
-
Evaluate conditions in a choice component
-
Access an inbound property
-
Dynamically set the payload
Studio Visual Editor
-
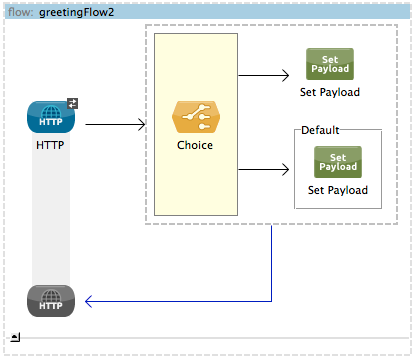
In a new flow, drag an HTTP endpoint and a Choice Router. Inside this Choice Router, add a Set Payload component in the space provided for the Default action and another Set Payload as a separate branch, as shown below.
-
Open the HTTP Endpoint’s properties editor and give it the path
greet2. In this way, the endpoint can be reached via thehttp://localhost:8081/greet2URI. -
Open the properties editor of the Set Payload transformer that sits in the Default space and set the Display Name to
Set Payload for valid usernameand configure the Value with the following MEL expression:Hello #[message.inboundProperties['username']]
This expression captures the inbound property "username", which is passed as a query string parameter when calling the service.
-
Open the properties editor of the other Set Payload transformer (the one that doesn’t sit in the default space) and set the Display Name to
Set Payload for invalid usernameand configure the Value with the expression#['No username provided']. -
Open the Choice Router’s properties editor to configure the routing logic. Double-click the row of the non-default route to provide a conditional expression. In the window that opens up, write the following MEL expression:
#[message.inboundProperties['username'] == empty]
This expression accesses the username inbound property and determines whether or not it is
nullor an empty string. This expression returns either Boolean true or false.In MEL, the keyword
emptytests the emptiness of a value, and returns boolean true for any of the following:` `-
null -
boolean false
-
empty strings or strings with only white space
-
0 value numeric values
-
empty collections
-
-
Save and run the project.
-
Through a web browser, access the
http://localhost:8081/greet2?username=yourNameURL. This displaysHello yourNamein your browser. -
Access the URL again, but this time do not include any parameters. Verify that the expected output is received.
XML Editor
-
In a new flow, add an
http:inbound-endpoint:<http:inbound-endpoint exchange-pattern="request-response" host="localhost" port="8081" path="greet2" doc:name="HTTP"/>Attribute Value exchange-pattern
request-responsehost
localhostport
8081path
greet2doc:name
HTTPIn this way, the endpoint can be reached via the
http://localhost:8081/greet2URI. -
After the endpoint, add a choice element with two possible outputs. One of these outputs is the default, the other evaluates a MEL expression.
<choice doc:name="Choice">
  <when>

  </when>
  <otherwise>

  </otherwise>
</choice>
Inside the
whentag, insert the following MEL expression:expression="#[message.inboundProperties['username'] == empty]"
This expression accesses the username inbound property and determines whether or not it is
nullor an empty string. This expression returns either booleantrueorfalse.In MEL, the keyword
emptytests the emptiness of a value, and returns boolean true for any of the following:` `-
null -
boolean
false -
empty strings or strings with only white space
-
0 value numeric values
-
empty collections
-
-
On each of the two paths in the choice router, add a
set-payloadtransformer. In the firstset-payloadtransformer, add the following attributes:Attribute Value value
#[No username provided]doc:name
Set Payload for invalid usernameIn the second set-payload transformer, use a MEL expression to access the inbound property:
Attribute Value value
Hello #[message.inboundProperties['username']]doc:name
Set Payload for valid usernameThe MEL expression in the
valueattribute in the secondset-propertycaptures the inbound propertyusername, which is passed as a query string parameter when calling the service.<choice doc:name="Choice"> <when expression="#[message.inboundProperties['username'] == empty]"> <set-payload value="#['No username provided']" doc:name="Set Payload for invalid username"/> </when> <otherwise> <set-payload value="Hello #[message.inboundProperties['username']]" doc:name="Set Payload for valid username"/> </otherwise> </choice> -
The full code of your flow should look like this:
<flow name="greetingFlow2" doc:name="greetingFlow2"> <http:inbound-endpoint exchange-pattern="request-response" host="localhost" port="8081" path="greet2" doc:name="HTTP"/> <choice doc:name="Choice"> <when expression="#[message.inboundProperties['username'] == empty]"> <set-payload value="#['No username provided']" doc:name="Set Payload for invalid username"/> </when> <otherwise> <set-payload value="Hello #[message.inboundProperties['username']]" doc:name="Set Payload for valid username"/> </otherwise> </choice> </flow> -
Save and run the project.
-
Through a browser, access the
http://localhost:8081/greet1?username=yourNameURL.This displays
Hello yourNamein your browser. -
Access the URL again, but this time do not include any parameters. Verify that the expected output is received.
Example 3 – Variable Assignment and Evaluating Conditions
In this example, the service saves a CSV file with user data besides just returning a greeting. The call to the service now includes two parameters, username and age. The service stores these two parameters and adds a third boolean parameter that evaluates if the user is underage (if age is > 18).
In this example, you can use MEL to:
-
Set a flow variable in the message
-
Generate an output based on evaluating the input
-
Access an inbound property
-
Dynamically set the payload
Studio Visual Editor
-
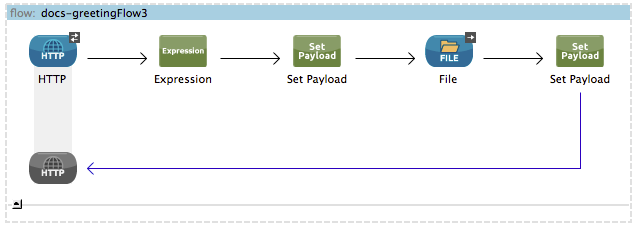
In a new flow, drag an HTTP endpoint, followed by an Expression component, then a Set Payload component, a File Enpoint, and finally another Set Payload Component.
-
Open the HTTP Endpoint’s properties editor and give it the Path
greet3. In this way, the endpoint can be reached via thehttp://localhost:8081/greet3URI. -
In the expression component, set the following MEL expression:
flowVars['username'] = message.inboundProperties['username']
This expression takes the value of the inbound property
usernameand sets it as the flow variableusername.Because this MEL expression is used in an expression component, it doesn’t need to be surrounded with #[]brackets. -
In the Set Payload transformer, set the Value to the following MEL expressions:
#[message.inboundProperties['username']], #[message.inboundProperties['age']], #[message.inboundProperties['age'] > 18]
This sets the payload to a string that contains three comma-separated values. The third of these values evaluates a condition and returns
trueorfalsedepending on the user’s age. -
In the properties editor of the File endpoint, set a path for the file to be saved.
-
Open the properties editor of the final Set Payload transformer and set the Value field with the following MEL expression:
Hello #[flowVars['username']]
This expression captures the flow variable
username, which was created by the Expression Component in your flow. -
Save and run the project.
-
Through a web browser, access the `http://localhost:8081/greet3?username=yourName&age=22 ` URL.
This displays
Hello yourNamein your browser and also saves a CSV file that contains this data, plus the valuetruefor the boolean parameter.
XML Editor
-
In a new flow, add an
http:inbound-endpoint. Configure it as shown:<http:inbound-endpoint exchange-pattern="request-response" host="localhost" port="8081" path="greet3" doc:name="HTTP"/>Attribute Value exchange-pattern
request-responsehost
localhostport
8081path
greet3doc:name
HTTPIn this way, the endpoint can be reached via the
http://localhost:8081/greet3URI. -
After the endpoint, add an expression component that uses a MEL expression to record the inbound property
usernameinto a flowVar.<expression-component doc:name="Expression"><![CDATA[flowVars['username'] = message.inboundProperties['username']]]> </expression-component>This expression takes the value of the inbound property
usernameand sets it as the flow variableusername.Since this MEL expression is used in an expression component, it doesn’t need to be surrounded with #[]brackets. -
Add a Set Payload transformer and set the
valuefield to a MEL expression:<set-payload value="#[message.inboundProperties['username']], #[message.inboundProperties['age']], #[message.inboundProperties['age']>18]" doc:name="Set Payload"/>Attribute Value value
#[message.inboundProperties['username']], #[message.inboundProperties['age']], #[message.inboundProperties['age']>18]doc:name
Set PayloadThis sets the payload to a string that contains three comma-separated values. The third of these values evaluates a condition and returns
trueorfalsedepending on the user’s age. -
Below, add a
file:outbound-endpointto send this data to a file:<file:outbound-endpoint path="path_of_your_choice" responseTimeout="10000" doc:name="File"/>Attribute Value path(Example)/Users/AaronMacbook/DownloadsresponseTimeout10000doc:nameFile -
Below, add another Set Payload transformer containing a MEL expression that references the flow variable that you set earlier in the flow:
<set-payload value="Hello #[flowVars['username']]" doc:name="Set Payload"/>This expression accesses the flow variable
username, which was created by the Expression Component in your flow.Attribute Value valueHelo #[flowVars['username']]`doc:nameSet Payload -
The full code of your flow should look like this:
<flow name="greetingFlow3" doc:name="greetingFlow3"> <http:inbound-endpoint exchange-pattern="request-response" host="localhost" port="8081" path="greet3" doc:name="HTTP"/> <expression-component doc:name="Expression"><![CDATA[flowVars['username'] = message.inboundProperties['username']]]></expression-component> <set-payload value="#[message.inboundProperties['username']], #[message.inboundProperties['age']], #[message.inboundProperties['age']>18]" doc:name="Set Payload"/> <file:outbound-endpoint path="path_of_your_choice" responseTimeout="10000" doc:name="File"/> <set-payload value="Helo #[flowVars['username']]" doc:name="Set Payload"/> </flow> -
Save and run your project.
-
In a browser, access the URL` http://localhost:8081/greet3?username=yourName&age=22 `
This will print the wordsHello yourNamein your browser and also save a csv file that contains this data, plus the valuetruefor the boolean parameter.
Example 4 – Creating Maps and Evaluating Conditions with DataMapper
Enterprise
In this example, like in the previous one, the Mule application saves a CSV file with user data and returns a greeting. The call to the service includes two parameters, username and age. The service stores these two parameters and adds a third boolean parameter that evaluates if the user is above a certain age (if age `> 18`). In this case, however, the mapping between input and output fields and the generation of the third field is performed by a DataMapper component.
In this example, you can use MEL to:
-
Set a flow variable in the message
-
Set a map as your message payload
-
Generate an output based on evaluating the input within DataMapper
-
Access an inbound property
-
Dynamically set the payload
Studio Visual Editor
-
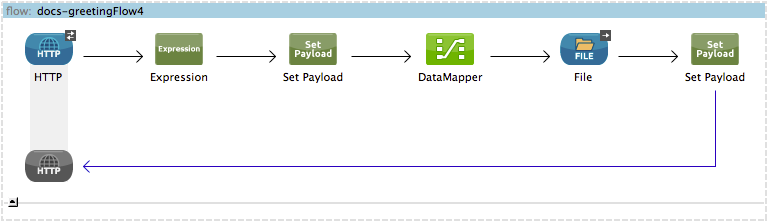
In a new flow, drag an HTTP endpoint, followed by an Expression Component, then a Set Payload transformer, a DataMapper transformer, a File Endpoint, and finally another Set Payload transformer.
-
Open the HTTP endpoint’s properties editor and give it the path
greet4. In this way, the endpoint can be reached via thehttp://localhost:8081/greet4URI. -
In the expression component, set the following MEL expression:
flowVars['username'] = message.inboundProperties['username']
Since this MEL expression is used in an expression component, it doesn’t need to be surrounded with #[]brackets. -
In the Set Payload transformer, set the Value field to the following MEL expression:
#[['username' : message.inboundProperties['username'], 'age' : message.inboundProperties['age']]]
This sets the payload to a map that contains two key:value pairs.
-
In the DataMapper properties editor, configure the fields as shown:
-
In the Input, select Map<k,v> type and User Defined structure.
-
In the Output, select CSV type and User Defined structure.
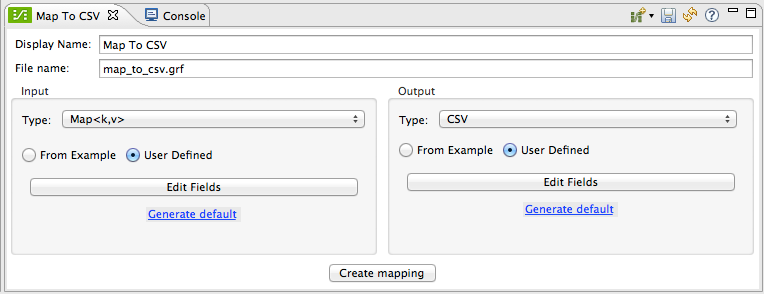
-
-
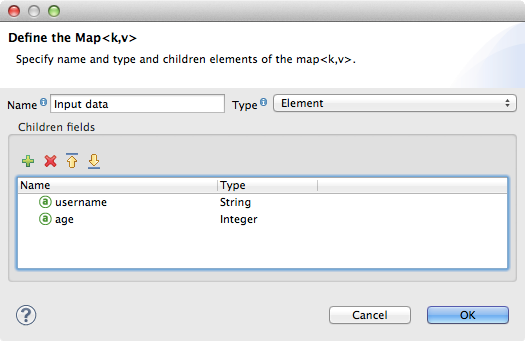
For the input, click Edit Fields to open the Define the Map dialog.
-
Give your map a Name and Type, then create two fields by clicking the green plus sign:
Name Type username
String
age
Integer
-
For the Output, click Edit Fields, then give the output a Name, select a Delimiter, and create three fields, as shown:
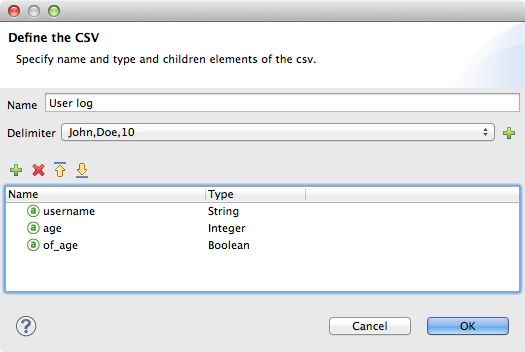
-
Click Create Mapping to trigger DataMapper to generate the mapping.
-
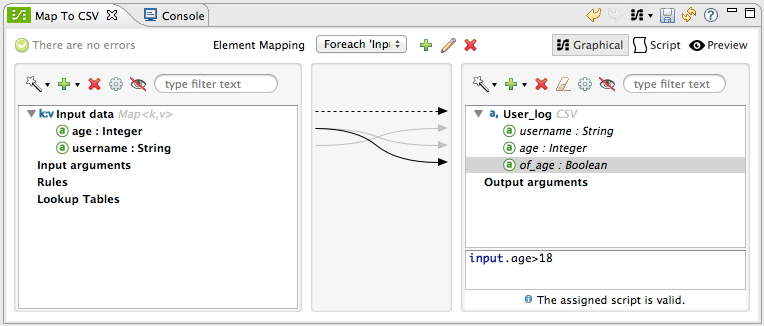
DataMapper now displays the mapping between input and output fields. The third output field (of_age) needs a MEL expression to get its values. Select it and then write the following MEL expression in the input box below:
input.age>18
The resulting mapping should look like this:
-
In the File endpoint, set a path of your choice for the file to be saved.
-
Open the properties editor of the final Set Payload transformer and set the Value field with the following:
Hello #[flowVars['username']]
This expression accesses the flow variable
username, which was created by the Expression Component in your flow. -
Save and run the project.
-
In a browser, access the
http://localhost:8081/greet4?username=yourName&age=22URL.This displays
Hello yourNamein your browser and also saves a CSV file that contains this data, plus the valuetruefor the boolean parameter.
XML Editor
-
In a new flow, add an `http:inbound-endpoint `configured as shown.
<http:inbound-endpoint exchange-pattern="request-response" host="localhost" port="8081" path="greet4" doc:name="HTTP"/>Attribute Value exchange-pattern
request-responsehost
localhostport
8081path
greet4doc:name
HTTPIn this way, the endpoint is reached via the
http://localhost:8081/greet4URI. -
After the endpoint, add an expression component that uses a MEL expression to record the inbound property
usernameinto a flow variable of the same name.<expression-component doc:name="Expression"><![CDATA[flowVars['username'] = message.inboundProperties['username']]]> </expression-component>Since this MEL expression is used in an expression component, it doesn’t need to be surrounded with #[]brackets. -
Add a set-payload transformer and set the value attribute to a MEL expression:
<set-payload value="#[['username' : message.inboundProperties['username'], 'age' : message.inboundProperties['age']]]" doc:name="Set Payload"/>Attribute Value value
#[['username' : message.inboundProperties['username'], 'age' : message.inboundProperties['age']]]doc:name
Set PayloadThis sets the payload to a map of key:value pairs that contains username and age.
-
Next, add a data-mapper:transform element.
<data-mapper:transform doc:name="Map To CSV"/>
To configure the DataMapper, transition to Studio’s Visual Editor.
-
In the DataMapper properties editor, configure the following:
-
In the input, select Map<k,v> type and User Defined structure.
-
In the output, slect CSV type and User Defined structure.
-
-
For the input, click Edit fields to open the Define the Map dialog.
-
Give your map a Name and Type, then create two fields by clicking the green plus sign:
Name Type username
String
age
Integer
-
For the Output, click Edit Fields, then give the output a Name, select a Delimiter, and create three fields, as shown:
-
Click Create Mapping to trigger DataMapper to generate the mapping. DataMapper now displays the mapping between input and output fields. The third output field (of_age) needs a MEL expression to get its values. Select it and write the following MEL expression in the input box below:
input.age>18
The resulting mapping should look like this:
-
Set Studio’s view back to the XML editor. Below the last component, add a
file:outbound-endpointto send this data to a file:<file:outbound-endpoint path="path_of_your_choice" responseTimeout="10000" doc:name="File"/>Attribute Value path
(Example)
Users/AaronMacBook/DesktopresponseTimeout
10000doc:name
File -
Below, add another Set Payload transformer, configured as shown:
<set-payload value="Hello #[flowVars['username']]" doc:name="Set Payload"/>This expression accesses the flow variable
username, which was created by the Expression Component in your flow.Attribute Value value
Hello #[flowVars['username']]doc:name
Set Payload -
The full code of your flow should look like this:
<flow name="greetingFlow4" doc:name="greetingFlow4"> <http:inbound-endpoint exchange-pattern="request-response" host="localhost" port="8081" path="greet4" doc:name="HTTP"/> <expression-component doc:name="Expression"><![CDATA[flowVars['username'] = message.inboundProperties['username']]]> </expression-component> <set-payload value="#[['username' : message.inboundProperties['username'], 'age' : message.inboundProperties['age']]]" doc:name="Set Payload"/> <data-mapper:transform config-ref="map_to_csv" doc:name="Map To CSV"/> <file:outbound-endpoint path="path_of_your_choice" responseTimeout="10000" doc:name="File"/> <set-payload value="Hello #[flowVars['username']]" doc:name="Set Payload"/> </flow> -
Save and run your project.
-
In a browser, access the
http://localhost:8081/greet4?username=yourName&age=22URL.This displays
Hello yourNamein your browser and also save a csv file that contains this data, plus the valuetruefor the boolean parameter.
Example 5 – Using Xpath
In all the previous examples, calls to the service were made via GET requests that included query parameters. In this example, the service you create is an API that accepts POST requests with XML bodies. The required XML includes two parameters, username and age. The service stores these two parameters and adds a third boolean parameter that evaluates if the user is above a certain age (if age >18)
In this example, you use MEL to:
-
Set a flow variable in the message
-
Generate an output based on evaluating the input
-
Parse an XML input through an xpath query
-
Dynamically set the payload
Studio Visual Editor
-
In a new flow, drag an HTTP endpoint, followed by an Expression Component, a Set Payload transformer, a File endpoint, and another Set Payload transformer.

-
Open the HTTP Endpoint’s properties editor and give it the path
greet5. In this way, the endpoint is be reached via the URI ` http://localhost:8081/greet5`. -
Open the Expression Component’s properties editor and set the following MEL expression:
flowVars['username'] = xpath('/user/username').textThis expression calculates the result of the xpath function and sets it as the value of the flow variable
username.Since this MEL expression is used in an expression component, it doesn’t need to be surrounded with #[].Since the payload is in XML, xpath is needed to parse it.
-
In the Set Payload transformer, set the Value field to the following:
#[xpath('/user/username').text], #[xpath('/user/age').text], #[xpath('/user/age').text > 18]This sets the payload to a string that contains three comma-separated values. The third of these values evaluates a condition and returns
trueorfalsedepending on the user’s age. Once again, as the payload is in XML, xpath is needed to parse it. -
In the File endpoint, set a path of your choice to determine where the .csv file should be saved.
-
Open the properties editor of the final Set Payload transformer and set the Value field with the following:
Hello #[flowVars['username']]
This expression accesses the flow variable username, which was created by the Expression Component earlier in your flow.
-
Save and run your project.
-
You must now send the HTTP endpoint an HTTP request that includes a body with an attached XML file.
Send a POST request to
http://localhost:8081/greet5and attach an XML to the body of the message. A sample XML is provided below.<user> <username>test</username> <age>21</age> </user>This displays
Hello yourNamein your browser and also saves a CSV file that contains this data, plus the valuetruefor the boolean parameter.
XML Editor
-
In a new flow, add an `http:inbound-endpoint `configured as shown.
<http:inbound-endpoint exchange-pattern="request-response" host="localhost" port="8081" path="greet5" doc:name="HTTP"/>Attribute Value exchange-pattern
request-responsehost
localhostport
8081path
greet5doc:name
HTTPIn this way, the endpoint can be reached via the
http://localhost:8081/greet5URI. -
After the endpoint, add an Expression Component that uses a MEL expression to record the inbound property
usernameinto a flow variable. Because the payload is an XML file, it must be parsed with xpath.<expression-component doc:name="Expression"><![CDATA[flowVars['username'] = xpath('/user/username').text]]></expression-component>This expression calculates the result of the xpath function and sets it as the value of the flow variable
username.Since this MEL expression is used in an expression component, it isn’t surrounded with brackets #[] -
Add a set-payload transformer and set the
valueattribute to a comma-separated list of MEL expressions:<set-payload value="#[xpath('/user/username').text], #[xpath('/user/age').text], #[xpath('/user/age').text > 18]" doc:name="Set Payload"/>Attribute Value value
#[
xpath('/user/username').text], #[xpath('/user/age').text], #[xpath('/user/age').text > 18]doc:name
Set PayloadThis sets the payload to a string that contains three comma separated values. The third of these values is evaluating a condition and returns
trueorfalsedepending on the user’s age. Once again, as the payload is in XML, xpath is needed to parse it. -
Add a
file:outbound-endpointto output the payload into a csv file.<file:outbound-endpoint path="path_of_your_choice" responseTimeout="10000" doc:name="File"/>Attribute Value path
(Example)Users/AaronMacBook/DownloadsresponseTimeout
10000doc:name
File -
Below, add another set-payload transformer with a value containing a MEL expression that references the flow variable
usernamethat you set earlier in the flow:<set-payload value="Hello #[flowVars['username']]" doc:name="Set Payload"/>Attribute Value value
Hello #[flowVars['username']]doc:name
Set Payload -
The full code of your flow should look like this:
<flow name="greetingFlow5" doc:name="greetingFlow5"> <http:inbound-endpoint exchange-pattern="request-response" host="localhost" port="8081" path="greet5" doc:name="HTTP"/> <expression-component doc:name="Expression"><![CDATA[flowVars['username'] = xpath('/user/username').text]]></expression-component> <set-payload value="#[xpath('/user/username').text], #[xpath('/user/age').text], #[xpath('/user/age').text > 18]" doc:name="Set Payload"/> <file:outbound-endpoint path="path_of_your_choice" responseTimeout="10000" doc:name="File"/> <set-payload value="Hello #[flowVars['username']]" doc:name="Set Payload"/> </flow> -
Save and run your project. You must now send the HTTP endpoint an HTTP request that includes a body with an attached XML file. Send a POST request to` http://localhost:8081/greet5`, and attach an XML to the body of the message. A sample XML is provided below.
The easiest way to do this is by sending a POST via a browser extension such as Postman (for Google Chrome) or the curl command line utility. <user> <username>test</username> <age>21</age> </user>This displays
Hello yourNamein your browser and also saves a CSV file that contains this data, plus the valuetruefor the boolean parameter.
Example 6 – Working with Java Objects
This example is just like example 5, except that the service now receives JSON inputs rather than of XML.
The JSON input includes two parameters, username and age. The service stores these two parameters and adds a third boolean parameter that evaluates if the user is above a certain age (if age>18). Mule first transforms the JSON object into a Java object so that MEL expressions can access the object’s attributes.
In this example, you can use MEL to:
-
Set a flow variable in the message
-
Generate an output based on evaluating the input
-
Access a Java object’s attributes
-
Dynamically set the payload
Studio Visual Editor
-
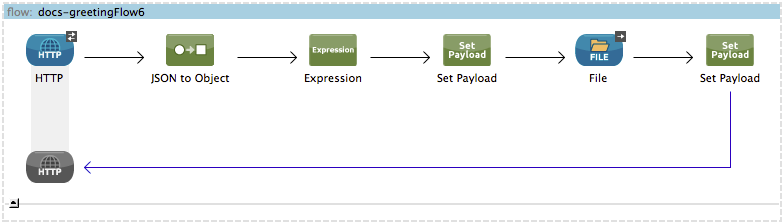
In a new flow, drag an HTTP endpoint, followed by a JSON to Object transformer, an Expression Component, a Set Payload transformer, a File endpoint, and another Set Payload transformer.
-
Open the HTTP Endpoint’s properties editor and give it the path
greet6. In this way, the endpoint can be reached via thehttp://localhost:8081/greet6URI. -
Open the properties editor of the JSON to Object transformer and click the Advanced tab. Set the Return Class to
java.lang.Object. With this configuration, the JSON input becomes a Java object with attributes that can be easily called by usingobject.attributenotation. -
In the expression component, set the following MEL expression that accesses an attribute of the object and sets that as the value of a flow variable called
username:flowVars['username'] = payload.username
Since this MEL expression is used in an expression component, it doesn’t need to be surrounded with #[]brackets. -
In the Set Payload component, set the Value field to the following comma-separated list of MEL expressions:
#[payload.username], #[payload.age], #[payload.age > 18]This sets the payload to a string that contains three comma-separated values. The third of these values is evaluating a condition and returns
trueorfalsedepending on the user’s age. -
In the File endpoint, set a Path of your choice to determine where the CSV files should be saved.
-
Open the properties editor of the final Set Payload transformer and set the Value field with the following:
Hello #[flowVars['username']]
This expression accesses the flow variable
username, which was created by the Expression Component earlier in your flow. -
Save and run the project.
-
You must now send the HTTP endpoint an HTTP request that includes a body with an attached JSON file.
Send a POST request tohttp://localhost:8081/greet6, attaching a JSON object the body of the message. A sample JSON is provided below.The easiest way to do this is by sending a POST via a browser extension such as Postman (for Google Chrome) or the curl command line utility. { "username": "test", "age" : 21 }This displays
Hello yourNamein your browser and also saves a CSV file that contains this data, plus the valuetruefor the boolean parameter.
XML Editor
-
In a new flow, add an
http:inbound-endpointstatement configured as shown.<http:inbound-endpoint exchange-pattern="request-response" host="localhost" port="8081" path="greet6" doc:name="HTTP"/>Attribute Value exchange-pattern
request-responsehost
localhostport
8081path
greet6doc:name
HTTPIn this way, the endpoint is reached via the URI
http://localhost:8081/greet6. -
After the endpoint, add a
json:json-to-object-transformerstatement.<json:json-to-object-transformer doc:name="JSON to Object" returnClass="java.lang.Object"/>Attribute Value returnClass
java.lang.Objectdoc:name
JSON to ObjectWith this configuration, the JSON input becomes a Java object with attributes that can be easily called by using
object.attributenotation. -
After the transformer, add an expression component that uses a MEL expression to access the Java object’s
usernameattribute and assign its value into a flow variable of the same name.<expression-component doc:name="Expression"><![CDATA[flowVars['username'] = payload.username]]></expression-component>Since this MEL expression is used in an expression component, it doesn’t need to be surrounded with #[]. -
Add a set-payload transformer and set the
valueattribute to a comma-separated list of MEL expressions:<set-payload value="#[payload.username], #[payload.age], #[payload.age > 18]" doc:name="Set Payload"/>Attribute Value value#[
payload.username], #[payload.age], #[payload.age > 18]doc:nameSet PayloadThis sets the payload to a string that contains three comma-separated values. The third of these values is evaluating a condition and returns
trueorfalsedepending on the user’s age. -
Add a
file:outbound-endpointto output the payload into a csv file.<file:outbound-endpoint path="path_of_your_choice" responseTimeout="10000" doc:name="File"/>Attribute Value path
(
Example)Users/AaronMacBook/DownloadsresponseTimeout
10000doc:name
File -
Below, add another set-payload transformer, containing a MEL expression that references a flow variable:
<set-payload value="Hello #[flowVars['username']]" doc:name="Set Payload"/>This expression accesses the flow variable
username, which was created by the Expression Component earlier in your flow.Attribute Value value
Hello #[flowVars['username']]doc:name
Set Payload -
The full code of your flow should look like this:
<flow name="greetingFlow6" doc:name="greetingFlow6"> <http:inbound-endpoint exchange-pattern="request-response" host="localhost" port="8081" path="greet6" doc:name="HTTP"/> <json:json-to-object-transformer doc:name="JSON to Object" returnClass="java.lang.Object"/> <expression-component doc:name="Expression"><![CDATA[flowVars['username'] = payload.username]]></expression-component> <set-payload value="#[payload.username], #[payload.age], #[payload.age > 18]" doc:name="Set Payload"/> <file:outbound-endpoint path="users" responseTimeout="10000" doc:name="File"/> <set-payload value="Hello #[flowVars['username']]" doc:name="Set Payload"/> </flow> -
Save and run the project. You must now send the HTTP endpoint an HTTP request that includes a body with an attached JSON file.
-
Send a POST request to http://localhost:8081/greet6, and attach a JSON object the body of the message. A sample JSON is provided below.
The easiest way to do this is to send a POST via a browser extension such as Postman (for Google Chrome) or the curl command line utility. { "username": "test", "age" : 21 }This displays
Hello yourNamein your browser and also saves a CSV file that contains this data, plus the valuetruefor the boolean parameter.
Full Code for All Examples
| For your convenience, you may download the complete project. |
<?xml version="1.0" encoding="UTF-8"?>
<mule xmlns:json="http://www.mulesoft.org/schema/mule/json"
xmlns:data-mapper="http://www.mulesoft.org/schema/mule/ee/data-mapper" xmlns:file="http://www.mulesoft.org/schema/mule/file"
xmlns:tracking="http://www.mulesoft.org/schema/mule/ee/tracking" xmlns:http="http://www.mulesoft.org/schema/mule/http" xmlns="http://www.mulesoft.org/schema/mule/core" xmlns:doc="http://www.mulesoft.org/schema/mule/documentation" xmlns:spring="http://www.springframework.org/schema/beans" xmlns:xsi="http://www.w3.org/2001/XMLSchema-instance" xsi:schemaLocation="http://www.mulesoft.org/schema/mule/json http://www.mulesoft.org/schema/mule/json/current/mule-json.xsd
http://www.mulesoft.org/schema/mule/http http://www.mulesoft.org/schema/mule/http/current/mule-http.xsd
http://www.mulesoft.org/schema/mule/file http://www.mulesoft.org/schema/mule/file/current/mule-file.xsd
http://www.mulesoft.org/schema/mule/ee/tracking http://www.mulesoft.org/schema/mule/ee/tracking/current/mule-tracking-ee.xsd
http://www.mulesoft.org/schema/mule/ee/data-mapper http://www.mulesoft.org/schema/mule/ee/data-mapper/current/mule-data-mapper.xsd
http://www.springframework.org/schema/beans http://www.springframework.org/schema/beans/spring-beans-current.xsd
http://www.mulesoft.org/schema/mule/core http://www.mulesoft.org/schema/mule/core/current/mule.xsd">
<data-mapper:config name="new_mapping_grf" transformationGraphPath="new_mapping.grf" doc:name="DataMapper"/>
<data-mapper:config name="map_to_csv" transformationGraphPath="map_to_csv.grf" doc:name="map_to_csv"/>
<!-- Example 1 Start - How to access properties using MEL, how to set a payload dynamically -->
<flow name="greetingFlow1" doc:name="greetingFlow1">
<http:inbound-endpoint exchange-pattern="request-response" host="localhost" port="8081" path="greet1" doc:name="HTTP"/>
<set-payload value="Hello #[message.inboundProperties['username']]" doc:name="Set Payload"/>
</flow>
<!-- Example 1 End -->
<!-- Example 2 Start - How to dynamically route messages based on the results of a conditional expression -->
<flow name="greetingFlow2" doc:name="greetingFlow2">
<http:inbound-endpoint exchange-pattern="request-response" host="localhost" port="8081" path="greet2" doc:name="HTTP"/>
<choice doc:name="Choice">
  <when expression="#[message.inboundProperties['username'] == empty]">
    <set-payload value="#['No username provided']" doc:name="Set Payload for invalid username"/>
  </when>
  <otherwise>
    <set-payload value="Hello #[message.inboundProperties['username']]" doc:name="Set Payload for valid username"/>
  </otherwise>
</choice>
</flow>
<!-- Example 2 End -->
<!-- Example 3 Start - How to assign variables, how to evaluate a condition -->
<flow name="docs-greetingFlow3" doc:name="greetingFlow3">
<http:inbound-endpoint exchange-pattern="request-response" host="localhost" port="8081" path="greet3" doc:name="HTTP"/>
<expression-component doc:name="Expression"><![CDATA[flowVars['username'] = message.inboundProperties['username']]]></expression-component>
<set-payload value="#[message.inboundProperties['username']], #[message.inboundProperties['age']], #[message.inboundProperties['age']>18]" doc:name="Set Payload"/>
<file:outbound-endpoint path="Path_of_your_choice" responseTimeout="10000" doc:name="File"/>
<set-payload value="Hello #[flowVars['username']]" doc:name="Set Payload"/>
</flow>
<!-- Example 3 End -->
<!-- Example 4 Start - How to create a map, how to evaluate a condition with DataMapper -->
<flow name="docs-greetingFlow4" doc:name="greetingFlow4">
<http:inbound-endpoint exchange-pattern="request-response" host="localhost" port="8081" path="greet4" doc:name="HTTP"/>
<expression-component doc:name="Expression"><![CDATA[flowVars['username'] = message.inboundProperties['username']]]></expression-component>
<set-payload value="#[['username' : message.inboundProperties['username'], 'age' : message.inboundProperties['age']]]" doc:name="Set Payload"/>
<data-mapper:transform config-ref="map_to_csv" doc:name="Map To CSV"/>
<file:outbound-endpoint path="Path_of_your_choice" responseTimeout="10000" doc:name="File"/>
<set-payload value="Hello #[flowVars['username']]" doc:name="Set Payload"/>
</flow>
<!-- Example 4 End -->
<!-- Example 5 Start - How to parse XML input with Xpath -->
<flow name="docs-greetingFlow5" doc:name="greetingFlow5">
<http:inbound-endpoint exchange-pattern="request-response" host="localhost" port="8081" path="greet5" doc:name="HTTP"/>
<expression-component doc:name="Expression"><![CDATA[flowVars['username'] = xpath('/user/username').text]]></expression-component>
<set-payload value="#[xpath('/user/username').text], #[xpath('/user/age').text], #[xpath('/user/age').text > 18]" doc:name="Set Payload"/>
<file:outbound-endpoint path="Path_of_your_choice" responseTimeout="10000" doc:name="File"/>
<set-payload value="Hello #[flowVars['username']]" doc:name="Set Payload"/>
</flow>
<!-- Example 5 End -->
<!-- Example 6 Start - How to parse Java objects -->
<flow name="greetingFlow6" doc:name="greetingFlow6">
<http:inbound-endpoint exchange-pattern="request-response" host="localhost" port="8081" path="greet6" doc:name="HTTP"/>
<json:json-to-object-transformer doc:name="JSON to Object" returnClass="java.lang.Object"/>
<expression-component doc:name="Expression"><![CDATA[flowVars['username'] = payload.username]]></expression-component>
<set-payload value="#[payload.username], #[payload.age], #[payload.age > 18]" doc:name="Set Payload"/>
<file:outbound-endpoint path="Path_of_your_choice" responseTimeout="10000" doc:name="File"/>
<set-payload value="Hello #[flowVars['username']]" doc:name="Set Payload"/>
</flow>
<!-- Example 6 End -->
</mule>