Hello World Example
| Mule Runtime Engine versions 3.5, 3.6, and 3.7 reached End of Life on or before January 25, 2020. For more information, contact your Customer Success Manager to determine how you can migrate to the latest Mule version. |
This application demonstrates a simple HTTP request-response activity. Mule responds to end user calls submitted via Web browser with a message that reads, "Hello World".
Hello, World
This example was designed to demonstrate the ability of a Mule application to interact with an end user via an HTTP request. Its goal is to introduce users to Mule by illustrating very simple functionality.
Assumptions
This document describes the details of the example within the context of Anypoint Studio, Mule ESB’s graphical user interface (GUI). Where appropriate, the XML configuration accompanies the Studio interface screenshots. This document assumes that you are familiar with Mule ESB and the Anypoint Studio interface. To increase your familiarity with Mule Studio, consider completing one or more Anypoint Studio Tutorials.
Set Up and Run the Example
Complete the following procedure to create, then run this example in your own instance of Anypoint Studio. You can create template applications straight out of the box in Anypoint Studio and tweak the configurations of the use case-based templates to create your own customized applications in Mule.
-
Create, then run the Hello World example application in Anypoint Studio.
-
Open your Web browser.
-
In the address bar, type the following URL:
http://localhost:8081 -
Press enter to elicit a response from the Hello World application (see image below).
image::hello-world-response.png[hello_world_response]
How it Works
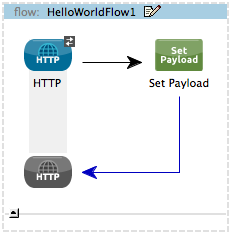
The Hello World example consists of one simple Mule flow. This flow accepts an HTTP request, sets a static payload on the message, then returns a response to the end user.
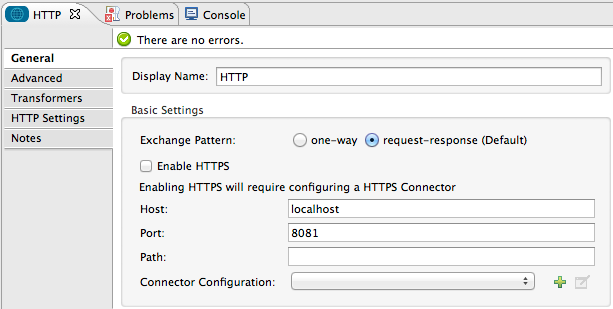
The request-response inbound HTTP endpoint receives requests the end user submits to the Web service. Because it has a request-response message exchange pattern, this HTTP endpoint is responsible for both receiving and returning messages. The descriptive notes included in the configuration of the endpoint helps other developers understand the actions the element performs in the context of the application.
Studio Visual Editor
| Field | Value |
|---|---|
General Tab |
|
Display Name |
|
Host |
|
Port |
|
Notes Tab |
|
Description |
|
Studio XML Editor
<http:inbound-endpoint exchange-pattern="request-response" host="localhost" port="8081" doc:name="HTTP" doc:description="This endpoint receives an HTTP message."/>| Attribute | Value |
|---|---|
exchange-pattern |
|
host |
|
port |
|
doc:name |
|
doc:description |
|
|
Two-Way vs. One-Way Notice that the HTTP endpoint has a request-response message exchange pattern (as indicated by the small double-arrow icon — below, left). Because it must respond to the requester, the HTTP endpoint in this example has a request-response message exchange pattern. If an HTTP endpoint has only to input information into an application, it requires a one-way message exchange pattern (below, right). 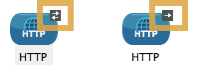
|
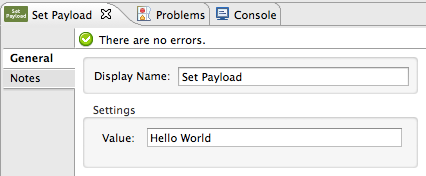
As its name suggests, the Set Payload transformer sets a value in the message payload. In this example, the value utilizes a Mule expression to set a static string on the payload. Like the HTTP endpoint, the descriptive notes included in the configuration helps other developers understand the actions the element performs in the context of the application.
Studio Visual Editor
| Field | Value |
|---|---|
General Tab |
|
Display Name |
|
Value |
|
Notes Tab |
|
Description |
|
Studio XML Editor
<set-payload value="Hello World" doc:name="Set Payload" doc:description="This processor sets the payload of the message to the string 'Hello World'."/>| Attribute | Value |
|---|---|
value |
|
doc:name |
|
doc:description |
|
Full Code
Studio Visual Editor
Studio XML Editor
<?xml version="1.0" encoding="UTF-8"?>

<mule xmlns="http://www.mulesoft.org/schema/mule/core" xmlns:http="http://www.mulesoft.org/schema/mule/http" xmlns:doc="http://www.mulesoft.org/schema/mule/documentation" xmlns:spring="http://www.springframework.org/schema/beans" xmlns:core="http://www.mulesoft.org/schema/mule/core" xmlns:xsi="http://www.w3.org/2001/XMLSchema-instance" xsi:schemaLocation="

http://www.mulesoft.org/schema/mule/http http://www.mulesoft.org/schema/mule/http/current/mule-http.xsd

http://www.springframework.org/schema/beans http://www.springframework.org/schema/beans/spring-beans-current.xsd

http://www.mulesoft.org/schema/mule/core http://www.mulesoft.org/schema/mule/core/current/mule.xsd ">

    <flow name="HelloWorldFlow1" doc:name="HelloWorldFlow1">
        <http:inbound-endpoint exchange-pattern="request-response" host="localhost" port="8081" doc:name="HTTP" doc:description="This endpoint receives an HTTP message."/>
        <set-payload value="Hello World" doc:name="Set Payload" doc:description="This processor sets the payload of the message to the string 'Hello World'."/>
    </flow>
</mule>
Documentation
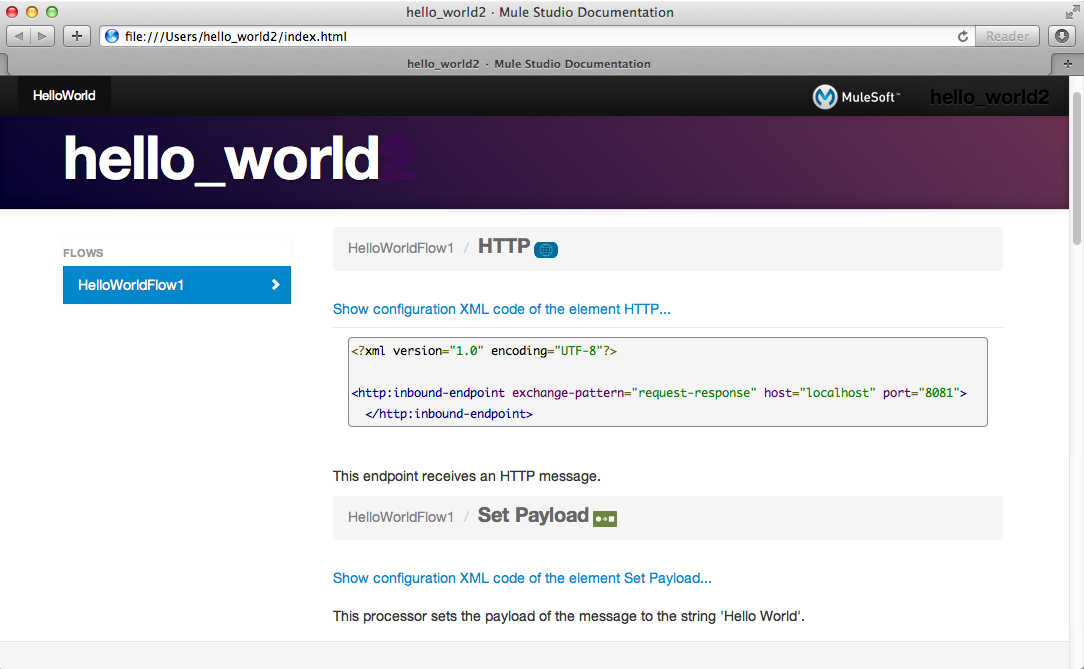
Anypoint Studio includes a feature that enables you to easily export all the documentation you have recorded for your project. Whenever you want to share your project with others outside the Studio environment, you can export the project’s documentation to print, email or share online. Studio’s auto-generated documentation includes:
-
a visual diagram of the flows in your application
-
the XML configuration which corresponds to each flow in your application
-
the text you entered in the Notes tab of any building block in your flow
The image below is an example of the documentation Studio produced for this Hello World application.
See Also
-
Learn more about configuring an HTTP Endpoint in Studio.
-
Read about the concept of flows in Mule.
-
Examine the HTTP Request-Response with Logger example, which expands upon the basic functionality in Hello World.