WebSphere MQ Example
| Mule Runtime Engine versions 3.5, 3.6, and 3.7 reached End of Life on or before January 25, 2020. For more information, contact your Customer Success Manager to determine how you can migrate to the latest Mule version. |
Enterprise Edition, CloudHub
The WebSphere MQ example demonstrates how to use the Websphere MQ Transport to send and receive transactional messages to WebSphere MQ. This example is available in Mule Enterprise Edition.
Cooperate with WMQ
 At times, you may find the need to bridge a communication gap between IBM’s message queue product, Websphere MQ, and Mule. To facilitate message processing across products, Mule uses a WMQ Endpoint.
Assumptions
This document assumes that you are familiar with Mule ESB and the Anypoint Studio interface. To increase your familiarity with Studio, consider completing one or more Anypoint Studio Tutorials.
This document describes the details of the example within the context of Anypoint Studio, Mule ESB’s graphical user interface (GUI), and includes configuration details for both the visual and XML editors.
Set Up and Run the Example
As with other example templates, you can create template applications straight out of the box in Anypoint Studio or Mule Standalone (Mule ESB without Studio). You can tweak the configurations of these use case-based templates to create your own customized applications in Mule.
Prerequisites
Before you run the example, ensure that your system meets the following conditions:
-
Mule Enterprise is installed
-
WebSphere MQ 6 or 7 is installed
-
the WebSphere MQ client JARs are available to you
Follow one of the two procedures below to create, then run the Websphere MQ application in Anypoint Studio or Mule Standalone.
Studio Visual Editor
-
Create the example application in Anypoint Studio. Do not run the application.
-
Add your WebSphere MQ client libraries to the project build path.
-
Make sure your WebSphere MQ installation has queues named "in" and "out."
-
Run the application. When the application starts, you may see some exceptions in the output console, since WMQ is not configured (we will configure it in the next step).
-
Edit the following properties in
wmq.properties `(located at `src/main/resources) with the values appropriate for your WebSphere MQ installation:wmq.host= wmq.port= wmq.queue.manager= wmq.username= wmq.password= -
After configuring WMQ, restart the application.
Standalone
-
Copy your WebSphere MQ client JARs to your
$MULE_HOME/lib/userdirectory.<MULE_HOME>is the root directory of your Mule installation, for example/opt/Mule/mule-standalone-3.5.0. -
Ensure that your WebSphere MQ installation has queues named "in" and "out."
-
Copy the example’s zip file, for example,
<MULE_HOME>/examples/wmq/mule-example-wmq-3.5.0.zip, to the$MULE_HOME/appsdirectory. -
Start Mule, then wait for it to install the example. You may see some exceptions in the logs, since WMQ is not configured yet (we configure it in the next step).
|
How to start the Mule server: There are several ways to start/stop the Mule server:
On a Windows system, go to the |
-
Edit the following properties in the file <`MULE_HOME>/apps/mule-example-wmq/classes/wmq.properties` with the values appropriate for your Websphere MQ installation:
wmq.host= wmq.port= wmq.queue.manager= wmq.username= wmq.password= -
After configuring WMQ, restart Mule or reload the application.
|
How to reload the Websphere MQ app without restarting Mule (Unix) If you modify the Websphere MQ application while Mule is running, you can reload the application without restarting Mule by "touching" (updating the timestamps of) the file To update the timestamps, run the following command: Mule automatically reloads the application, activating any modifications. |
In this section we will demonstrate basic usage of the application: sending text messages, then retrieving them from a Websphere MQ using Mule.
-
After Mule starts up, open a Web browser and navigate to the following URL:
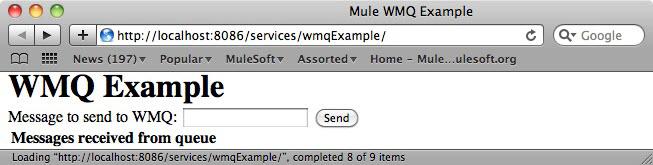
-
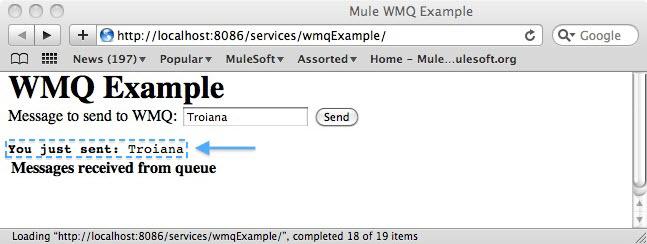
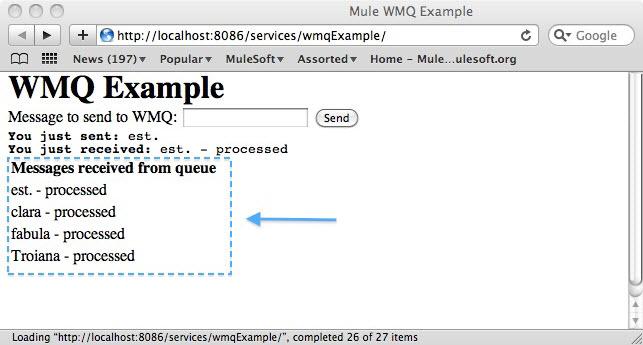
The application prompts you to enter text to send a message to WebSphere MQ. The app transmits your input via AJAX/WMQ to the Mule application’s "in" queue and you will receive confirmation that your message has been submitted. Enter some text, then hit "Send".
-
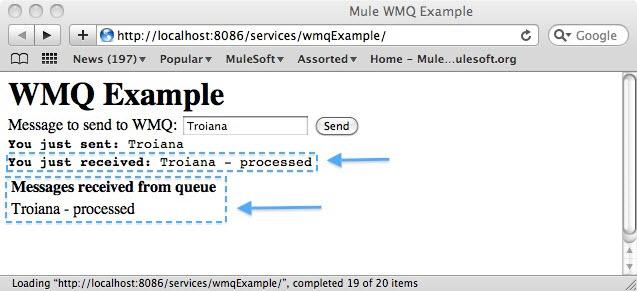
Mule processes the message sent to the "in" queue, then it sends the confirmation to you via the "out" queue and WMQ/AJAX. Note that Mule introduces an intentional 15 second delay between receiving your message and sending you a confirmation . Mule notifies you when the message is received and its content will be added to the table below.
-
Play with it! Start typing several messages in the text box, then hit "Send" to submit them to Mule via AJAX/WMQ. After 15 seconds of intentional delay, the Mule confirms receipt of the messages.
How it works
Global Elements
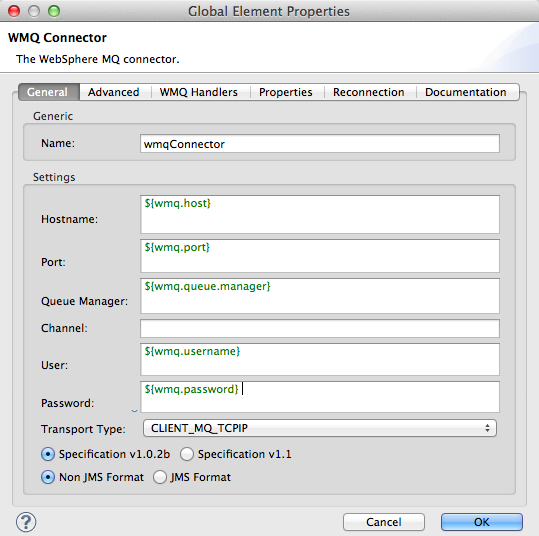
Mule configures the WMQ connector with the values previously defined on the wmq.properties file. In Anypoint Studio, this configuration is stored as a Global Element, named wmqConnector. To view the configured global element, click the Global Elements tab under the canvas, then double-click the wmqConnector Global Element. Studio displays the Global Element Properties, shown below:
Studio Visual Editor
Studio XML Editor or Standalone
<wmq:connector name="wmqConnector" hostName="${wmq.host}" port="${wmq.port}" queueManager="${wmq.queue.manager}" username="${wmq.username}" password="${wmq.password}" doc:name="WMQ Connector">
<ee:reconnect-forever/>
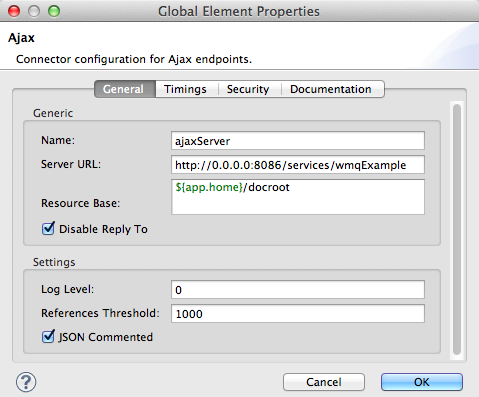
</wmq:connector>To be able to send and receive Mule events asynchronously to and from a web browser, the application uses an AJAX connector. To view the configured global element for the AJAX connector, click the Global Elements tab under the canvas, then double-click the ajaxServer Global Element. Studio displays the Global Element Properties, shown below:
Studio Visual Editor
Studio XML Editor or Standalone
<ajax:connector name="ajaxServer" serverUrl="http://0.0.0.0:8086/services/wmqExample"
   resourceBase="${app.home}/docroot" disableReplyTo="true" doc:name="Ajax"/>
Flows
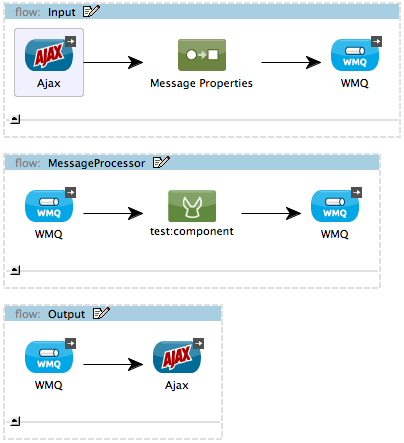
The application contains three flows, which process, then retrieve messages from a WMQ.
Input flow
The first building block in the flow is an AJAX Inbound Endpoint, which listens for messages on the configured channel, /services/wmqExample/enqueue. The flow adds the incoming messages to the "in" queue.
MessageProcessor Flow
The MessageProcessor flow reads from the "in" queue. The flow’s test component appends a string to the message, waits 15 seconds, then adds the message to the 'out' queue.
Output Flow
The Output flow reads messages from the "out" queue, then publishes via the AJAX outbound endpoint.
Studio Visual Editor
Studio XML Editor or Standalone
<?xml version="1.0" encoding="UTF-8"?>
<mule xmlns="http://www.mulesoft.org/schema/mule/core" xmlns:ajax="http://www.mulesoft.org/schema/mule/ajax" xmlns:core="http://www.mulesoft.org/schema/mule/core" xmlns:doc="http://www.mulesoft.org/schema/mule/documentation" xmlns:ee="http://www.mulesoft.org/schema/mule/ee/core" xmlns:json="http://www.mulesoft.org/schema/mule/json" xmlns:spring="http://www.springframework.org/schema/beans" xmlns:stdio="http://www.mulesoft.org/schema/mule/stdio" xmlns:test="http://www.mulesoft.org/schema/mule/test" xmlns:wmq="http://www.mulesoft.org/schema/mule/ee/wmq" xmlns:xsi="http://www.w3.org/2001/XMLSchema-instance" xsi:schemaLocation=" http://www.mulesoft.org/schema/mule/ajax http://www.mulesoft.org/schema/mule/ajax/current/mule-ajax.xsd  http://www.mulesoft.org/schema/mule/ee/wmq http://www.mulesoft.org/schema/mule/ee/wmq/current/mule-wmq-ee.xsd  http://www.springframework.org/schema/beans http://www.springframework.org/schema/beans/spring-beans-current.xsd  http://www.mulesoft.org/schema/mule/core http://www.mulesoft.org/schema/mule/core/current/mule.xsd  http://www.mulesoft.org/schema/mule/ee/core http://www.mulesoft.org/schema/mule/ee/core/current/mule-ee.xsd  http://www.mulesoft.org/schema/mule/stdio http://www.mulesoft.org/schema/mule/stdio/current/mule-stdio.xsd  http://www.mulesoft.org/schema/mule/test http://www.mulesoft.org/schema/mule/test/current/mule-test.xsd  http://www.mulesoft.org/schema/mule/json http://www.mulesoft.org/schema/mule/json/current/mule-json.xsd ">
    <spring:beans>
        <spring:bean class="org.springframework.beans.factory.config.PropertyPlaceholderConfigurer" id="property-placeholder">
            <spring:property name="location" value="classpath:wmq.properties"/>
        </spring:bean>
    </spring:beans>
    <wmq:connector doc:name="WMQ Connector" hostName="${wmq.host}" name="wmqConnector" password="${wmq.password}" port="${wmq.port}" queueManager="${wmq.queue.manager}" username="${wmq.username}">
        <ee:reconnect-forever/>
    </wmq:connector>
    <ajax:connector disableReplyTo="true" doc:name="Ajax" name="ajaxServer" resourceBase="${app.home}/docroot" serverUrl="http://0.0.0.0:8086/services/wmqExample"/>
    <flow doc:name="Input" name="Input">
        <ajax:inbound-endpoint channel="/services/wmqExample/enqueue" doc:name="Ajax"/>
        <message-properties-transformer doc:name="Message Properties">
            <delete-message-property key="MULE_REPLYTO"/>
        </message-properties-transformer>
        <wmq:outbound-endpoint connector-ref="wmqConnector" doc:name="WMQ" queue="in"/>
    </flow>
    <flow doc:name="MessageProcessor" name="MessageProcessor">
        <wmq:inbound-endpoint connector-ref="wmqConnector" doc:name="WMQ" queue="in">
            <wmq:transaction action="ALWAYS_BEGIN"/>
        </wmq:inbound-endpoint>
        <test:component appendString=" - processed" logMessageDetails="true" waitTime="15000"/>
        <wmq:outbound-endpoint connector-ref="wmqConnector" doc:name="WMQ" queue="out">
            <wmq:transaction action="ALWAYS_JOIN"/>
        </wmq:outbound-endpoint>
    </flow>
    <flow doc:name="Output" name="Output">
        <wmq:inbound-endpoint connector-ref="wmqConnector" doc:name="WMQ" queue="out"/>
        <ajax:outbound-endpoint cacheMessages="true" channel="/services/wmqExample/dequeue" doc:name="Ajax"/>
    </flow>
</mule>
See Also
-
Explore more Mule example applications.
-
Learn more about the WMQ Connector.
-
Learn more about the AJAX Connector.