Batch Filters and Batch Commit
| Mule Runtime Engine versions 3.5, 3.6, and 3.7 reached End of Life on or before January 25, 2020. For more information, contact your Customer Success Manager to determine how you can migrate to the latest Mule version. |
Enterprise, CloudHub
Using batch processing, you can refine the work that a batch step performs upon the records it processes.
-
You can set filters upon batch steps so as to only accept some records for processing.
-
You can commit records in groups, sending them as bulk upserts to external sources or services.
This document outlines how and when to use batch filters and the batch commit wrapper.
Assumptions
This document assumes that you are familiar with Anypoint Studio and have reviewed the overview and basic anatomy of Batch Processing, and that you understand how batch jobs handle records which fail processing. You should also consider Streaming Batch Commits.
Filters
You can apply one or more filters as attributes to any number of batch steps within your batch job. By having batch steps accept only some records for processing, you streamline processing so that Mule focuses only on the data which is relevant for a particular batch step.
For example, you could apply a filter to the second batch step in your batch job to make sure that the second step only attempts to process records which didn’t fail during processing in the first batch step. To put this in context of a use case, imagine a batch job which uses its first batch step to check to see if a Salesforce contact exists for a record; the second batch step updates each existing Salesforce contact with new information. In such a case, you could apply a filter to the second batch step to ensure it only processes records which didn’t fail during the first batch step.
Filters are applied within batch steps. Use an Accept Expression to process only those records which, relative to the MEL expression, evaluate to true; if the record evaluates to false, the batch step does not process the record. In other words, those records with a filter expression that resolves to false are the ones Mule filters out.
The example below filters out all records where the age is less than 21; the batch step does not process those records.
STUDIO Visaul Editor

XML Editor
Note that details in code snippet are abbreviated so as to highlight batch step attributes.
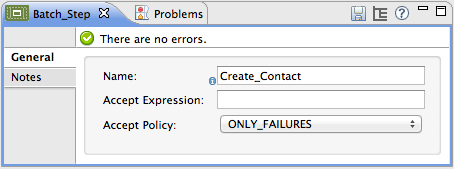
<batch:step name="adultsOnlyStep" accept-expression="#[payload.age > 21]">Use an Accept Policy to process only those records which, relative to the value of the accept policy attribute, evaluate to true. Refer to the table below for a list of the available values for accept policy. The example below illustrates the second batch step in a batch job which processes only those records which failed processing during the preceding step. In the first batch step, Mule checked each record to see if it had an existing Salesforce contact; the second batch step, which creates a contact for each record, processes only the failed records (i.e. failed to have an existing account).
| Accept Policy | When evaluates to TRUE |
|---|---|
NO_FAILURES |
Default |
ONLY_FAILURES |
batch step processes only those records which failed processing in a preceding batch step |
ALL |
batch step processes all records, regardless of whether they failed processing in a preceding batch step |
STUDIO Visual Editor
XML Editor
Note that details in code snippet are abbreviated so as to highlight batch step attributes.
<batch:step name="Create_Contact" accept-policy="ONLY_FAILURES" doc:name="Create Contact">----=== Filter Characteristics
-
Batch filters only apply to batch steps which, in turn, are only usable within the batch process phase of a batch job. You cannot apply filters with the Input or On Complete phases.
-
If you apply no filters to a batch step, the batch processes only those records which succeeded processing in all preceding steps. In other words, the default Accept Policy applied to all batch steps is NO_FAILURES.
-
When a batch job instance exceeds its
max-failed-recordsvalue, regardless of the filter set on the batch step, the step does not process any records, and simply pushes the failed batch job instance to the On Complete phase. Read more about failure handling in batch jobs. -
Refer to Batch Reference for details regarding batch step attributes.
-
Where you apply both types of filters, Mule evaluates them in the following order:
-
Accept Policy
-
Accept Expression
-
== Batch Commit
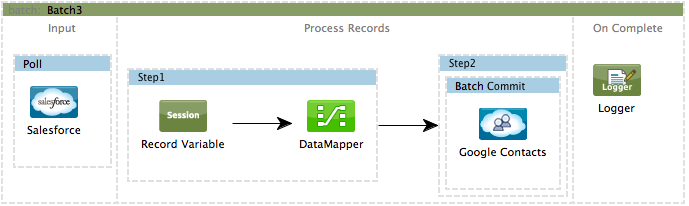
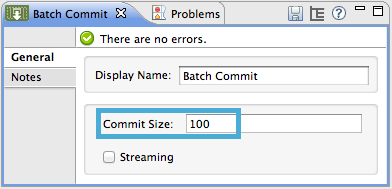
You can use a Batch Commit scope in a batch step to accumulate a subset of records within a batch for bulk upsert to an external source or service. For example, rather than upserting each individual contact (that is, a record) in a batch to Google Contacts, you can configure a Batch Commit to accumulate, say, 100 records then upsert all of them to Google Contacts in one chunk.
Within a batch step – the only place you can apply it – you use a Batch Commit to wrap an outbound message source. See the example below.
Note: See also Streaming Batch Commits.
Studio Visual Editor
XML Editor
Note that details in code snippet are abbreviated so as to highlight batch commit and its attributes.
<batch:step name="Step2">
            <batch:commit size="100">
                <google-contacts:/>
            </batch:commit>
        </batch:step>
=== Batch Commit Characteristics
-
Batch Commit scopes can only exist in batch steps which, in turn, are only usable within the batch process phase of a batch job. You cannot use batch commits within the Input or On Complete phases.
-
A commit can only wrap the final element within the batch step in which it resides.
-
Several Anypoint Connectors have the ability to handle record-level errors without failing a whole batch commit (i.e. upsert). At runtime, these connectors keep track of which records were successfully accepted by the target resource, and which failed to upsert. Thus, rather than failing a complete group of records during a commit activity, the connector simply upserts as many records as it can, and tracks any failures for notification. The short – but soon to grow – list of such connectors follows:
-
Salesforce
-
Google Contacts
-
Google Calendars
-
NetSuite
-
Database
-
-
Refer to Batch Reference for details regarding batch step attributes.
-
Batch processing does not support job-instance-wide transactions. You can define a transaction inside a batch step which processes each record in a separate transaction. (Think of it like a step within a step.) Such a transaction must start and end within the step’s boundaries.
-
You cannot share a transaction between a batch step and a batch commit that exists within the step. Any transaction that the batch step starts, ends before the batch commit begins processes. In other words, a transaction cannot cross the barrier between a batch step and the batch commit it contains.
== Example
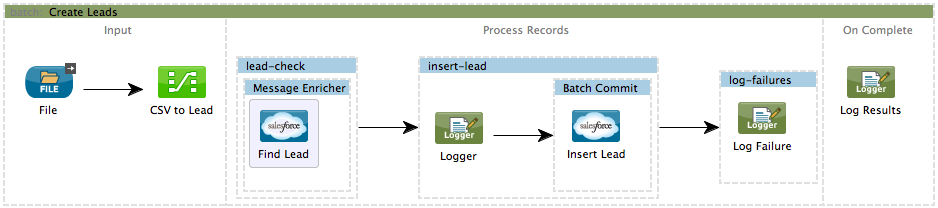
This example uses batch processing to address a use case in which the contents of a comma-separated value file (CSV) of leads – comprised of names, birthdays and email addresses – must be uploaded to Salesforce. To avoid duplicating any leads, the batch job checks to see if a lead exists before uploading data to Salesforce. See Batch Processing for a full description of the steps the batch job takes in each phase of processing
Meanwhile, the insert-lead batch step employs both an Accept Expression and Batch Commit (see below).
Studio Visual Editor
XML Editor
|
If you copy and paste the code into your instance of Studio, be sure to enter your own values for the global Salesforce connector:
How do I get a Salesforce security token?
|
<?xml version="1.0" encoding="UTF-8"?>
<mule xmlns:batch="http://www.mulesoft.org/schema/mule/batch" xmlns:data-mapper="http://www.mulesoft.org/schema/mule/ee/data-mapper" xmlns:sfdc="http://www.mulesoft.org/schema/mule/sfdc" xmlns:file="http://www.mulesoft.org/schema/mule/file" xmlns="http://www.mulesoft.org/schema/mule/core" xmlns:doc="http://www.mulesoft.org/schema/mule/documentation" xmlns:spring="http://www.springframework.org/schema/beans" xmlns:xsi="http://www.w3.org/2001/XMLSchema-instance" xsi:schemaLocation="http://www.springframework.org/schema/beans http://www.springframework.org/schema/beans/spring-beans-current.xsd
http://www.mulesoft.org/schema/mule/core http://www.mulesoft.org/schema/mule/core/current/mule.xsd
http://www.mulesoft.org/schema/mule/file http://www.mulesoft.org/schema/mule/file/current/mule-file.xsd
http://www.mulesoft.org/schema/mule/batch http://www.mulesoft.org/schema/mule/batch/current/mule-batch.xsd
http://www.mulesoft.org/schema/mule/ee/data-mapper http://www.mulesoft.org/schema/mule/ee/data-mapper/current/mule-data-mapper.xsd
http://www.mulesoft.org/schema/mule/sfdc http://www.mulesoft.org/schema/mule/sfdc/current/mule-sfdc.xsd">
<sfdc:config name="Salesforce" username="username" password="password" securityToken="SpBdsf98af9tTR3m3YVcm4Y5q0y0R" doc:name="Salesforce">
<sfdc:connection-pooling-profile initialisationPolicy="INITIALISE_ONE" exhaustedAction="WHEN_EXHAUSTED_GROW"/>
</sfdc:config>
<data-mapper:config name="new_mapping_grf" transformationGraphPath="new_mapping.grf" doc:name="DataMapper"/>
<data-mapper:config name="new_mapping_1_grf" transformationGraphPath="new_mapping_1.grf" doc:name="DataMapper"/>
<data-mapper:config name="leads_grf" transformationGraphPath="leads.grf" doc:name="DataMapper"/>
<data-mapper:config name="csv_to_lead_grf" transformationGraphPath="csv-to-lead.grf" doc:name="DataMapper"/>
<batch:job max-failed-records="1000" name="Create Leads" doc:name="Create Leads">
<batch:threading-profile poolExhaustedAction="WAIT"/>
<batch:input>
<file:inbound-endpoint path="src/test/resources/input" moveToDirectory="src/test/resources/output" responseTimeout="10000" doc:name="File"/>
<data-mapper:transform config-ref="csv_to_lead_grf" doc:name="CSV to Lead"/>
</batch:input>
<batch:process-records>
<batch:step name="lead-check" doc:name="Lead Check">
<enricher source="#[payload.size() > 0]" target="#[recordVars['exists']]" doc:name="Message Enricher">
<sfdc:query config-ref="Salesforce" query="dsql:SELECT Id FROM Lead WHERE Email = '#[payload["Email"]]'" doc:name="Find Lead"/>
</enricher>
</batch:step>
<batch:step name="insert-lead" doc:name="Insert Lead" accept-expression="#[recordVars['exists']]">
<logger message="Got Record #[payload], it exists #[recordVars['exists']]" level="INFO" doc:name="Logger"/>
<batch:commit size="200" doc:name="Batch Commit">
<sfdc:create config-ref="Salesforce" type="Lead" doc:name="Insert Lead">
<sfdc:objects ref="#[payload]"/>
</sfdc:create>
</batch:commit>
</batch:step>
<batch:step name="log-failures" accept-policy="ONLY_FAILURES" doc:name="Log Failures">
<logger message="Got Failure #[payload]" level="INFO" doc:name="Log Failure"/>
</batch:step>
</batch:process-records>
<batch:on-complete>
<logger message="#[payload.loadedRecords] Loaded Records #[payload.failedRecords] Failed Records" level="INFO" doc:name="Log Results"/>
</batch:on-complete>
</batch:job>
</mule>== See Also
-
Access reference details about batch processing.
-
Read about the basic anatomy of batch processing in Mule.
-
Examine the attributes you can configure for batch jobs, steps and message processors.
-
Learn more about setting and removing record-level variables.