Publishing a SOAP API
| Mule Runtime Engine versions 3.5, 3.6, and 3.7 reached End of Life on or before January 25, 2020. For more information, contact your Customer Success Manager to determine how you can migrate to the latest Mule version. |
| When sending requests to an external web service, the recommended approach is to use the Web Service Consumer rather than the CXF Module. |
The CXF Component facilitates the publication of SOAP APIs within a Mule flow.
Mule leverages Apache’s open-source CXF framework to build APIs. You can create a CXF API in Studio by configuring a CXF component in your Mule flow to perform any of the following CXF operations related to publishing a SOAP API:
-
publish a simple service
-
publish a JAX-WS service
-
proxy a published service
Using Mule’s CXF Component, you can also enable WS-security, specify databindings, and add interceptors to your CXF API. For more information about how Mule leverages the CXF framework, consult the CXF Module Configuration Reference.
Assumptions
This document describes the details of the example within the context of Anypoint Studio, Mule ESB’s graphical user interface (GUI). Where appropriate, the XML configuration accompanies the Studio interface screenshots. This document assumes that you are familiar with Mule ESB and the Anypoint Studio interface.
Basic Anatomy
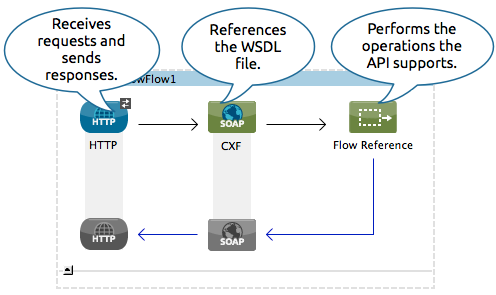
Exposing a SOAP API through a Mule application always requires a minimum of three elements:
-
an endpoint that receives requests and sends responses
-
a CXF Component that references and exposes the WSDL file
-
a component (or more likely a combination of components) that performs the operations the API supports (retrieving data, updating data in a database, etc.)
| Element | Description |
|---|---|
Endpoint |
The endpoint receives requests and sends responses, both containing XML SOAP envelopes. Typically, the endpoint is HTTP, HTTPS, JMS, or VM. |
CXF component |
A SOAP API needs to expose its contract through a WSDL file. Access the contents of this file by adding Through CXF, Mule allows you to present this WSDL contract using one of two methods:
Regardless of which method you use, you can instruct the CXF component to verify the validity of incoming requests against the WSDL. The CXF component also allows you to select an operation type:
The third option, Simple service, can be used if you are using a simple service pattern, but is not covered here. |
Processing Component(s) |
With the other two components in place, your flow is ready to process requests and perform the business logic that makes up your API. Your API could potentially fit into a single Java class, but will more likely include the use of several elements, such as flow controls, transformers, HTTP calls to Web services, etc. |
Building a WSDL-First Proxy Service API
This process assumes that you have already created the WSDL you intend to use for your SOAP API. For the purpose of exploring this functionality, you can use a sample WSDL file.
STUDIO Visual Editor
-
Import a WSDL file into your project.
-
Select File > Import.
-
Select General > File System.
-
Select the WSDL file from your file system, then, in the Into Folder field, select
src/main/resources. -
Click Finish.
-
-
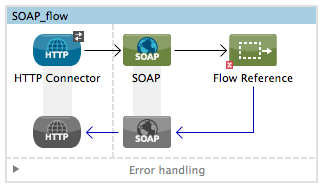
Drag and drop an HTTP listener and a CXF component into a new flow on your canvas.
-
In the HTTP Listener’s properties, create a new configuration element for it. Let the port stay as the default value 8081, and set the host to localhost.
-
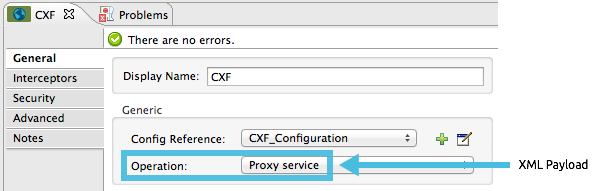
Configure the CXF component as per the image and table below.
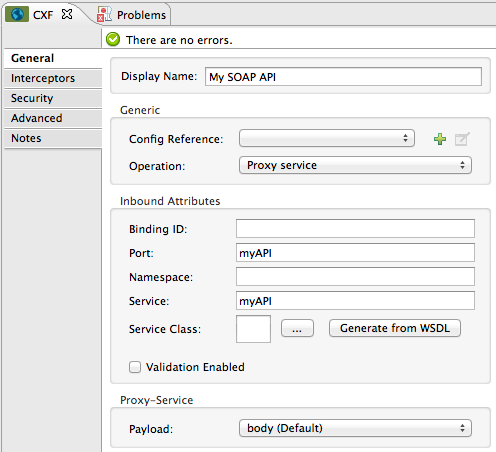
Field Value Operation
Proxy service
Port
Specify the port to which you wish to bind the WSDL
Payload
body
The output of this component is a byte array who’s content depends upon the value you set in the Payload field.
-
If you select envelope, then the message remains wrapped within the envelope in which it was originally received
-
If you selected body, then the message contains only the body, without its envelope
-
-
Configure the CXF component’s Advanced settings as per the image and table below. (Read more about Advanced Settings of the CXF Component.)
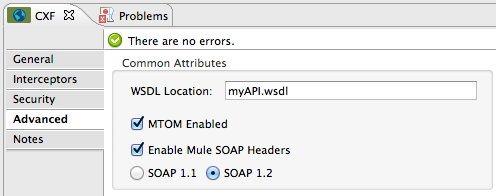
Field Value WSDL Location
Filepath of the WSDL in your Mule project
Soap 1.1
OR
Soap 1.2Version of SOAP you wish to use
-
Drop a Flow Reference after your CXF component. This reference will redirect the requests to another flow, where the actual business logic of your API will be carried out. Keep in mind that whatever happens in this second flow, the returned output must match the output declared by the WSDL.
As stated earlier, rather than fitting into a single Java class, your API’s business logic may involve the use of several elements, such as flow controls, transformers, HTTP calls to Web services, etc. Where this is the case, you do not need to include a Java class; you can model, then configure your flow to perform the operations your SOAP API must support.
-
Create a new flow and configure the Flow Reference component so that the Flow Name matches the name of this new flow. Then use other mule components to build your business logic inside this flow.
-
If you want direct access to the payload in your business logic flow, you must pass the message through an XML-to-DOM transformer.
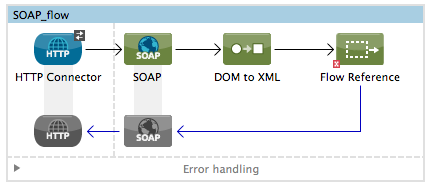
Otherwise, you can use Xpath expressions to parse parts of the payload when needed. For example, suppose that you only want to alter the message when a condition is met, you can implement a choice router that evaluates the condition based on an Xpath expression.
-
Run your Mule project. Access the API by sending requests to the HTTP listener. Include a SOAP envelope in the body.
To make SOAP requests to send to your SOAP API, use a free service such as SoapUI which automatically provides the SOAP message structure you need for each kind of request to the API.
Alternatively, you can use a browser extension such as Postman (Google Chrome), or the curl command line utility to send SOAP requests. To use these, you must know the required structure of the requests.
XML Editor or Standalone
-
Import a WSDL file into your project:
-
Select File > Import.
-
Select General > File System.
-
Select the WSDL File from your file system, then, in the Into Folder field, select
src/main/resources. -
Click Finish.
-
-
Create an` http:listener `in a new flow.
<http:listener config-ref="listener-config" path="/" doc:name="HTTP Connector"/>Attribute Value config-ref
listener-configpath
/
doc:name
HTTP Connector -
Create a global configuration element for the HTTP listener, outside the flow
<http:listener-config name="listener-config" host="localhost" port="8081"/>Attribute Value name
listener-confighost
localhostport
8081 -
Add a
cxf:proxy-serviceelement after the HTTP listener.<cxf:proxy-service doc:name="SOAP" payload="body" port="myAPI" service="myAPI" wsdlLocation="myAPI.wsdl"/>Attribute Value wsdlLocation
The filepath of your WSDL in the Mule project
service
myAPIport
myAPIpayload
bodyThe output of this component is a byte array who’s content depends upon the value you set for the
payloadattribute.-
If you select envelope, then the message remains wrapped within the envelope in which it was originally received
-
If you selected body, then the message contains only the body, without its envelope
-
-
Create a
flow-refafter your CXF component. This reference will redirect the requests to another flow, where the actual business logic of your API is carried out. Keep in mind that whatever happens in this second flow, the returned output must match the output declared by the WSDL.<flow-ref name="business-logic_flow" doc:name="Flow Reference"/>Attribute Value name
business-logic_flowdoc:name
Flow ReferenceAs stated earlier, rather than fitting into a single Java class, your API’s business logic may involve the use of several elements, such as flow controls, transformers, HTTP calls to Web services, etc. Through these elements, you can model, then configure your flow to perform the operations your SOAP API must support.
<flow name="business-logic_flow" doc:name="business-logic_flow"> <!-- your business logic here --> </flow> -
Create a new flow and name it with the value you assigned to the
flow-refattribute Flow Name. Then use other mule components to build your business logic inside this flow. -
If you want direct access to the payload in your business-logic flow, you must pass the message through a
mulexml:xml-to-dom-transformer.<mulexml:xml-to-dom-transformer doc:name="XML to DOM"/>Otherwise, you can use Xpath expressions to parse parts of the payload when needed. For example, suppose that you only want to alter the message when a condition is met, you can implement a choice router that evaluates the condition based on an Xpath expression.
-
Run your Mule project. Access the API by sending requests to the HTTP listener. Include a SOAP envelope in the body.
To make SOAP requests to send to your SOAP API, use a free service such as SoapUI which automatically provides the SOAP message structure you need for each kind of request to the API.
Alternatively, you can use a browser extension such as Postman (Google Chrome), or the curl command line utility to send SOAP requests. To use these, you must know the required structure of the requests.
Complete WSDL-First Example
|
For this code to be executable, you must include, in your project:
|
<?xml version="1.0" encoding="UTF-8"?>

<mule xmlns:mulexml="http://www.mulesoft.org/schema/mule/xml" xmlns:http="http://www.mulesoft.org/schema/mule/http" xmlns:tracking="http://www.mulesoft.org/schema/mule/ee/tracking" xmlns:cxf="http://www.mulesoft.org/schema/mule/cxf" xmlns="http://www.mulesoft.org/schema/mule/core" xmlns:doc="http://www.mulesoft.org/schema/mule/documentation"
    xmlns:spring="http://www.springframework.org/schema/beans"
    xmlns:xsi="http://www.w3.org/2001/XMLSchema-instance"
    xsi:schemaLocation="http://www.springframework.org/schema/beans http://www.springframework.org/schema/beans/spring-beans-current.xsd
http://www.mulesoft.org/schema/mule/core http://www.mulesoft.org/schema/mule/core/current/mule.xsd
http://www.mulesoft.org/schema/mule/http http://www.mulesoft.org/schema/mule/http/current/mule-http.xsd
http://www.mulesoft.org/schema/mule/cxf http://www.mulesoft.org/schema/mule/cxf/current/mule-cxf.xsd
http://www.mulesoft.org/schema/mule/ee/tracking http://www.mulesoft.org/schema/mule/ee/tracking/current/mule-tracking-ee.xsd
http://www.mulesoft.org/schema/mule/xml http://www.mulesoft.org/schema/mule/xml/current/mule-xml.xsd">
    <http:listener-config name="listener-config" host="localhost" port="8081"/>
    <flow name="SOAP_flow" doc:name="SOAP_flow">
        <http:listener config-ref="listener-config" path="/" doc:name="HTTP Connector"/>
        <cxf:proxy-service doc:name="SOAP" payload="body" port="myAPI" service="myAPI" wsdlLocation="myAPI.wsdl"/>
        <mulexml:dom-to-xml-transformer doc:name="DOM to XML"/>
        <flow-ref name="business-logic_flow" doc:name="Flow Reference"/>
    </flow>
    <flow name="business-logic_flow" doc:name="business-logic_flow">
         <!-- your business logic here -->
    </flow>
</mule>Building a WSDL-First JAX-WS API
This process assumes that you have already created the WSDL you intend to use for your SOAP API. For the purpose of exploring this functionality, you can use a sample WSDL file.
STUDIO Visual Editor
-
Import a WSDL file into your project.
-
Select File > Import.
-
Select General > File System.
-
Select the WSDL file from your file system, then, in the Into Folder field, select
src/main/resources. -
Click Finish.
-
-
Drag and drop an HTTP connector and a CXF component into a new flow on your canvas.
-
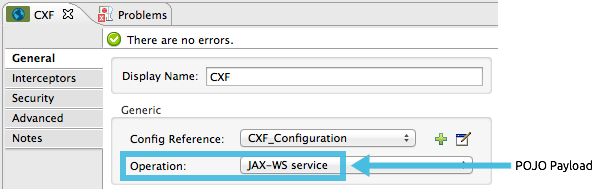
Configure the CXF component as per the image and table below. At runtime, the output of this component is a POJO.
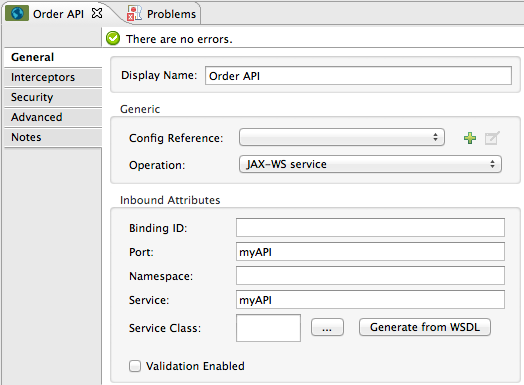
Field Value Operation
JAX-WS servicePort
myAPIService
myAPI -
Configure the CXF component’s Advanced settings as per the image and table below.
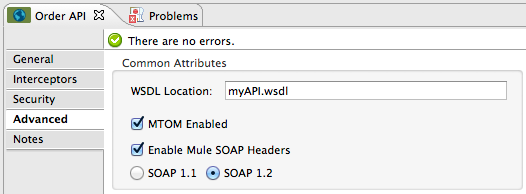
Field Value WSDL Location
Filepath of the WSDL in your Mule project
Soap 1.1
OR
Soap 1.2Version of SOAP you wish to use
-
Drop a Flow Reference after your CXF component. This reference will redirect the requests to another flow, where the actual business logic of your API will be carried out. Keep in mind that whatever happens in this second flow, the returned output must match the output declared by the WSDL.
As stated earlier, rather than fitting into a single Java class, your API’s business logic may involve the use of several elements, such as flow controls, transformers, HTTP calls to Web services, etc. Where this is the case, you do not need to include a Java class; you can model, then configure your flow to perform the operations your SOAP API must support.
-
Create a new flow and configure the Flow Reference component so that the Flow Name matches the name of this new flow. Then use other mule elements to build your business logic inside this flow.
-
Run your Mule project. Access the API by sending requests to the HTTP Listener. Include a SOAP envelope in the body.
To make SOAP requests to send to your SOAP API, use a free service such as SoapUI which automatically provides the SOAP message structure you need for each kind of request to the API.
Alternatively, you can use a browser extension such as Postman (Google Chrome), or the curl command line utility to send SOAP requests. To use these, you must know the required structure of the requests.
XML Editor or Standalone
-
Import a WSDL file into your project:
-
Select File > Import.
-
Select General > File System.
-
Select the WSDL File from your file system, then, in the Into Folder field, select
src/main/resources. -
Click Finish.
-
-
Create an` http:listener `in a new flow.
<http:listener config-ref="listener-config" path="/" doc:name="HTTP Connector"/>Attribute Value config-ref
listener-configpath
/doc:name
HTTP Connector -
Create a global configuration element for the HTTP listener, outside the flow
<http:listener-config name="listener-config" host="localhost" port="8081"/>Attribute Value name
listener-confighost
localhostport
8081 -
Add a
cxf:jaxws-serviceelement after the HTTP Listener. At runtime, the output of this component is a POJO.<cxf:jaxws-service doc:name="SOAP" port="myService" service="myService" wsdlLocation="myAPI.wsdl"/>Attribute Value wsdlLocation
The filepath of your WSDL in the Mule project
service
myServiceport
myServicedoc:name
SOAP -
Create a
flow-refafter your CXF component. This reference will redirect the requests to another flow, where the actual business logic of your API is carried out. Keep in mind that whatever happens in this second flow, the returned output must match the output declared by the WSDL.<flow-ref name="business-logic_flow" doc:name="Flow Reference"/>Attribute Value name
business-logic_flowdoc:name
Flow ReferenceAs stated earlier, rather than fitting into a single Java class, your API’s business logic may involve the use of several elements, such as flow controls, transformers, HTTP calls to Web services, etc. Through these elements, you can model, then configure your flow to perform the operations your SOAP API must support.
-
Create a new flow and name it with the value you assigned to the
flow-refattribute Flow Name. Then use other mule components to build your business logic inside this flow. -
Run your Mule project. Access the API by sending requests to the HTTP Listener. Include a SOAP envelope in the body.
To make SOAP requests to send to your SOAP API, use a free service such as SoapUI which automatically provides the SOAP message structure you need for each kind of request to the API.
Alternatively, you can use a browser extension such as Postman (Google Chrome), or the curl command line utility to send SOAP requests. To use these, you must know the required structure of the requests.
Complete WSDL-First Example
|
For this code to be executable, you must include, in your project:
|
<?xml version="1.0" encoding="UTF-8"?>

<mule xmlns:mulexml="http://www.mulesoft.org/schema/mule/xml" xmlns:http="http://www.mulesoft.org/schema/mule/http" xmlns:tracking="http://www.mulesoft.org/schema/mule/ee/tracking" xmlns:cxf="http://www.mulesoft.org/schema/mule/cxf" xmlns="http://www.mulesoft.org/schema/mule/core" xmlns:doc="http://www.mulesoft.org/schema/mule/documentation"
    xmlns:spring="http://www.springframework.org/schema/beans"
    xmlns:xsi="http://www.w3.org/2001/XMLSchema-instance"
    xsi:schemaLocation="http://www.springframework.org/schema/beans http://www.springframework.org/schema/beans/spring-beans-current.xsd
http://www.mulesoft.org/schema/mule/core http://www.mulesoft.org/schema/mule/core/current/mule.xsd
http://www.mulesoft.org/schema/mule/http http://www.mulesoft.org/schema/mule/http/current/mule-http.xsd
http://www.mulesoft.org/schema/mule/cxf http://www.mulesoft.org/schema/mule/cxf/current/mule-cxf.xsd
http://www.mulesoft.org/schema/mule/ee/tracking http://www.mulesoft.org/schema/mule/ee/tracking/current/mule-tracking-ee.xsd
http://www.mulesoft.org/schema/mule/xml http://www.mulesoft.org/schema/mule/xml/current/mule-xml.xsd">
    <http:listener-config name="listener-config" host="localhost" port="8081"/>
    <flow name="SOAP_flow" doc:name="SOAP_flow">
        <http:listener config-ref="listener-config" path="/" doc:name="HTTP Connector"/>
        <cxf:jaxws-service doc:name="SOAP"  port="myService" service="myService" wsdlLocation="myAPI.wsdl"/>
        <flow-ref name="business-logic_flow" doc:name="Flow Reference"/>
    </flow>
    <flow name="business-logic_flow" doc:name="business-logic_flow">
         <!-- your business logic here -->
    </flow>
</mule>
Build a Code-First JAX-WS API
STUDIO Visual Editor
-
Create the Java class that implements the API.
-
In the Package Explorer, right click on the project name, then select New > Class.
-
Enter the class name, then click Add… then use the filter to display, then select the Interface Definition you wish to use. Click Finish to save your selection.
-
In the new tab that appears in Studio, create the definition for your API in the Java class, adding annotations that follow the JAX-WS specification.
If you already have a WSDL file for your API, you can import it, then automatically create a Java class based upon it.
Import a WSDL file into your project
-
Select File > Import.
-
Select General > File System.
-
Select the WSDL File from your file system, then, in the Into Folder field, select
src/main/resources. -
Click Finish.
-
-
-
Build a flow with an HTTP listener and a CXF component.
-
Configure the CXF component as per the image and table below. At runtime, the output of this component is a POJO.
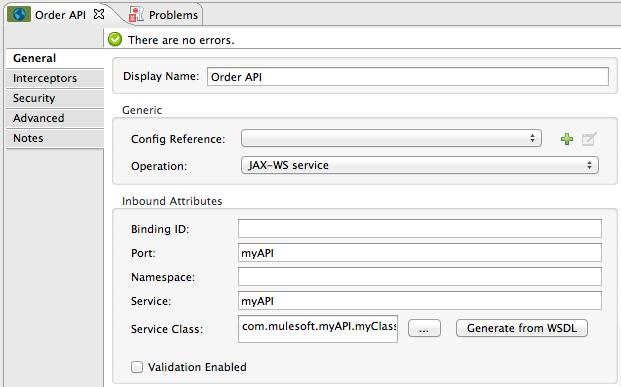
Field Value Operation
JAX-WS servicePort
myAPIService
myAPIService Class
Specify the Java class you created
Instead of building a Java class, you can import an existing WSDL file into your project, then use CXF to automatically build a Java class based upon it.
In the CXF component, click Generate from WSDL.
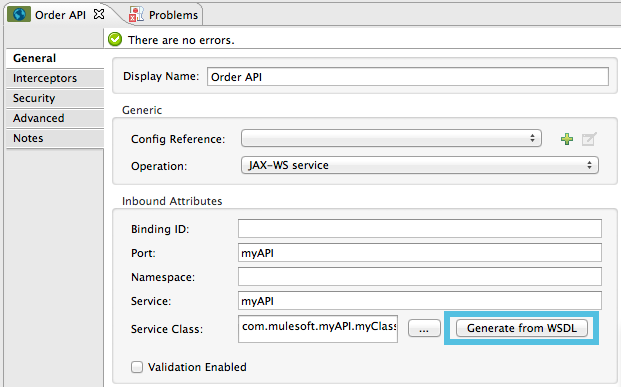
Then, select either the URL of the WSDL or the full filepath of the WSDL (including WSDL extension) within the project. After Mule generates the classes, ensure the Service Class field points to the actual Service Interface Definition, not the Implementation Class.
-
Drop a Flow Reference after your CXF component. This reference will redirect the requests to another flow, where the actual business logic of your API will be carried out. Keep in mind that whatever happens in this second flow, the returned output must match the output declared by the WSDL.
As stated earlier, rather than fitting into a single Java class, your API’s business logic may involve the use of several elements, such as flow controls, transformers, HTTP calls to Web services, etc. Where this is the case, you do not need to include a Java class; you can model, then configure your flow to perform the operations your SOAP API must support.
-
Create a new flow and configure the Flow Reference component so that the Flow Name matches the name of this new flow. Then use other mule components to build your business logic inside this flow.
-
Run your Mule project. Access the API by sending requests to the HTTP Listener. Include a SOAP envelope in the body.
To make SOAP requests to send to your SOAP API, use a free service such as SoapUI which automatically provides the SOAP message structure you need for each kind of request to the API.
Alternatively, you can use a browser extension such as Postman (Google Chrome), or the curl command line utility to send SOAP requests. To use these, you must know the required structure of the requests.
XML Editor or Standalone
-
Create the Java class that implements the API.
-
In the Package Explorer, right click on the project name, then select New > Class.
-
Enter the class name, then click Add… then use the filter to display, then select the Interface Definition you wish to use. Click Finish to save your selection.
-
In the new tab that appears in Studio, create the definition for your API in the Java class, adding annotations that follow the JAX-WS specification.
If you already have a WSDL file for your API, you can import it, then automatically create a Java class based upon it.
Import a WSDL file into your project
-
Select File >Import.
-
Select General > File System.
-
Select the WSDL File from your file system, then, in the Into Folder field, select
src/main/resources. -
Click Finish.
-
-
-
Create an` http:listener `in a new flow.
<http:listener config-ref="listener-config" path="/" doc:name="HTTP Connector"/>Attribute Value config-ref
listener-configpath
/doc:name
HTTP Connector -
Create a global configuration element for the HTTP listener, outside the flow
<http:listener-config name="listener-config" host="localhost" port="8081"/>Attribute Value name
listener-confighost
localhostport
8081 -
Add a
cxf:jaxws-serviceelement after the HTTP Listener. At runtime, the output of this component is a POJO.cxf:jaxws-service doc:name="SOAP" port="myService" service="myService" serviceClass="com.mulesoft.myService.myClass"/>Attribute Value serviceClass
com.mulesoft.myService.myClassservice
myServiceport
myServicedoc:name
SOAP -
Create a
flow-refafter your CXF component. This reference will redirect the requests to another flow, where the actual business logic of your API will be carried out. Keep in mind that whatever happens in this second flow, the returned output must match the output declared by the WSDL.<flow-ref name="business-logic_flow" doc:name="Flow Reference"/>Attribute Value name
business-logic_flowdoc:name
Flow ReferenceAs stated earlier, rather than fitting into a single Java class, your API’s business logic may involve the use of several elements, such as flow controls, transformers, HTTP calls to Web services, etc. Through these elements, you can model, then configure your flow to perform the operations your SOAP API must support.
<flow name="business-logic_flow" doc:name="business-logic_flow"> <!-- your business logic here --> </flow> -
Create a new flow and name it with the value you assigned to the
flow-refattribute Flow Name. Then use other mule components to build your business logic inside this flow. -
Run your Mule project. Access the API by sending requests to the HTTP Listener. Include a SOAP envelope in the body.
|
To make SOAP requests to send to your SOAP API, use a free service such as SoapUI which automatically provides the SOAP message structure you need for each kind of request to the API. Alternatively, you can use a browser extension such as Postman (Google Chrome), or the curl command line utility to send SOAP requests. To use these, you must know the required structure of the requests. |
Complete Code-First JAX-WS Example
|
For this code to be executable, you must include, in your project:
|
<?xml version="1.0" encoding="UTF-8"?>

<mule xmlns:http="http://www.mulesoft.org/schema/mule/http" xmlns:tracking="http://www.mulesoft.org/schema/mule/ee/tracking" xmlns:cxf="http://www.mulesoft.org/schema/mule/cxf" xmlns="http://www.mulesoft.org/schema/mule/core" xmlns:doc="http://www.mulesoft.org/schema/mule/documentation"
    xmlns:spring="http://www.springframework.org/schema/beans"
    xmlns:xsi="http://www.w3.org/2001/XMLSchema-instance"
    xsi:schemaLocation="http://www.springframework.org/schema/beans http://www.springframework.org/schema/beans/spring-beans-current.xsd
http://www.mulesoft.org/schema/mule/core http://www.mulesoft.org/schema/mule/core/current/mule.xsd
http://www.mulesoft.org/schema/mule/http http://www.mulesoft.org/schema/mule/http/current/mule-http.xsd
http://www.mulesoft.org/schema/mule/cxf http://www.mulesoft.org/schema/mule/cxf/current/mule-cxf.xsd
http://www.mulesoft.org/schema/mule/ee/tracking http://www.mulesoft.org/schema/mule/ee/tracking/current/mule-tracking-ee.xsd">
    <http:listener-config name="listener-config" host="localhost" port="8081"/>
    <flow name="SOAP_flow" doc:name="SOAP_flow">
        <http:listener config-ref="listener-config" path="/" doc:name="HTTP Connector"/>
        <cxf:jaxws-service doc:name="SOAP"  port="myService" service="myService"  serviceClass="com.mulesoft.myService.myClass"/>
        <flow-ref name="business-logic_flow" doc:name="Flow Reference"/>
    </flow>
    <flow name="business-logic_flow" doc:name="business-logic_flow">
         <!-- your business logic here -->
    </flow>
</mule>
Advanced Examples
Download the following Studio project and then import it as a Mule Studio generated Deployable Archive (.zip):
| Note that for the example to be deployable, you must add your own Kissmetrics API key in kissmetrics.properties and your own database reference and credentials in postgresql.properties. Without these, you can still examine the flow to get an idea of best practices. |
For a different example, create a Mule Example Project in Studio and select the template Service Orchestration and Choice Routing.
Notice in these examples how the routing is being performed for different operations. Also notice how exceptions are being handled.
Adding Security
Enterprise
To protect the SOAP API in your Mule flow, you can configure elements in the CXF component to apply WS-security. You can add WS-Security Configuration Elements (i.e. key-value pairs) to validate and/or authenticate information in the SOAP header of a message; you can also enable one or more of six Token Validators to ensure message security. The ability to add these security features is available only in the Enterprise version of Mule.
Consult the Securing a SOAP API document to configure the security elements of your API.
See Also
-
Consult the CXF Component Reference.
-
Read this blog post about code-first SOAP implementation.
-
Read another blog post that explains the XML-only SOAP Web Service template.
-
Learn about the JAX-WS annotations you need to make your Java class into a WSDL.
-
Learn how to proxy a SOAP API with Mule.