Authentication in HTTP Requests
Use the authentication that you configure in HTTP requests when your Mule app is sending requests to a service that requires authentication. In this case, your Mule app is the client. On the other hand, when you want to protect your API or app from receiving requests from unauthorized access, use an API Manager policy, such as the OAuth 2.0 Access Token Enforcement Using External Provider policy.
The HTTP request connector supports connecting a Mule client app to a service that requires any of the following types of authentication:
-
Basic Authentication
-
NTLM Authentication
-
Digest Authentication
-
OAuth2 - Authorization Code
-
OAuth2 - Client Credentials
If the target HTTP service of your request requires that you authenticate, provide the necessary credentials in the global HTTP Request Configuration element. Mule uses the credentials you configure in the authorization header of the request.
You can also configure Transport Layer Security (TLS) to encrypt the OAuth credentials.
Basic Authentication
-
Drag an HTTP Connector to your canvas, create a new Connector Configuration element for it
-
Select the Authentication tab
-
In the Protocol dropdown menu, pick Basic
-
Provide your Username and Password (or references to properties that contain them.
XML Code
Add a child element to the global element, in it add the user and password attributes.
<http:request-config name="HTTP_Request_Configuration" host="example.com" port="8081" doc:name="HTTP Request Configuration">
        <http:basic-authentication username="myuser" password="mypass"/>
    </http:request-config>

<flow name="basicauth_flow">
    ...
    <http:request config-ref="HTTP_Request_Configuration" path="test" method="GET" />

</flow>
In this example, a GET request is sent to http://www.example.com/test, adding an "Authorization" header with the provided username and password.
Preemptive Basic Auth
You can easily make Basic Auth work preemptively, changing the way credentials are required.
When configuring the Basic Auth credentials of your connector, tick the Preemptive checkbox.
XML Code
Add the attribute preemptive="true" on your `basic-authentication`element in the global configuration of the connector:
<http:request-config name="HTTP_Request_Configuration" doc:name="HTTP Request Configuration">
     <http:basic-authentication username="myuser" password="mypass" preemptive="true"/>
</http:request-config>
NTLM
In this example, a GET request is sent to http://www.example.com/test, adding an "Authorization" header with the provided username and password.
-
Drag an HTTP Connector to your canvas, create a new Connector Configuration element for it
-
Select the Authentication tab
-
In the Protocol dropdown menu, pick NTLM
-
Provide your Username and Password (or references to properties that contain them), also optionally your Domain and Workstation
XML Code
NTLM authentication is configured in the same way as Basic Authentication, just provide username and password in the attributes of the child element. The only difference is that the child element is differently named: "ntlm-authentication" and that you can optionally add domain and workstation attributes.
<http:request-config name="HTTP_Request_Configuration" host="example.com" port="8081" doc:name="HTTP Request Configuration">
        <http:ntlm-authentication username="myuser" password="mypass" domain="mydomain"/>
</http:request-config>

<flow name="digest_flow">
    ...
    <http:request config-ref="HTTP_Request_Configuration" path="test" method="GET" />

</flow>
Digest Authentication
-
Drag an HTTP Connector to your canvas, create a new Connector Configuration element for it
-
Select the Authentication tab
-
In the Protocol dropdown menu, pick Digest
-
Provide your Username and Password (or references to properties that contain them)
XML Code
Digest authentication is configured in the same way as Basic Authentication, just provide username and password in the attributes of the child element. The only difference is that the child element is differently named: "digest-authentication".
<http:request-config name="HTTP_Request_Configuration" host="example.com" port="8081" doc:name="HTTP Request Configuration">
        <http:digest-authentication username="myuser" password="mypass"/>
    </http:request-config>

<flow name="digest_flow">
    ...
    <http:request config-ref="HTTP_Request_Configuration" path="test" method="GET" />

</flow>
In this example, a GET request is sent to http://www.example.com/test, adding an "Authorization" header with the provided username and password.
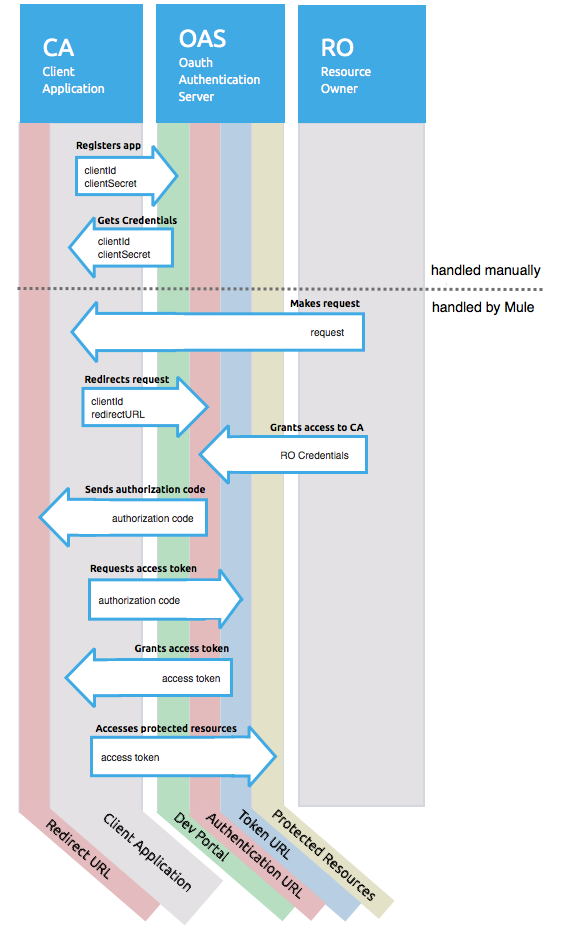
OAuth Authentication with Authorization Code Grant Type
The OAuth Authentication Server (OAS) is a server that holds the resources that are protected by OAuth. ex: Box server provides an API with OAuth authentication.
The Resource Owner (RO) is the owner of the resource to be accessed. ex: the Box user who owns a private repository
The Client Application (CA) is the server that tries to access a protected resource that belongs to a resource owner and that is held in an OAuth authentication server. ex: a Mule Server trying to access the resources that belong to a Box user and that are held in a Box server.
-
The CA must register an app to the OAS server. When this happens, the OAS assigns credentials to the CA that it can later use to identify itself: client id and client secret. The OAS must also provide an Authentication URL, which points to a web page where the RO can later introduce its credentials to grant the CA access to the resources it owns. The OAS must also provide a Token URL, to which the CA can later send HTTP requests to retrieve an access token that is required when accessing the Protected Resources on behalf of the RO.
-
When the RO makes a request to the CA, the CA redirects it to the Authentication URL of the OAS. There, the RO can grant the CA access to the resources. This URL that the RO is redirected to is actually not just the Authentication URL of the OAS, it also contains some query parameters that the CA includes: a client id and a Redirect URL.
-
The RO introduces its private credentials to grant the CA access to the protected resources it owns.
-
Once this happens, the OAS calls the Redirect URL that was included as a query parameter in the URL that brought the RO there. In this call that the OAS makes to the CA’s Redirect URL, it sends an authorization code.
-
Once the CA receives an authorization code, it sends it to the Token URL of the OAS. As a response, the OAS grants it an access token.
-
With this access token, the CA is now free to access the protected resources in the OAS as long as it includes it in its requests. Depending on the policies defined by the OAS, this token may eventually expire.
Basic Configuration
Your mule application will act as the CA (Client application) and follow the necessary steps in the process of obtaining an access token.
First of all, you need to register your application to the OAS (Box, in this example) to obtain your client id and your client secret that will later identify your CA to the OAS. During your registration, you may also be required to provide the redirect url that will be called by the OAS (including an access token) once the RO has granted you access. This redirect URL also needs to be used in the authorization code configuration.
Obtain the following from the OAS:
-
its authorization URL
-
its token URL
-
your client id
-
your client secret
With this information you are now ready to configure OAuth Authorization Code Grant Type in the HTTP Request Connector.
-
Drag an HTTP Connector to your canvas, create a new Connector Configuration element for it
-
Select the Authentication tab
-
In the Protocol dropdown menu, pick OAuth2 - Authorization Code
-
Provide the following values (or references to properties that contain them)
-
The Client Id and Client Secret the OAS gave you when registering your application.
-
The Redirect URL to which the OAS will send the access token once the RO grants you access.
-
If you were required to provide a redirect URL when registering your application to the OAS, this value must match what you provided there.
-
The Authorization URL that the OAS exposes
-
The Local Authorization URL
-
The Scopes field is optional, it allows you to define a comma separated list of OAuth scopes available in the OAS. Scopes in OAuth are very much like security roles.
-
The Token URI that the OAS exposes
The Local Authorization URL field is used to define a URL in your application that listens for incoming requests and redirects them to the Authorization URL of the OAS. There, the user can login, and then an access token will be sent to the application. After you start your mule application, you can hit this URL and it will allow you to login to the application.
XML Code
Within the global configuration of the connector, add an ` oauth2:authorization-code-grant-type ` child element, include the following values in it:
-
The clientId and clientSecret the OAS gave you when registering your application.
-
The redirectionUrl to which the OAS will send the access token once the RO grants you access.
If you were required to provide a redirect URL when registering your application to the OAS, this value must match what you provided there.
Inside it this element, add a ` oauth2:authorization-request ` child element with the following:
-
The authorizationUrl that the OAS exposes
-
The localauthorizationUrl
-
The scopes attribute is optional, it allows you to define a comma separated list of OAuth scopes available in the OAS. Scopes in OAuth are like security roles.
Also, at the same level, add a ` oauth2:token-request ` child element with the following:
-
The tokenUrl that the OAS exposes
-
The localauthorizationUrl attribute is used to define a URL in your application that listens for incoming requests and redirects them to the Authorization URL of the OAS. There, the user can login, and then an access token will be sent to the application. After you start your mule application, you can hit this URL and it will allow you to login to the application.
<http:request-config name="HTTP_Request_Configuration" host="api.box.com" port="443" basePath="/2.0" doc:name="HTTP Request Configuration">
        <oauth2:authorization-code-grant-type clientId="your_client_id" clientSecret="your_client_secret" redirectionUrl="http://localhost:8082/redirectUrl" >
            <oauth2:authorization-request authorizationUrl="http://www.box.com/api/oauth2/authorize" localAuthorizationUrl="http://localhost:8082/authorization"
scopes="access_user_details, read_user_files">
            </oauth2:authorization-request>
            <oauth2:token-request tokenUrl="http://www.box.com/api/oauth2/token"/>
        </oauth2:authorization-code-grant-type>
    </http:request-config>
Sending Custom Parameters to the Authorization URL
There are OAuth implementations that require or allow extra query parameters to be sent when calling the Authentication URL of the OAS.
-
Drag an HTTP Connector to your canvas, create a new Connector Configuration element for it
-
Select the Authentication tab
-
In the Protocol dropdown menu, pick OAuth2 - Authorization Code
-
Fill in the same fields as in the previous example
-
Click the Add Custom Parameter as many times as you need and define a name and value for each custom parameter
XML Code
This resembles the previous one, but includes two Oauth2:custom-parameter child elements that define parameters that are specific to this API.
<http:request-config name="HTTP_Request_Configuration" host="api.box.com" port="443" basePath="/2.0" doc:name="HTTP Request Configuration" >
        <oauth2:authorization-code-grant-type clientId="your_client_id" clientSecret="your_client_secret" redirectionUrl="http://localhost:8082/redirectUrl">
            <oauth2:authorization-request authorizationUrl="http://www.box.com/api/oauth2/authorize" localAuthorizationUrl="http://localhost:8082/authorization">
                <oauth2:custom-parameters>
                    <oauth2:custom-parameter paramName="box_device_id" value="123142"/>
                    <oauth2:custom-parameter paramName="box_device_name" value="my-phone"/>
                </oauth2:custom-parameters>
            </oauth2:authorization-request>
            <oauth2:token-request tokenUrl="http://www.box.com/api/oauth2/token"/>
        </oauth2:authorization-code-grant-type>
    </http:request-config>
Extracting Parameters from the Token URL Response
Once you have obtained an authorization code from the OAS, you must make a request to the OAS’s Token URL in order to receive an access token.
The format of the response to this request to the token URL is not defined in the OAuth spec. Each implementation may therefore return different response formats. By default, Mule expects the response to be in JSON format, when this is the case, the HTTP Response Connector knows how to extract the required information, as long as its elements are named as below:
-
access token: JSON filed must be named
access_token -
refresh token: JSON field must be named
refresh_token -
expires: JSON field must be named
expires_in
When this is the case, the parameters will be automatically extracted and you can easily use MEL expressions later in the flow to reference these values in the Mule Message that was generated from the response to the request to the token URL.
When this is not the case, then you must first configure the connector so that it knows where to extract these values from. In the example below, the connector expects the response to have a Content-Type of application/x-www-form-urlencoded, so the body of the response will be transformed into a Map in the payload, from there it’s easy to extract the values from the Map through MEL expressions, such as #[payload.'access_token'].
-
Drag an HTTP Connector to your canvas, create a new Connector Configuration element for it
-
Select the Authentication tab
-
In the Protocol dropdown menu, pick OAuth2 - Authorization Code
-
Fill in the same fields as in the previous example
-
Fill in the following extra parameters:
-
Access Token:
#[payload.'access_token'] -
Expires In
#[payload.'expires_in'] -
Refresh Token
#[payload.'refresh_token']
-
XML Code
This example resemebles the previous one, but includes two Oauth2:custom-parameter child elements that define parameters that are specific to this API.
<http:request-config name="HTTP_Request_Configuration" host="api.box.com" port="443" basePath="/2.0" doc:name="HTTP Request Configuration">
        <oauth2:authorization-code-grant-type clientId="your_client_id" clientSecret="your_client_secret" redirectionUrl="http://localhost:8082/redirectUrl">
            <oauth2:authorization-request authorizationUrl="http://www.box.com/api/oauth2/authorize" localAuthorizationUrl="http://localhost:8082/authorization"/>
            <oauth2:token-request tokenUrl="http://www.box.com/api/oauth2/token">
                <oauth2:token-response accessToken="#[payload.'access_token']" expiresIn="#[payload.'expires_in']" refreshToken="#[payload.'refresh_token']"/>
            </oauth2:token-request>
        </oauth2:authorization-code-grant-type>
    </http:request-config>
Refresh Access Token Customization
The access token you obtain from the Token URL eventually expires, how long the access token is valid it up to the OAS implementation. Once the access token expires, instead of going through the whole process once again, you can retrieve a new access token by using the refresh access token provided by the token URL response.
Mule handles this use case automatically. So by default, when an HTTP Request Connector is executed, if the response has a status code of 403, mule will call the token URL and get a new access token automatically.
It’s possible to customize when Mule will perform one of these requests to obtain a new access token. This is configured through a MEL Expression that is evaluated against the Mule Message that is generated from the response of the HTTP Request Connector call.
-
Drag an HTTP Connector to your canvas, create a new Connector Configuration element for it
-
Select the Authentication tab
-
In the Protocol dropdown menu, pick OAuth2 - Authorization Code
-
Fill in the same fields as in the previous examples
-
Fill in the Request Token When field with the following MEL expression: #
[xpath3('/response/status/text()', payload, 'STRING') == ‘unauthorized’]
XML Code
To set when to perform a call to obtain a new access token, set a MEL expression for the attribute refreshTokenwhen in the oauth2:token-request element.
<http:request-config name="HTTP_Request_Configuration" host="api.box.com" port="443" basePath="/2.0" doc:name="HTTP Request Configuration">
        <oauth2:authorization-code-grant-type clientId="your_client_id" clientSecret="your_client_secret" redirectionUrl="http://localhost:8082/redirectUrl">
            <oauth2:authorization-request authorizationUrl="http://www.box.com/api/oauth2/authorize" localAuthorizationUrl="http://localhost:8082/authorization"/>
            <oauth2:token-request tokenUrl="http://www.box.com/api/oauth2/token" refreshTokenWhen="#[xpath3('/response/status/text()', payload, 'STRING') == ‘unauthorized’]"/>
        </oauth2:authorization-code-grant-type>
    </http:request-config>
Whenever a request authorization fails, the response contains an XML node named status with value ‘unauthorized’. In the example above, the MEL expression evaluates that condition. When it evaluates to true, Mule sends a request to the Token URL to retrieve a new access token.
Accessing Resources on Behalf of Several Users
All of the examples so far have been about authenticating a single RO. It’s also possible to handle access tokens for multiple RO’s in a single application. For this use case, you need to define a way to identify each RO while it’s being authorized (while you send a request to the Token URL to retrieve an access token) and while you are executing operations against the API with the acquired access token.
To identify which RO is granting access to the CA, you must define a MEL expression to retrieve a Resource Owner ID against the call done to the local authorization URL.
-
Drag an HTTP Connector to your canvas, create a new Connector Configuration element for it
-
Select the Authentication tab
-
In the Protocol dropdown menu, pick OAuth2 - Authorization Code
-
Fill in the same fields as in the previous examples
-
In the Advanced section of the Authentication tab, set:
-
Resource Owner ID to
#[flowVars.'userId'] -
Local Authorization URI #[message.inboundProperties.'http.query.params'.userId]
-
The field Resource Owner ID must be set with a MEL expression that allows each execution of the HTTP Request Connector to retrieve the RO identifier from the Mule Message. So on this example, whenever the HTTP Request Connector is executed, there must be a flow variable named ‘userId’ with the RO identifier to use. To create this variable, you can add a Variable transformer to your flow, positioned before the HTTP Request Connector, and configure the transformer to create the userId variable in the Mule Message.
The Local Authorization URI field (the one in the Advanced section), defines that in order to get the RO identifier, the userId query parameter must be parsed from the call done to the local authorization URL.
So if you hit http://localhost:8082/authorization?userId=john, then the RO john can grant access to the CA on his behalf. If you hit http://localhost:8082/authorization?userId=peter then the RO peter can grant access to the CA on his behalf.
XML Code
Set resourceOwnerId to [flowVars.'userId'] and localAuthorizationUrlResourceOwnerId to [message.inboundProperties.'http.query.params'.userId]
<http:request-config name="HTTP_Request_Configuration" host="api.box.com" port="443" basePath="/2.0" doc:name="HTTP Request Configuration" tlsContext-ref="TLS_Context">
        <oauth2:authorization-code-grant-type clientId="your_client_id" clientSecret="your_client_secret" redirectionUrl="http://localhost:8082/redirectUrl" localAuthorizationUrlResourceOwnerId="#[message.inboundProperties.'http.query.params'.userId]"
resourceOwnerId="#[flowVars.'userId']">
            <oauth2:authorization-request authorizationUrl="http://www.box.com/api/oauth2/authorize" localAuthorizationUrl="http://localhost:8082/authorization" scopes="access_user_details, read_user_files"/>
            <oauth2:token-request tokenUrl="http://www.box.com/api/oauth2/token" refreshTokenWhen="#[xpath3('/response/status/text()')]" />
        </oauth2:authorization-code-grant-type>
    </http:request-config>
The attribute resourceOwnerId must be set with a MEL expression that allows each ` http:request ` execution to retrieve the RO identifier from the Mule Message. So on this example, whenever the ` http:request ` is executed, there must be a flow variable named ‘userId’ with the RO identifier to use.
<flow name="accessROFolders">
        <set-variable variableName="userId" value="#['Peter']" doc:name="Variable"/>
        <http:request config-ref="HTTP_Request_Configuration" path="/folders" method="GET" doc:name="HTTP"/>
    </flow>
The attribute localAuthorizationUrlResourceOwnerId defines that, in order to get the RO identifier, the userId query parameter must be parsed from the call done to the local authorization URL.
If you hit http://localhost:8082/authorization?userId=john, then the RO john can grant access to the CA on his behalf. If you hit http://localhost:8082/authorization?userId=peter then the RO peter can grant access to the CA on his behalf.
Use HTTPS for OAuth Authorization Code
When you need to use HTTPS for the communication with the OAS, which is usually the case for any production environment, you must apply HTTPS encoding to the OAuth credentials in all requests, including those done to:
-
the local authorization URL
-
the authorization URL
-
the redirect URL
-
the token URL
By specifying a TLS context in your HTTP Request Connector authentication settings, this is handled in all of these requests.
-
Drag an HTTP Connector to your canvas, create a new Connector Configuration element for it
-
In the General tab, pick the HTTPS radio button to select the protocol
-
Select the Authentication tab
-
In the Protocol dropdown menu, pick OAuth2 - Authorization Code
-
Fill in the same fields as in the previous examples
-
In the TLS configuration section, select Use Global TLS Config
-
Click the green plus sign next to the field to create a new TLS Context
-
Set up the trust store and key store configuration and click OK to save
Keep in mind that the TLS settings in the Authentication tab are for encoding your OAuth credentials, whilst the TLS/SSL tab of the HTTP Request Configuration are for encoding your request’s body.
XML Code
Set tlsContext-ref to reference a TLS context element, provide your trust store and key store credentials in this element.
<http:request-config name="HTTP_Request_Configuration_HTTPS" host="api.box.com" port="443" basePath="/2.0" doc:name="HTTP Request Configuration" tlsContext-ref="TLS_Context" protocol="HTTPS">
        <oauth2:authorization-code-grant-type clientId="your_client_id" clientSecret="your_client_secret" redirectionUrl="http://localhost:8082/redirectUrl" tlsContext-ref="TLS_Context">
            <oauth2:authorization-request authorizationUrl="https://www.box.com/api/oauth2/authorize" localAuthorizationUrl="https://localhost:8082/authorization" scopes="access_user_details, read_user_files"/>
            <oauth2:token-request tokenUrl="https://www.box.com/api/oauth2/token" />
        </oauth2:authorization-code-grant-type>
    </http:request-config>

    <tls:context name="TLS_Context" doc:name="TLS Context">
        <tls:trust-store path="your_trust_store" password="your_password"/>
        <tls:key-store path="your_keystore_path" password="your_password" keyPassword="your_key_password"/>
    </tls:context>
The tlsContext-ref attribute of the oauth2:authorization-code-grant-type element is for encoding your OAuth credentials, tls:context child element of the http:request-config is for encoding your request’s body.
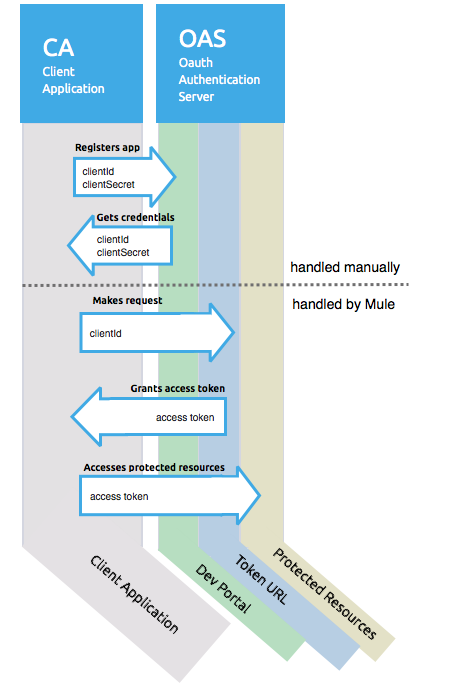
OAuth Authentication Client Credentials Grant Type
The OAuth Authentication Server (OAS) is a server that holds the resources that are protected by OAuth. ex: Box server provides an API with OAuth authentication.
The Client Application (CA) is the server that tries to access a protected resource that belongs to a resource owner and that is held in an OAuth authentication server. ex: a Mule Server trying to access the resources that belong to a Box user and that are held in a Box server.
In this case, the resource owner (RO) is also the CA. This means that the CA is implicitly authorized by the RO, which makes the whole procedure a lot simpler.
-
The CA must register an app to the OAS server. When this happens, the OAS assigns credentials to the CA that it can later use to identify itself: client id and client secret. The OAS must also provide a Token URL, to which the CA can later send HTTP requests to retrieve an access token that is required when accessing the Protected Resources.
-
The CA makes a request to the Token URL of the OAS, containing its client id to prove its identity. As a response, the OAS grants it an access token.
-
With this access token, the CA is now free to access the protected resources in the OAS as long as it includes it in its requests. Depending on the policies defined by the OAS, this token may eventually expire.
Basic Configuration
Client credentials grant type is meant to be used by a CA to grant access to an application on behalf of itself, rather than on behalf of a RO (resource owner) in the OAS. To get an access token all you need is the application credentials.
-
Drag an HTTP Connector to your canvas, create a new Connector Configuration element for it
-
Select the Authentication tab
-
In the Protocol dropdown menu, pick OAuth2 - Client Credentials
-
Fill in the following fields:
-
The Client Id and Client Secret the OAS gave you when registering your application.
-
The Scopes field is optional, it allows you to define a comma separated list of OAuth scopes available in the OAS. Scopes in OAuth are very much like security roles.
-
The Token URI that the OAS exposes
-
XML Code
You must include the following information:
-
The clientId and clientSecret the OAS gave you when registering your application.
-
The scopes attribute is optional, it allows you to define a comma separated list of OAuth scopes available in the OAS. Scopes in OAuth are very much like security roles.
-
The tokenUrl that the OAS exposes
<http:request-config name="HTTP_Request_Configuration" host="some.api.com" port="80" basePath="/api/1.0" doc:name="HTTP Request Configuration">
        <oauth2:client-credentials-grant-type clientId="your_client_id" clientSecret="your_client_secret">
            <oauth2:token-request tokenUrl="http://some.api.com/api/1.0/oauth/token" scopes="access_user_details, read_user_files"/>
</oauth2:client-credentials-grant-type>
    </http:request-config>
When the mule application is deployed, it will try to retrieve an access token. If the app is not able to retrieve an access token, it will fail in the deployment.
Token Manager Configuration
It’s possible to access authorization information for client credentials and authorization codes by using a token manager configuration.
-
Drag an HTTP Connector to your canvas, create a new Connector Configuration element for it
-
Select the Authentication tab
-
In the Protocol dropdown menu, pick OAuth2 - Client Credentials
-
In the Advanced section of the form, click the green plus sign next to Token Manager to create a new token manager
-
Assign it a reference to an object store
XML Code
The tokenManager-ref attribute need to reference a token-manager-config element in the configuration.
<oauth2:token-manager-config name="Token_Manager_Config"  doc:name="Token Manager Config"/>

    <http:request-config name="HTTP_Request_Configuration" host="api.box.com" port="443" basePath="/2.0" doc:name="HTTP Request Configuration">
        <oauth2:authorization-code-grant-type clientId="your_client_id" clientSecret="your_client_secret" redirectionUrl="http://localhost:8082/redirectUrl" tokenManager-ref="Token_Manager_Config" localAuthorizationUrlResourceOwnerId="#[message.inboundProperties.'http.query.params'.userId]" resourceOwnerId="#[flowVars.'userId']">
            <oauth2:authorization-request authorizationUrl="https://www.box.com/api/oauth2/authorize" localAuthorizationUrl="https://localhost:8082/authorization" scopes="access_user_details, read_user_files"/>
            <oauth2:token-request tokenUrl="https://www.box.com/api/oauth2/token"/>
        </oauth2:authorization-code-grant-type>
    </http:request-config>
Access Authorization Information Through the Token Manager
Once you have a token manager associated with the authorization grant type (in the example below, with authorization code) we can use the oauthContext function in a MEL expression anywhere in your flow to access information from an OAuth authorization.
If you’re using client credentials or authorization code with a single RO, use the following function:
oauthContext(tokenManagerConfigName)
This function provides access to the OAuth authorization information from a token manager.
-
tokenManagerConfigName: Name of a token manager in the configuration
If you’re using authorization code with multiple RO , use the following function:
oauthContext(tokenManagerConfigName, resourceOwnerId)
This function provides access to OAuth authorization information from a token manager.
-
tokenManagerConfigName: Name of a token manager in the configuration -
resourceOwnerId: Identifier of a RO.
Examples
In the table below is a set of examples showing you how to retrieve information from a Token Manager. These expressions can be used in any building block in your flow that you place after the HTTP Request Connector that handles your OAuth authentication.
| Function | Result |
|---|---|
|
accessToken value |
|
accessToken value for the RO identified with the id ‘Peter’ |
|
refreshToken value |
|
expires in value |
|
state used for the authorization URL |
|
custom parameter extracted from the token URL response |
|
custom parameter extracted from the token URL response for RO ‘Peter’. |
Access Token Invalidation
When using a Token Manager, it’s easy to block a particular RO.
-
Drag an Invalidate OAuth Context element to your canvas.
-
In its properties editor, set up the Token Manager Configuration so that it points to the same Token Manager that your HTTP Request Connector references when handling OAuth authentication.
XML Code
<flow name="invalidateOauthContext">
    <oauth2:invalidate-oauth-context config-ref="tokenManagerConfig"/>
</flow>
The Invalidate OAuth Context element cleans up all of the OAuth information stored in the token manager.
When using multiple RO with a single Token Manager, if you want to only clear the OAuth information of one RO, then you must specify the resource owner id in the Invalidate OAuth Context element.
-
Drag an Invalidate OAuth Context element to your canvas.
-
In its properties editor, set up the Token Manager Configuration so that it points to the same Token Manager that your HTTP Request Connector references when handling OAuth authentication.
-
Set the Resource Owner Id to an expression that points to the RO you want to clear. For example #
[flowVars.'resourceOwnerId']
XML Code
<flow name="invalidateOauthContextWithResourceOwnerId">
    <oauth2:invalidate-oauth-context config-ref="tokenManagerConfig" resourceOwnerId="#[flowVars.'resourceOwnerId']"/>
</flow>