Content-Based Routing Tutorial
The Basic Studio Tutorialintroduced Mule Studio and built a simple "Hello, World" application.This tutorial walks you through how to use Mule Studio to build a slightly more complex "Hello, World" application that routes messages according to their content. After creating and running the example in this tutorial locally, you should be able to apply what you have learned to create more complex applications.
Assumptions
This tutorial assumes that you have downloaded and installed Mule Studio. If you do not have any previous experience with Eclipse or an Eclipse-based IDE, please review the brief introduction to the Mule Studio interface or complete the Basic Studio Tutorial.
Goals
In this tutorial, your goals are to:
-
Create an application in Mule Studio that routes messages according to the logic you supply in a Choice Router.
-
Set and invoke flow variables using Mule Expression Language.
-
Run the application on a local runtime embedded in Mule Studio.
-
Test the application using a browser.
-
Adjust the application while it is running, effectively invoking a "hot deployment."
-
Edit the application to move some processing into a Subflow.
-
(Optional) Apply your knowledge to an extra credit challenge.
Modeling a Flow with Choice Routing
Launch Mule Studio and create a new Mule Project named CBR Tutorial. If you need more directions on launching Studio and creating a project, please refer to the Basic Studio Tutorial.
Next, use the building blocks in the Studio palette to model an application that:
-
receives an HTTP request
-
filters out any "favicon.ico" browser requests
-
transforms an inbound property into a flow variable
-
routes the message according to the flow variable associated with the message
-
sets a new payload based on the routing logic
-
supplies that payload as an HTTP response
-
logs a summary of the results to the console
You can model this application using these building blocks in Studio:
Allows your Mule application to connect to Web resources through the HTTP or HTTPS protocol; find this in the Endpoints section of the palette |
|
Expression Filter |
Filters messages according to a Mule expression. Find this message processor in the Filters section of the palette |
Sets a flow variable on the message that can be invoked elsewhere in the flow; find this message processor in the Transformers section of the palette |
|
Routes incoming messages according to configured logic; find this in the Flow Controls section of the palette |
|
Modifies your payload into a different message, depending on the results of the choice routing; find this in the Transformers section of the palette |
|
Logs messages or activity based on the value of a Mule expression; find this in the Components section of the palette at the right of the screen |
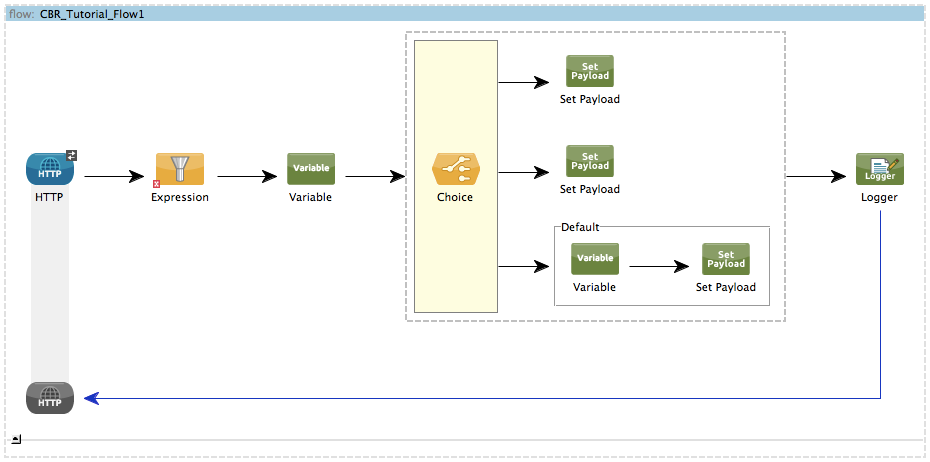
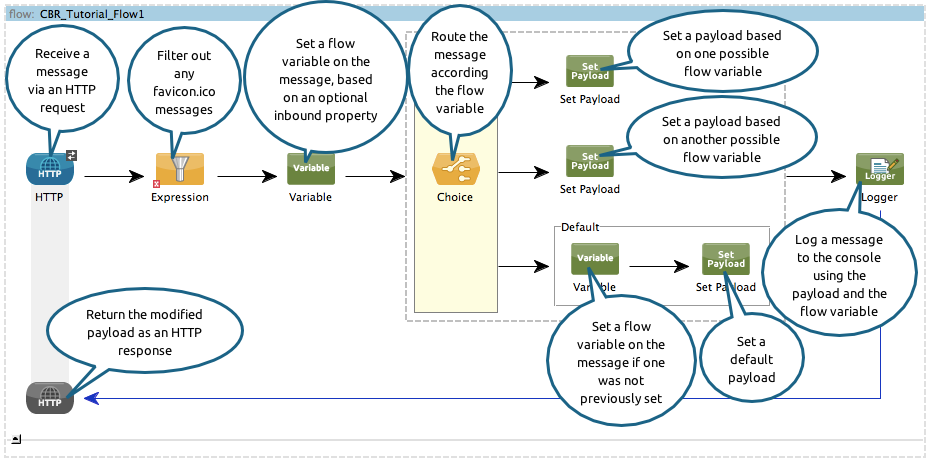
Drag and drop these building blocks into place on the canvas to visually construct, or model, a flow, as shown.
Dragging and dropping within the choice scope requires some precise positioning. Here are the detailed step-by-step instructions for modeling the choice router.
-
First, drop the appropriate message processors into the Default box on the canvas.
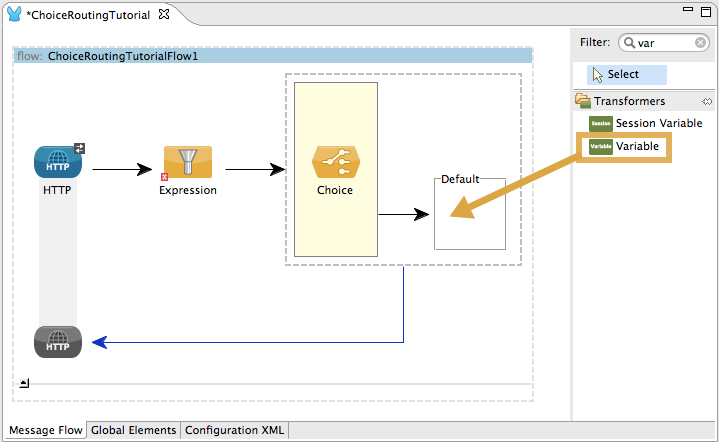
-
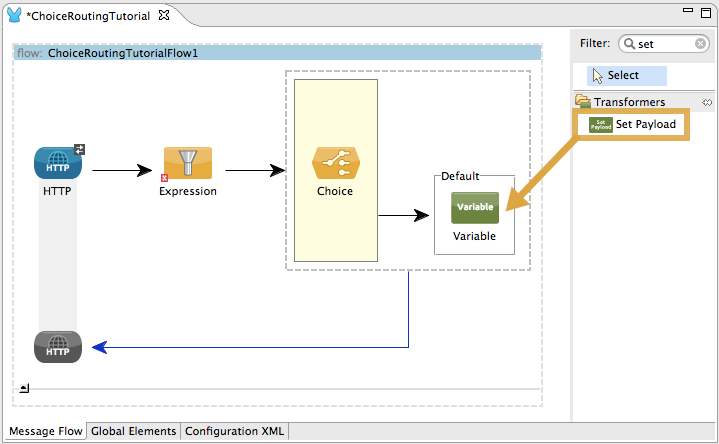
Next, drag a message processor outside the Default box, but inside the dotted line that defines the choice scope, to define your first non-default routing option.
-
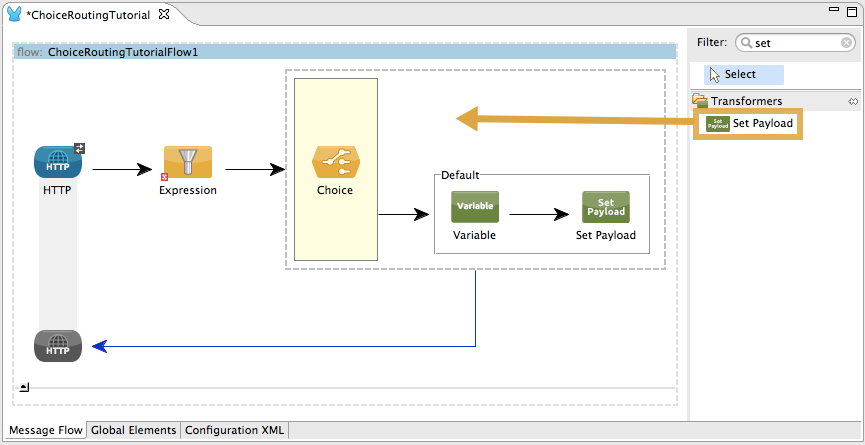
Then, drag another message processor into that same space, positioning your mouse so that you see the black vertical line that indicates you are creating another choice.
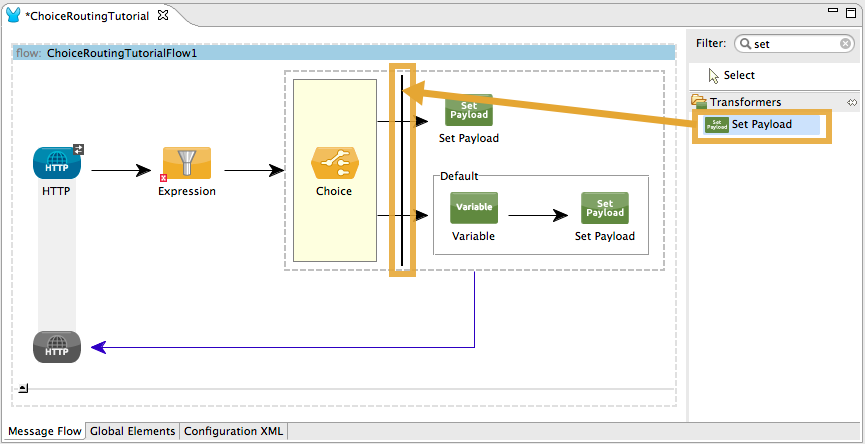
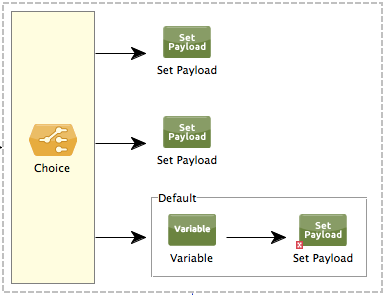
-
Your choice router should now match the image shown.
Use the Palette Filter. Building blocks in each category of the palette are organized alphabetically. To avoid scrolling, use the Filter tool in the upper right corner of the palette to find the building blocks that you want more quickly.
You have modeled a full application on the Studio canvas.
Once you configure the individual elements within it, which you will do in the next section, this flow will accomplish the goals that you set out to achieve with this application. Each building block that you selected and placed on the canvas will perform part of the functionality of your application, as shown in the image below.
Configuring the Flow Elements
Next, configure the flow elements to make the application respond to you in a few different languages based on a query parameter you pass in the URL when you invoke the inbound endpoint. For example, if you invoke http://localhost:8081/?language=French, the application should respond to you in French.
Nearly all Mule elements provide configuration options, which you can set in one of two ways:
-
via the building block Properties Editor in the console of Studio’s visual editor
-
via XML code in Studio’s XML editor, or in any other XML editing environment.
The following instructions walk you through how to configure each building block in the visual editor and via XML. Use the tabs to switch back and forth between the instructions for the visual editor and the XML editor.
HTTP Endpoint (Studio Visual Editor)
Click the HTTP Endpoint on your canvas to view its Properties Editor. Leave the default configuration of the HTTP inbound endpoint as they are.
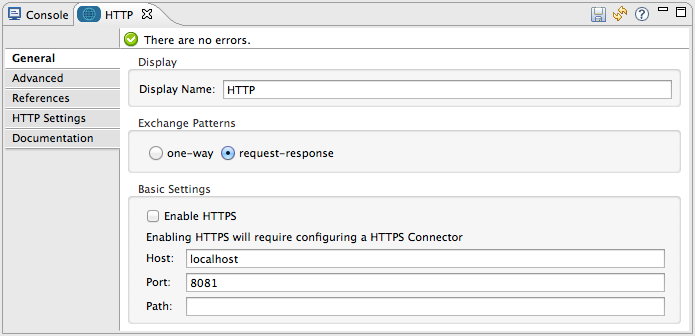
| Field | Value |
|---|---|
Display Name |
|
Host |
|
Port |
|
HTTP Endpoint (XML Editor or Standalone)
Configure the HTTP inbound endpoint as follows:
<http:inbound-endpoint exchange-pattern="request-response" host="localhost" port="8081" doc:name="HTTP"/>| Attribute | Value |
|---|---|
exchange-pattern |
|
host |
|
port |
|
doc:name |
|
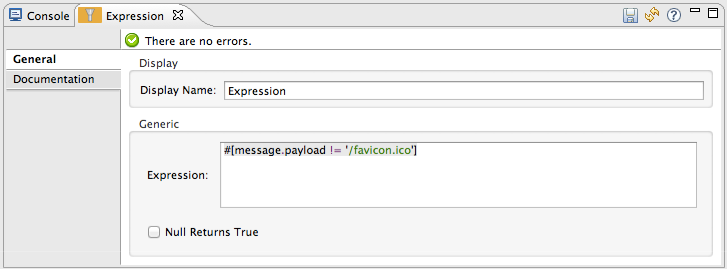
Expression Filter
This expression tells Mule to check that the payload is not equal to the string '/favicon.ico'. If the expression evaluates to true, Mule passes the message on to the next step in the flow. If the expression evaluates to false, Mule stops processing the message.
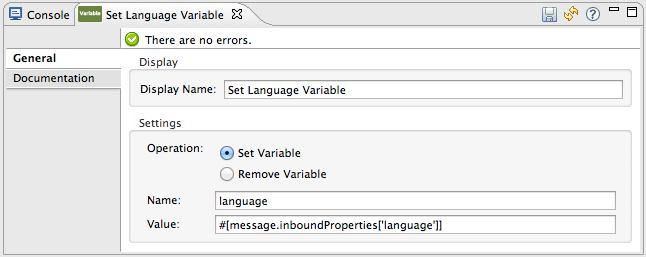
Variable Transformer
This transformer instructs Mule to look for an inbound property called language on all incoming messages, and, if found, set it (and its value) as a flow variable — metadata that is carried along with the message in the form of a key/value pair.
Variable Transformer (STUDIO Visual Editor)
Click the Variable Transformer to open its Properties Editor, then configure as per the table below.
| Field | Value |
|---|---|
Display Name |
|
Operation |
|
Name |
|
Value |
|
Variable Transformer (XML Editor or Standalone)
If you model the flow on the canvas, then switch to the XML editor, the placeholder XML for this element looks like the following code:
<variable-transformer doc:name="Variable"/>Change the variable-transformer placeholder element to the element set-variable, then configure the set-variable transformer as follows.
<set-variable variableName="language" value="#[message.inboundProperties['language']]" doc:name="Set Language Variable"/>| Field | Value |
|---|---|
variableName |
|
value |
|
doc:name |
|
Choice Router and Constituent Message Processors (STUDIO Visual Editor)
-
Click the Choice Router building block to open its Properties Editor. Here, enter Mule expressions to define the routing logic that Mule applies to incoming messages (see table below; detailed instructions follow).
When Route Message to #[flowVars['language'] == 'Spanish']Set Payload#[flowVars['language'] == 'French']Set PayloadDefaultVariable -
In the table, click the first empty row under When, then enter
#[flowVars['language'] == 'Spanish']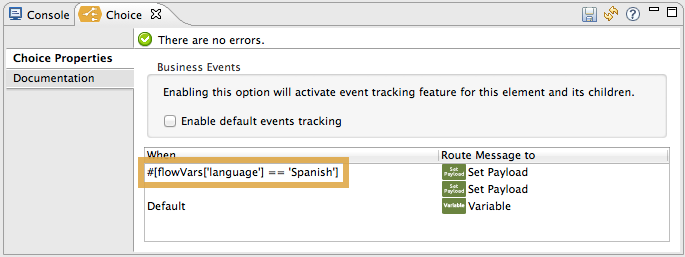
This expression tells Mule to look for a flow variable called
languageon the incoming message and check whether it equals Spanish. If this expression evaluates to true, Mule routes the message to the message processor in that path. -
Click the next empty row, then enter
#[flowVars['language'] == 'French']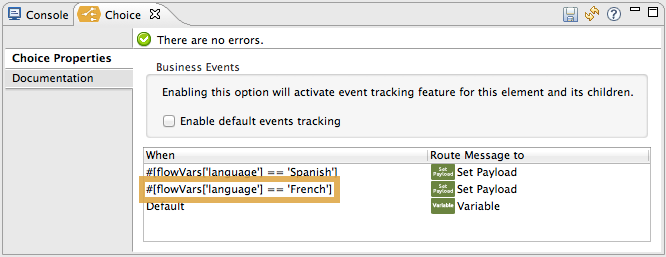
Just as in the previous row, this expression tells Mule to look for a flow variable called
languageon the incoming message. This time, the expression indicates Mule should check whetherlanguageequals French. If this expression evaluates to true, Mule routes the message to the message processor in that path. -
Next, click the topmost Set Payload building block within your Choice Router scope to open its Properties Editor, then configure it as shown below.
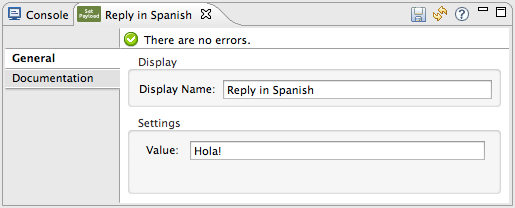
This Set Payload transformer corresponds to the first option you configured above in your choice routing logic. If Mule finds the flow variable
language=Spanish, your message produces this payload as a response. -
Click the next Set Payload building block within the Choice Router scope to open its Properties Editor, then configure it as shown below.

This Set Payload transformer corresponds to the second option you configured above in your choice routing logic. If Mule finds the flow variable
language=French, your message produces this payload as a response. -
Click the Variable Transformer inside the Default box to open its Properties Editor, then configure it as shown.
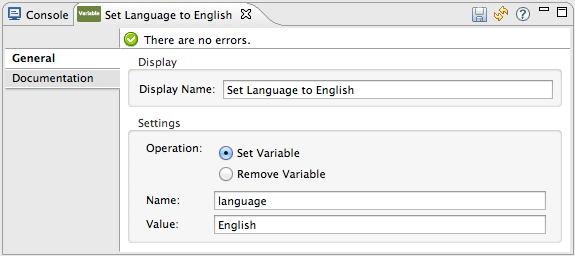
This Variable Transformer, and the Set Payload that follows it, are only invoked if neither of the expressions in the choice routing logic evaluate to true. Thus, if Mule does not find either the flow variable
language=Spanishor the flow variablelanguage=French, Mule routes the message to this default processing option, which sets the flow variablelanguagewith the valueEnglish.Note that in this configuration you are setting a literal value for the variable, rather than using Mule expression language to extract a value from the message, as you did in the previous Variable Transformer.
-
Click the Set Payload after the Variable Transformer inside the Default box to open its Properties Editor, then configure it as shown.
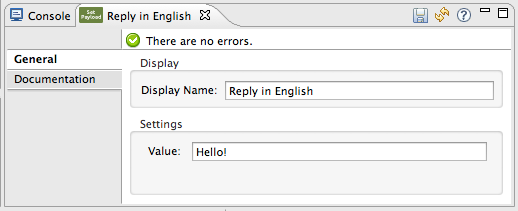
This Set Payload transformer sets a payload for the default option you configured above in your choice routing logic.
Choice Router and Constituent Message Processors (XML Editor or Standalone)
If you model the flow on the canvas, then switch to the XML editor, the placeholder XML for this element as per the following code:
<choice doc:name="Choice">
   <when expression="">
       <set-payload doc:name="Set Payload"/>
   </when>
   <when expression="">
       <set-payload doc:name="Set Payload"/>
   </when>
   <otherwise>
       <variable-transformer doc:name="Variable"/>
       <set-payload doc:name="Set Payload"/>
   </otherwise>
</choice>
Configure the two when and the otherwise child elements and each of their nested elements as shown.
<choice doc:name="Choice">
   <when expression="#[flowVars['language'] == 'Spanish']">
       <set-payload value="Hola!" doc:name="Reply in Spanish"/>
   </when>
   <when expression="#[flowVars['language'] == 'French']">
       <set-payload value="Bonjour!" doc:name="Reply in French"/>
   </when>
   <otherwise>
       <set-variable variableName="language" value="English" doc:name="Set Language to English"/>
       <set-payload value="Hello!" doc:name="Reply in English"/>
   </otherwise>
</choice>
In each of the when child elements of the choice router, the expression tells Mule to look for a flow variable called language on the incoming message and check whether it equals Spanish or French. If either expression evaluates to true, Mule routes the message to the corresponding nested set-payload message processor.
If both of the expressions in the when elements evaluate to false, Mule routes the message via the processing defining in the otherwise child element. Messages that are routed this way have a variable language=English set, then return a payload in English.
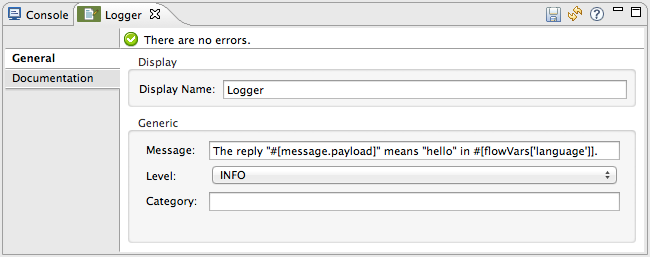
Logger
This logger produces one of three possible messages, depending on the result of the Choice routing.
Logger (Studio Visual Editor)
Click the Logger to open its Properties Editor, then configure as per the table below.
| Field | Value |
|---|---|
Display Name |
|
Message |
|
Level |
|
Logger (XML Editor or Standalone)
Configure the logger as follows:
<logger message="The reply "#[message.payload]" means "hello" in #[flowVars['language']]." level="INFO" doc:name="Logger"/>| Field | Value |
|---|---|
message |
|
level |
`INFO ` |
doc:name |
|
Studio automatically escapes the quotes, as per the following:
<logger message="The reply "#[message.payload]" means "hello" in #[flowVars['language']]." level="INFO" doc:name="Logger"/>Logger Complete Application
Your complete application XML, once configured, should look like the following:
<?xml version="1.0" encoding="UTF-8"?>
<mule xmlns:http="http://www.mulesoft.org/schema/mule/http" xmlns:tracking="http://www.mulesoft.org/schema/mule/ee/tracking" xmlns="http://www.mulesoft.org/schema/mule/core" xmlns:doc="http://www.mulesoft.org/schema/mule/documentation" xmlns:spring="http://www.springframework.org/schema/beans" version="EE-3.4.1" xmlns:xsi="http://www.w3.org/2001/XMLSchema-instance" xsi:schemaLocation="http://www.springframework.org/schema/beans http://www.springframework.org/schema/beans/spring-beans-current.xsd
http://www.mulesoft.org/schema/mule/core http://www.mulesoft.org/schema/mule/core/current/mule.xsd
http://www.mulesoft.org/schema/mule/http http://www.mulesoft.org/schema/mule/http/current/mule-http.xsd
http://www.mulesoft.org/schema/mule/ee/tracking http://www.mulesoft.org/schema/mule/ee/tracking/current/mule-tracking-ee.xsd">
<flow name="CBR_TutorialFlow1" doc:name="ChoiceRoutingTutorial">
<http:inbound-endpoint exchange-pattern="request-response" host="localhost" port="8084" doc:name="HTTP"/>
<expression-filter expression="#[message.payload != '/favicon.ico']" doc:name="Expression"/>
<set-variable variableName="language" value="#[message.inboundProperties['language']]" doc:name="Set Language Variable"/>
<choice doc:name="Choice">
<when expression="#[flowVars['language'] == 'Spanish']">
<set-payload value="Hola!" doc:name="Reply in Spanish"/>
</when>
<when expression="#[flowVars['language'] == 'French']">
<set-payload value="Bonjour!" doc:name="Reply in French"/>
</when>
<otherwise>
<set-variable variableName="language" value="English" doc:name="Set Language to English"/>
<set-payload value="Hello!" doc:name="Reply in English"/>
</otherwise>
</choice>
<logger message="The reply "#[message.payload]" means "hello" in #[flowVars['language']]." level="INFO" doc:name="Logger"/>
</flow>
</mule>Running the Application
Having built, configured, and saved your new application, you are ready to run it on the embedded Mule server (included as part of the bundled download of Mule Studio).
-
In the Package Explorer pane, right-click the
cbr_tutorialproject, then select Run As > Mule Application. (If you have not already saved, Mule prompts you to save now.) -
Mule immediately kicks into gear, starting your application and letting it run. When the startup process is complete, Studio displays a message in the console that reads,
Started app 'cbr_tutorial'.
Using the Application
-
Open any Web browser and go to` http://localhost:8081/?language=Spanish`
-
Your browser presents a message that reads "Hola!"
-
Check the console log in Studio and look for a log message that reads
INFO 2013-11-26 11:30:18,790 [[cbr_tutorial].connector.http.mule.default.receiver.03] org.mule.api.processor.LoggerMessageProcessor: The reply "Hola!" means "hello" in Spanish. -
In your browser’s address bar, replace URL with
http://localhost:8081/?language=French, then press enter. -
Your browser presents a message that reads "Bonjour!"
-
Check the console log in Studio again and look for a log message that reads
INFO 2013-11-26 11:36:38,826 [[cbr_tutorial].connector.http.mule.default.receiver.02] org.mule.api.processor.LoggerMessageProcessor: The reply "Bonjour!" means "hello" in French. -
Try requesting the URL without a query paramater:
http://localhost:8081 -
Your browser presents a message that reads "Hello!"
-
Check the console log in Studio again and look for a log message that reads
INFO 2013-11-26 11:36:53,709 [[cbr_tutorial].connector.http.mule.default.receiver.02] org.mule.api.processor.LoggerMessageProcessor: The reply "Hello!" means "hello" in English. -
This last log message is not terribly interesting or informative. You can fix that in the [Extra Credit] section, below.
Editing the Running Application
If you make and save changes to your application while it is running, Mule automatically redeploys your application, something that is commonly referred to as "hot deployment".
Editing the Running Application (STUDIO Visual Editor)
-
To see this feature in action, add another Logger to the chain of message processors that comprises the default option in the Choice scope.
-
Drag the Logger in front of the two message processors already in the Default box.
-
Click the Logger to open its Properties Editor, then configure as per the table below.
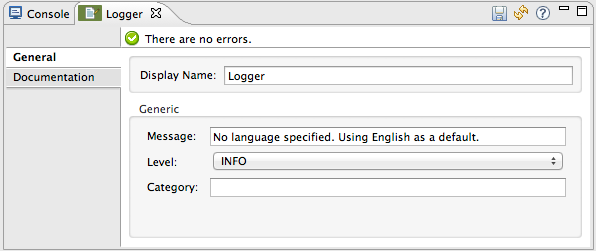
Field Value Display Name
LoggerMessage
`No language specified. Using English as a default. `
Level
INFO -
Click the Console tab underneath the canvas to view the running log of your application, then save your application by clicking File > Save. Watch the console and note that Mule redeploys the application immediately. The logs show an INFO message noting that the application deployment was due to a change.
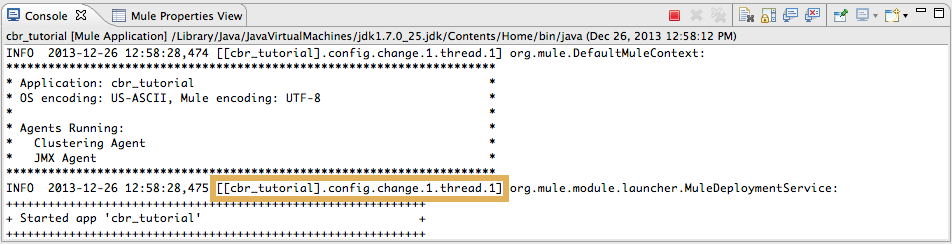
To test out this change and verify that your new logger is working, return to your browser and request
http://localhost:8081again. Check the console log in Studio and look for a log message that reads:INFO 2013-11-26 13:03:28,688 [[cbr_tutorial].connector.http.mule.default.receiver.02] org.mule.api.processor.LoggerMessageProcessor: No language specified. Using English as a default.
You successfully made a change to your application and performed a hot deployment of the update.
Editing the Running Application (XML or Standalone Editor)
Configure the logger as follows:
<logger message="No language specified. Using English as a default." level="INFO" doc:name="Logger"/>| Field | Value |
|---|---|
message |
|
level |
`INFO ` |
doc:name |
|
The full code of the choice scope now appears as follows:
...
        <choice doc:name="Choice">
            <when expression="#[flowVars['language'] == 'Spanish']">
                <set-payload value="Hola!" doc:name="Reply in Spanish"/>
            </when>
            <when expression="#[flowVars['language'] == 'French']">
                <set-payload value="Bonjour!" doc:name="Reply in French"/>
            </when>
            <otherwise>
                <logger message="No language specified. Using English as a default." level="INFO" doc:name="Logger"/>
                <set-variable variableName="language" value="English" doc:name="Set Language to English"/>
                <set-payload value="Hello!" doc:name="Reply in English"/>
            </otherwise>
        </choice>
...
Adding a Subflow
You’ve successfully routed messages in your application via a simple, limited set of options. In this example, the most complex routing option has only three message processors in a chain, but in a more complex application you might have many more message processing steps, possibly with additional branching or routing logic. To keep your code organized and break it into reusable chunks, you can move discrete sections of processing into separate flows or subflows and refer to those flows or subflows with a flow reference component to invoke them when needed.
The difference between a flow and subflow
Flows and subflows are both constructs within which you link together several individual building blocks to handle the receipt, processing, and routing of a message. For the purposes of this tutorial, you could use either a flow or a subflow to complete the steps below, but in more advanced situations you might need one or the other. A flow has more advanced configuration options, such as the ability to change the processing strategy and define an exception strategy. A subflow always has a synchronous processing strategy and it inherits the exception strategy of the flow from which it is referenced. Both a flow and subflow are invoked using a flow reference component.
Edit your application to add a subflow and move the processing that currently occurs within the Default box in your Choice Router into the subflow. To do this, you’ll need to add two building blocks to your application:
-
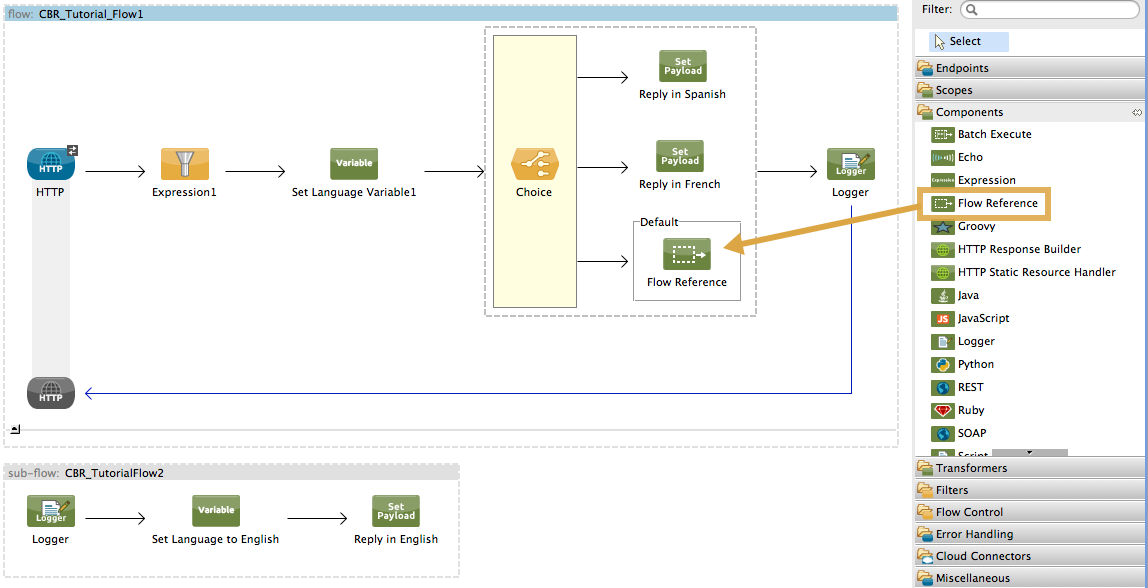
a Flow Reference Component, which invokes another flow in the application. Find this in the Components section of the palette.
-
a Subflow Scope, which creates another flow in your application that you can reference using the above Flow Reference Component. Find this in the Scopes section of the palette.
Moving message processors into a subflow is particularly easy to do using Studio’s visual editor.
-
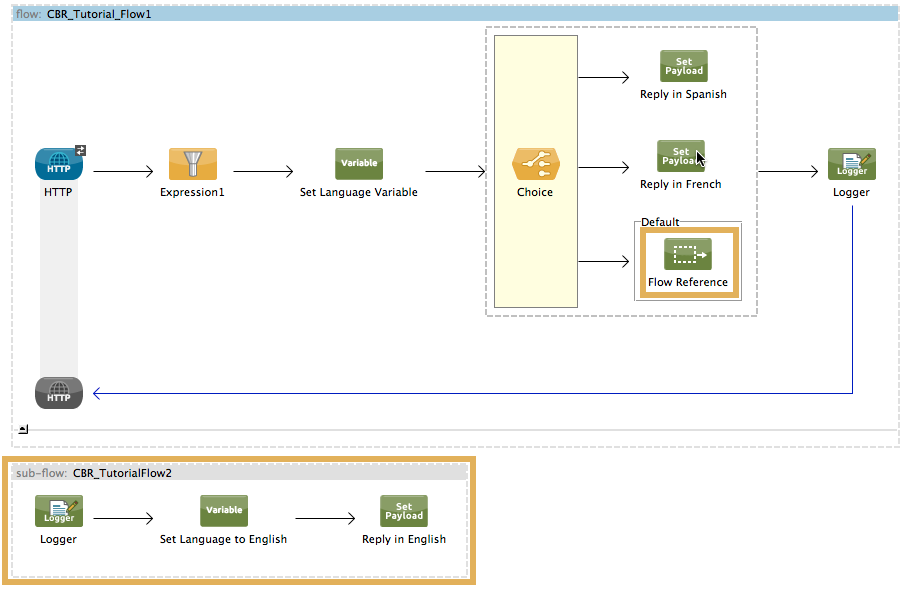
Shift + click the three message processors in the Default box of the Choice scope so that all three are highlighted, then right-click and select Extract to… > Sub Flow.
-
Studio will prompt you to name your subflow. You can give it any unique name. This example uses the name
CBR_TutorialFlow2. -
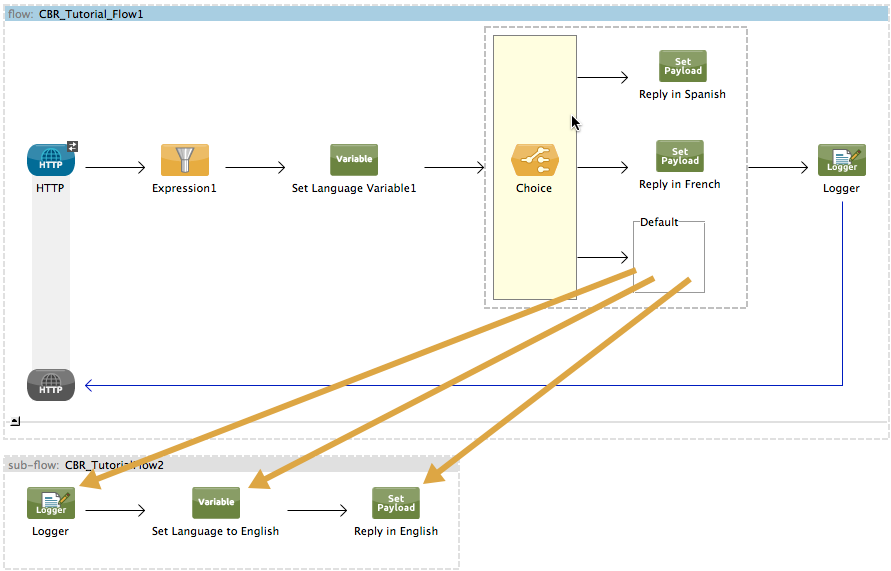
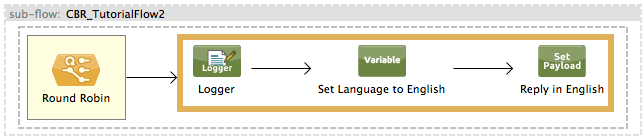
Studio creates the subflow underneath your existing flow, replacing the contents of the Default box with a Flow Ref component.
Drag-and-drop to Create the Subflow
Alternatively, you can also drag-and-drop to create the subflow, or use the XML editor.
-
Add a subflow scope below your existing flow.
-
Drag and drop the subflow scope onto your canvas in the empty space underneath your existing flow.
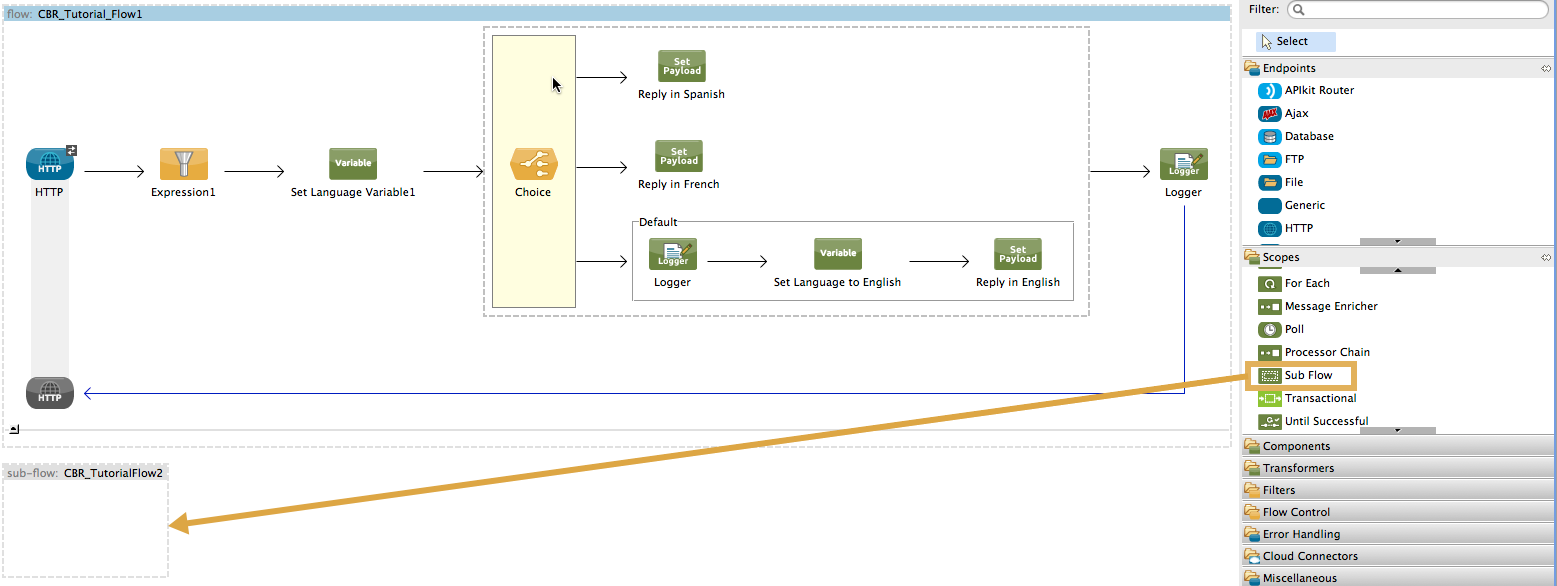
-
Move the two message processors from the default path of your choice router into the new subflow.
-
Drag and drop the message processors into their new positions in the subflow scope.
-
Add a flow reference in the default path of the choice router.
-
Drag and drop a Flow Reference Component into the Default box within the Choice scope.
-
Configure the flow reference to point to the subflow you just created.
-
Click the Flow Reference building block to open its properties tab, then select
CBR_TutorialFlow2from the Flow name drop down menu.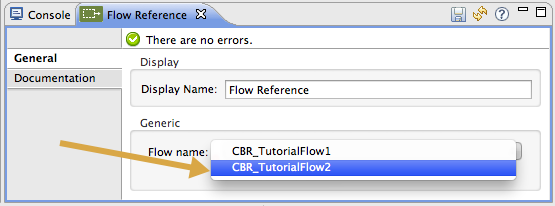
Creating the SubFlow (XML Editor or Standalone)
-
Add a sub-flow element beneath your existing flow and before the closing
muletag.... </flow> <sub-flow name="CBR_TutorialFlow2" doc:name="CBR_TutorialFlow2"/> </mule> -
Move the two message processors from the default path of your choice router into the new subflow.
-
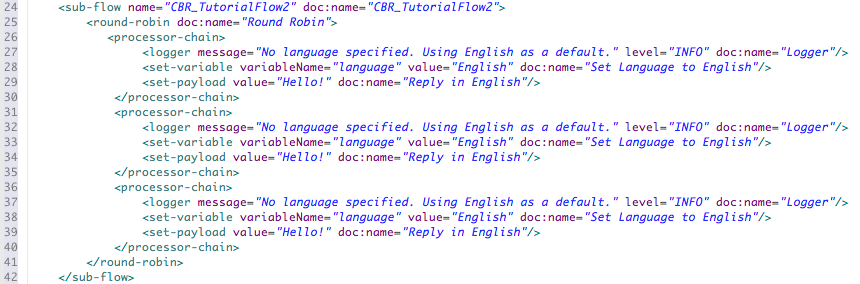
Copy and paste the code for these two processors into the scope of the subflow element.
<sub-flow name="CBR_TutorialFlow2" doc:name="CBR_TutorialFlow2"> <logger message="No language specified. Using English as a default." level="INFO" doc:name="Logger"/> <set-variable variableName="language" value="English" doc:name="Set Language to English"/> <set-payload value="Hello!" doc:name="Reply in English"/> </sub-flow> -
Add a
flow-refelement as a nested element within theotherwisechild element of the choice router.<otherwise> <flow-ref name="" doc:name="Flow Reference"/> </otherwise> -
Configure the flow reference to point to the subflow you just created.
-
Insert the name of the subflow as the value for the
nameattribute.<flow-ref name="CBR_TutorialFlow2" doc:name="Flow Reference"/>
Checking Complete Application Code
Check that your complete application code now matches the code shown below:
<?xml version="1.0" encoding="UTF-8"?>
<mule xmlns:http="http://www.mulesoft.org/schema/mule/http" xmlns:tracking="http://www.mulesoft.org/schema/mule/ee/tracking" xmlns="http://www.mulesoft.org/schema/mule/core" xmlns:doc="http://www.mulesoft.org/schema/mule/documentation" xmlns:spring="http://www.springframework.org/schema/beans" version="EE-3.4.1" xmlns:xsi="http://www.w3.org/2001/XMLSchema-instance" xsi:schemaLocation="http://www.springframework.org/schema/beans http://www.springframework.org/schema/beans/spring-beans-current.xsd
http://www.mulesoft.org/schema/mule/core http://www.mulesoft.org/schema/mule/core/current/mule.xsd
http://www.mulesoft.org/schema/mule/ee/tracking http://www.mulesoft.org/schema/mule/ee/tracking/current/mule-tracking-ee.xsd
http://www.mulesoft.org/schema/mule/http http://www.mulesoft.org/schema/mule/http/current/mule-http.xsd">
<flow name="CBR_TutorialFlow1" doc:name="CBR_TutorialFlow1">
<http:inbound-endpoint exchange-pattern="request-response" host="localhost" port="8081" doc:name="HTTP"/>
<expression-filter expression="#[message.payload != '/favicon.ico']" doc:name="Expression"/>
<set-variable doc:name="Set Language Variable" value="#[message.inboundProperties['language']]" variableName="language"/>
<choice doc:name="Choice">
<when expression="#[flowVars['language'] == 'Spanish']">
<set-payload doc:name="Reply in Spanish" value="Hola!"/>
</when>
<when expression="#[flowVars['language'] == 'French']">
<set-payload doc:name="Reply in French" value="Bonjour!"/>
</when>
<otherwise>
<flow-ref name="CBR_TutorialFlow2" doc:name="Flow Reference"/>
</otherwise>
</choice>
<logger level="INFO" doc:name="Logger" message="The reply "#[message.payload]" means "hello" in #[flowVars['language']]."/>
</flow>
<sub-flow name="CBR_TutorialFlow2" doc:name="CBR_TutorialFlow2">
<logger message="No language specified. Using English as a default." level="INFO" doc:name="Logger"/>
<set-variable variableName="language" value="English" doc:name="Set Language to English"/>
<set-payload value="Hello!" doc:name="Reply in English"/>
</sub-flow>
</mule>Save your project, and watch the console as it redeploys your changed application.
Repeat the steps in Using the Application, above.
Note that the behavior doesn’t change at all – organizing those three message processors into a subflow and then invoking that flow using a flow-ref has no affect on the functionality of the application. However, as you’ll see in the [Extra Credit] section below, separating out chunks of processing into subflows can help keep your application code (and its visual representation on the Studio canvas) organized and easy to read. For some realistic use case examples of how you might use multiple flows or subflows to organize your applications, take a look at some of the medium- and high-complexity Mule Examples, such as the Foreach Processing and Choice Routing Example.
Set No Default to English
Revise your application so that an incoming message without an inbound property set to French or Spanish does not automatically default to English, but instead replies in one of three other random languages (your choice!), selected according to a round robin principle.
To achieve this, you’ll need to replace the contents of the subflow that you just created. You will need another flow control designed to route incoming messages according to a round robin mechanism, and you will need to define three possible processing branches within the scope of the round robin flow control. In each of those three processing branches, set a language property and set the payload to respond in the language that you select.
How to add round robin logic to an application
Use the Round Robin flow control to add round robin logic to your application. Find this processor in the Flow Control section of the palette, or add a round-robin element into your XML.
How to define options for a round robin mechanism
In the visual editor, within the dotted line illustrating the scope of the Round Robin flow control, drag and drop three Variable Transformers. As you did above with the Choice flow control, position your mouse so that a vertical black line appears to create additional routing options. After each Variable Transformer, add a Set Payload Transformer.
Or, in the XML editor, nest three set-variable elements below the round-robin element. Add a set-payload element immediately after each set-variable. In order to instruct Mule that the set-payload transformer that follows each set-variable transformer should be the next step of processing rather than a different round robin option, wrap each set-variable and set-payload pair in a processor-chain tag, like this:
How to configure additional language responses
Do exactly what you did when you configured the default option in the [Choice Router and Constituent Message Processors], above, only with different languages.
There is more than one way to achieve the goals outlined above, but here is the fastest way:
-
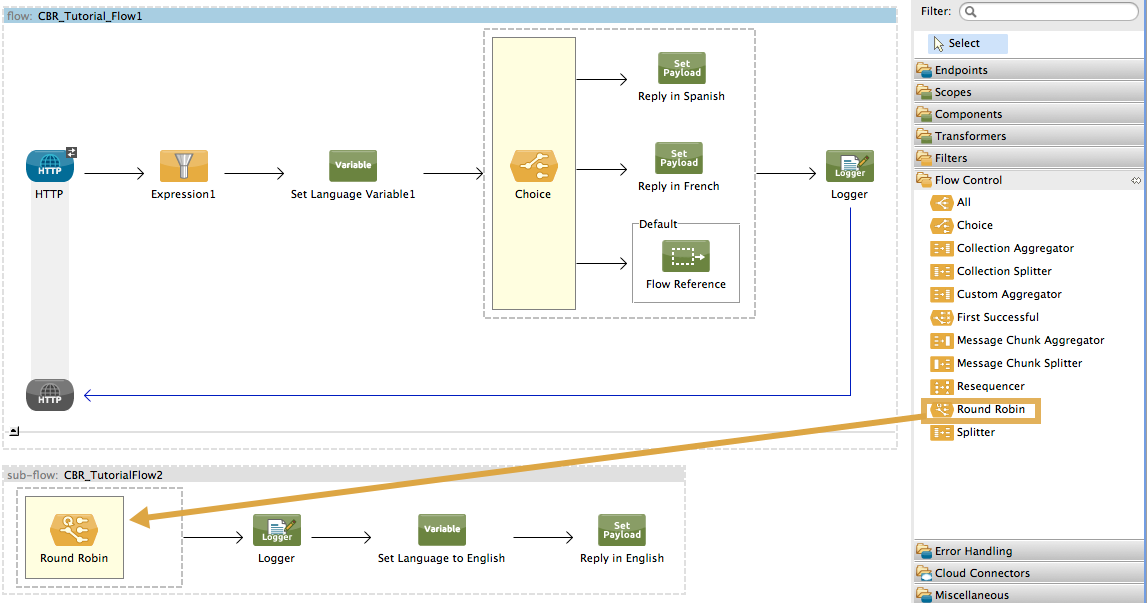
Drag a Round Robin router into the subflow, as shown.
-
Drag the existing three message processors into the Round Robin scope, as shown.
-
Switch to the Configuration XML tab to edit in XML.
-
Highlight the portion of the code wrapped in
processor-chaintags and copy it to your clipboard.
-
Press enter to start a new line, then paste the code twice to create three sets of processor chains.
-
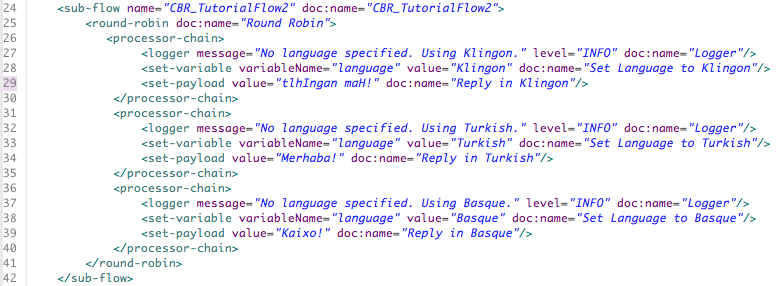
Edit the attributes for the three routing options you have created to set three new language variables and respond with payloads in those languages. Edit the loggers to match. For example:
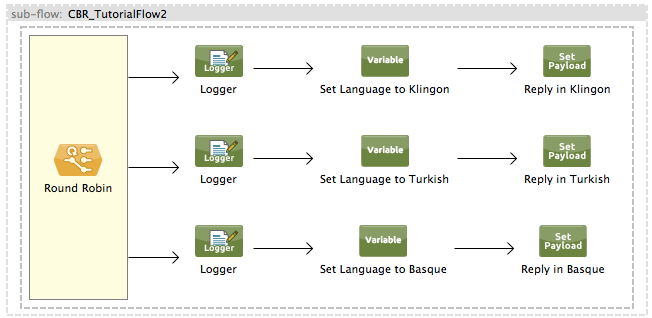
In the visual editor, the subflow looks like this:
Save the application again, wait for the redeployment to complete, and observe the results when you repeatedly visit http://localhost:8081 without specifying either French or Spanish using a query parameter.
Revised Application Code
<?xml version="1.0" encoding="UTF-8"?>
<mule xmlns:http="http://www.mulesoft.org/schema/mule/http" xmlns:tracking="http://www.mulesoft.org/schema/mule/ee/tracking" xmlns="http://www.mulesoft.org/schema/mule/core" xmlns:doc="http://www.mulesoft.org/schema/mule/documentation" xmlns:spring="http://www.springframework.org/schema/beans" version="EE-3.4.1" xmlns:xsi="http://www.w3.org/2001/XMLSchema-instance" xsi:schemaLocation="http://www.springframework.org/schema/beans http://www.springframework.org/schema/beans/spring-beans-current.xsd
http://www.mulesoft.org/schema/mule/core http://www.mulesoft.org/schema/mule/core/current/mule.xsd
http://www.mulesoft.org/schema/mule/ee/tracking http://www.mulesoft.org/schema/mule/ee/tracking/current/mule-tracking-ee.xsd
http://www.mulesoft.org/schema/mule/http http://www.mulesoft.org/schema/mule/http/current/mule-http.xsd">
<flow name="CBR_TutorialFlow1" doc:name="CBR_TutorialFlow1">
<http:inbound-endpoint exchange-pattern="request-response" host="localhost" port="8081" doc:name="HTTP"/>
<expression-filter expression="#[message.payload != '/favicon.ico']" doc:name="Expression"/>
<set-variable doc:name="Set Language Variable" value="#[message.inboundProperties['language']]" variableName="language"/>
<choice doc:name="Choice">
<when expression="#[flowVars['language'] == 'Spanish']">
<set-payload doc:name="Reply in Spanish" value="Hola!"/>
</when>
<when expression="#[flowVars['language'] == 'French']">
<set-payload doc:name="Reply in French" value="Bonjour!"/>
</when>
<otherwise>
<flow-ref name="CBR_TutorialFlow2" doc:name="Flow Reference"/>
</otherwise>
</choice>
<logger level="INFO" doc:name="Logger" message="The reply "#[message.payload]" means "hello" in #[flowVars['language']]."/>
</flow>
<sub-flow name="CBR_TutorialFlow2" doc:name="CBR_TutorialFlow2">
<round-robin doc:name="Round Robin">
<processor-chain>
<logger message="No language specified. Using Klingon." level="INFO" doc:name="Logger"/>
<set-variable variableName="language" value="Klingon" doc:name="Set Language to Klingon"/>
<set-payload value="tlhIngan maH!" doc:name="Reply in Klingon"/>
</processor-chain>
<processor-chain>
<logger message="No language specified. Using Turkish." level="INFO" doc:name="Logger"/>
<set-variable variableName="language" value="Turkish" doc:name="Set Language to Turkish"/>
<set-payload value="Merhaba!" doc:name="Reply in Turkish"/>
</processor-chain>
<processor-chain>
<logger message="No language specified. Using Basque." level="INFO" doc:name="Logger"/>
<set-variable variableName="language" value="Basque" doc:name="Set Language to Basque"/>
<set-payload value="Kaixo!" doc:name="Reply in Basque"/>
</processor-chain>
</round-robin>
</sub-flow>
</mule>Stopping the Application
To stop the application, click the red, square Terminate icon above the console.