Mule Examples
Mule provides a suite of tools to help you learn more about building applications in Studio and Mule Standalone. Walk through the Studio Configurations to learn the basics, or skip forward to learn from the Examples and Templates applications you can build using Mule ESB.
Studio Configurations
In order to demonstrate some of the key configuration activities in Mule Studio, review the videos and instructions in the Studio Basics Walkthrough section. Launch Studio and try mimicking the activities so as to gain familiarity and confidence in working with Studio.
Examples and Templates
Mule Examples offer insight into how you can use Mule to manage system connection and integration situations. Based on real-life business use cases, the examples demonstrate Mule’s powerful features and functionality, and suggest how you can take advantage of them.
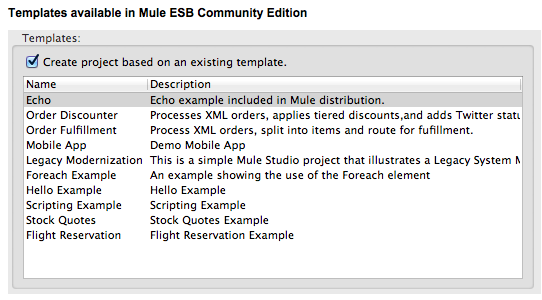
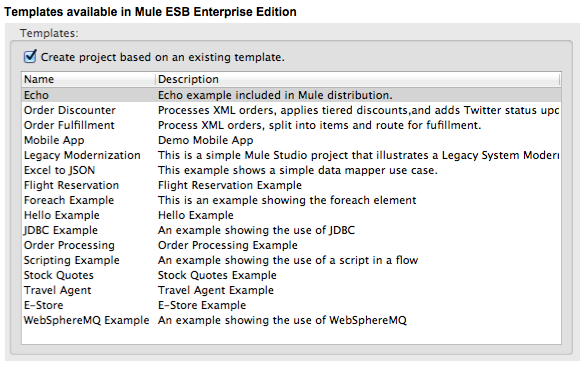
Mule ESB 3.3 Community Edition (CE) and Mule ESB 3.3 Enterprise Edition (EE) include Templates of Mule example applications in the bundled download. These templates help you build a Mule application without having to start from scratch. You can use either the Using a Studio Template, Mule ESB’s graphical interface, or the Using a Standalone Example from your computer’s console, to quickly create your own applications in Mule ESB.
| Template | EE | CE | Description |
|---|---|---|---|
✓ |
Exposes a SOAP-based Web service to reserve flights and hotels for specific timeframes. |
||
✓ |
Exposes a SOAP-based Web service that accepts order requests and processes each item in the order. |
||
✓ |
Demonstrates how to use Mule to implement a traditional e-commerce tasks, such as browsing for products, adding to cart, checking out, authorizing payment, and placing vendor orders. |
||
✓ |
Demonstrates how to use a JDBC transport in a Mule application with Oracle and Sybase databases. |
||
✓ |
Demonstrates how to use WMQ transport to send and receive transactional messages to WebSphere MQ. |
||
✓ |
✓ |
Illustrates how to use foreach to add information to each message in a collection. |
|
✓ |
✓ |
Simulates a flight reservation system using several of new features in Mule 3.3, including new transformers, foreach, catch exception strategies, and the unified Mule expression language. |
|
✓ |
✓ |
Demonstrates how to invoke a JSR-223 script from Mule ESB; illustrates how to use custom transformers, how to route messages based on the type of message payload content, and how to use JVM environment variables. |
|
✓ |
✓ |
Demonstrates how to invoke an ASPX Web service from Mule, transform the result using XSLT, and deserialize the result to a StockQuote Java bean; uses REST and Web Services to invoke the service. |
|
✓ |
Demonstrates different methods for adding WS-security to a Web service. |
||
✓ |
✓ |
Demonstrates how to run Mule ESB as a web application inside a servlet container (using the Jetty connector), and how to use Mule with CXF Web service and the Servlet transport. (Template not available in Studio.) |
|
✓ |
✓ |
Demonstrates how to add Logger and Echo to a flow to perform custom logging in your Mule application. |
|
✓ |
✓ |
Describes how to use AJAX to communicate from a Mule Service to a Web browser. (Template not available in Studio.) |
|
Order Discounter |
✓ |
✓ |
Processes XML orders, applies tiered discounts and sends Twitter status updates for orders. |
Order Fulfillment |
✓ |
✓ |
Processes XML orders, splits orders into items and routes them for fulfillment. |
Mobile App |
✓ |
✓ |
Demonstrates how to build an application for mobile. |
Using a Studio Template
-
If you haven’t already done so, visit www.mulesoft.org and download the free Community Edition of Mule ESB. Follow the instructions on the website to launch Mule Studio and select a workspace. (Alternatively, you can download and use the 30-day free trial of Mule ESB Enterprise Edition.)
-
Click the
Filemenu and selectNew>Mule Project. -
In the New Mule Project panel that appears, enter a Name for your new project and provide a brief Description, if you wish.

-
In the Server Runtime field, select the runtime version of Mule that you wish to use.
-
select
Mule Server 3.3.0 CEif you downloaded the free Community Edition of Mule. -
select
Mule Server 3.3.0 EEif you downloaded the Enterprise Edition of Mule
-
-
Click the box next to Create project based on an existing template.
-
Click a line item to select the template you wish to use to build your project.
-
Click Finish. Mule Studio creates and opens the new project, complete with pre-built and pre-configured flows.
-
In the Package Explorer pane in Studio, right-click the project name, then select
Run As > Mule Application. Studio runs the application and Mule is up and kicking! -
To stop the application from running, click the red Terminate button in Studio’s Console.

Using a Standalone Example
-
If you haven’t already done so, visit www.mulesoft.org and download the free Community Edition of Mule ESB. (Alternatively, you can download and use the 30-day free trial of Mule ESB Enterprise Edition.)
-
Navigate to the folder that contains your copy of Mule ESB Standalone.
-
Locate the
Examplesfolder, then the folder for the example you wish to run. -
Copy the pre-built application archive (the
.zipfile) for the example. -
Paste the copy of the
.zipfile in the Mule applications folder,$MULE_HOME/apps. For example, to run the Flight Reservation example, copymule-example-flight-reservation-3.3.0.zipand move the copy to the$MULE_HOME/examplesfolder.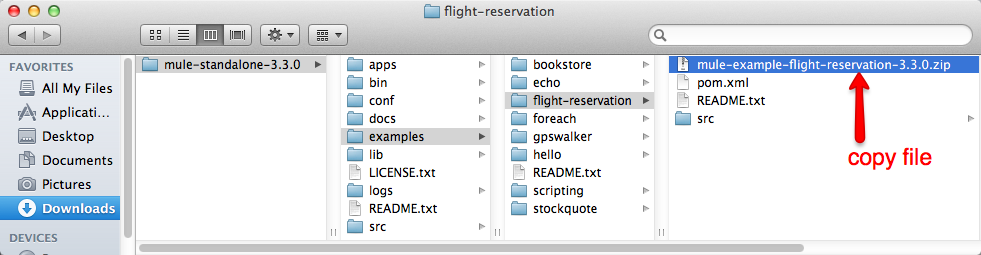
Alternatively, you can build the example in a build tool such as Ant or Maven.
-
Run
antormvnin your Ant or Maven build tool, respectively. -
The build tool compiles the example classes, produces an application zip file and copies it to your
$MULE_HOME/appsfolder.
-
-
Start Mule.
Need more detail?
-
Open a new command line.
PC: Open the Console.
Mac: Open the Terminal application (Applications > Utilities > Terminal). -
Access the directory and folder in which you pasted the zip file for your example (i.e. the application folder in Mule). For example, type
cd /Users/aaron/Downloads/mule-standalone-3.3.0/ -
Start Mule. For example, type
./bin/mule
-
After it starts, Mule polls the
appsandexamplesfolders every 5 seconds; it picks up the applications you copied to theexamplesfolder, then deploys it automatically. In the first command line, Mule notifies you that it has deployed the example application. -
To stop the application from running, hit CTRL-C.