Scripting Example
The Scripting example demonstrates two ways to use Java-platform scripts in Mule ESB applications.
You can include several kinds scripts in your Mule ESB application, all of which Mule backs by a JSR-223 compliant-script engine. Specifically, Mule ESB supports Groovy, Javascript, Python, Ruby and Beanshell scripting languages.
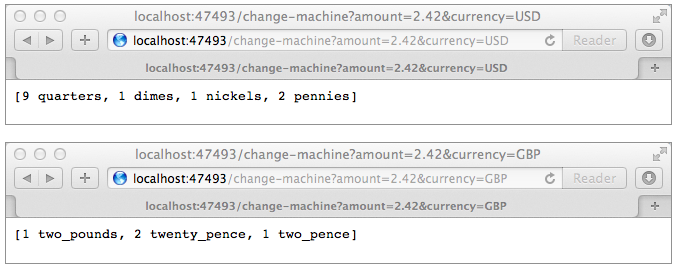
This Scripting example presents an HTTP request-response application which an end user accesses on the client-side via a Web browser. The end user in this example wants to find out how many, and what type, of coins to use to represent a specific amount of money in either American dollars (USD) or British pounds (GBP). In other words, she uses the Scripting example application to answer questions such as, “What coins do I need to make $2.42?” or “What coins do I need to make £2.42?”
The end user enters an amount of money into part of the URL on her browser, then presses enter to submit her request to the Mule ESB Scripting example application. When it receives an end user request, the Mule application performs several tasks to prepare the message payload for processing by one of two scripts. The script calculates how many, and what type, of coins the end user needs to represent a specific amount of money, then the application returns the response to the end user’s Web browser. To follow through with the example above, the application returns a response for a USD request that reads 9 quarters, 1 dimes, 1 nickels, 2 pennies.
In addition to executing scripts, this application performs the following processing tasks:
-
it routes messages based on their payload content
-
it parses and transforms message payload data
This example should enable you to create an application that incorporates Java-platform scripts. To understand more about Mule ESB’s ability to integrate services and systems, access the Mule examples and see other applications in action.
Assumptions
This document assumes that you are familiar with Mule ESB and the Mule Studio interface. To increase your familiarity with Studio, consider completing one or more Mule Studio Tutorials.
This document describes the details of the example within the context of Mule Studio, Mule ESB’s graphical user interface (GUI). Where appropriate, the XML configuration follows the Studio interface screenshot in an expandable section.
Set Up
As with this Scripting example, you can create template applications straight out of the box in Mule Studio or Mule Standalone (Mule ESB without Studio). You can tweak the configurations of these use case-based templates to create your own customized applications in Mule.
Follow the procedure below to create, then run the Scripting application in Mule ESB.
-
Complete the procedure in Examples and Exercises to create, then run the Scripting template in Mule Studio, or the Scripting example in Mule Standalone (Mule ESB without Studio).
-
Open your Web browser, then type one of two URLs in the address bar:
-
for a calculation in USD:
http://localhost:47493/change-machine?amount=2042¤cy=USD -
for a calculation in GBP:
-
-
Press enter to submit your request (the default value is 2.42) and elicit a response from the Mule application (see image below, top for USD; below, bottom for GBP).
-
Adjust the URL to change
2.42to another amount, for example,6.85, then press enter to submit your request and elicit a response (see image below, top for USD; below, bottom for GBP).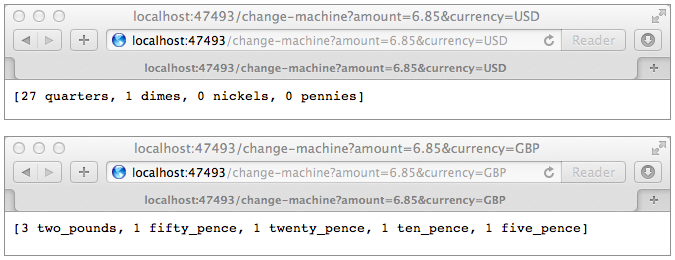
How it Works
The Scripting example application uses a flow which processes end user HTTP requests.
The sections below elaborate further on the configurations of the Scripting example application and how it uses scripts to provide responses to end user requests.
|
For Mule Studio Users In Mule Studio, double-click a building block to open its Properties Panel, then examine its configuration details. Alternatively, click the Configuration XML tab to examine the application’s XML configuration file. 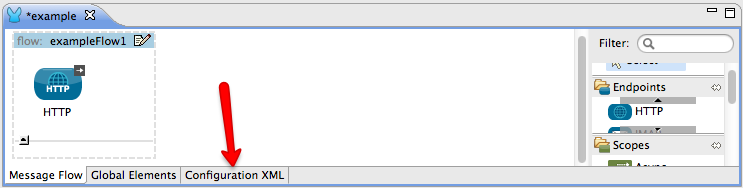
|
HTTP-inbound Flow
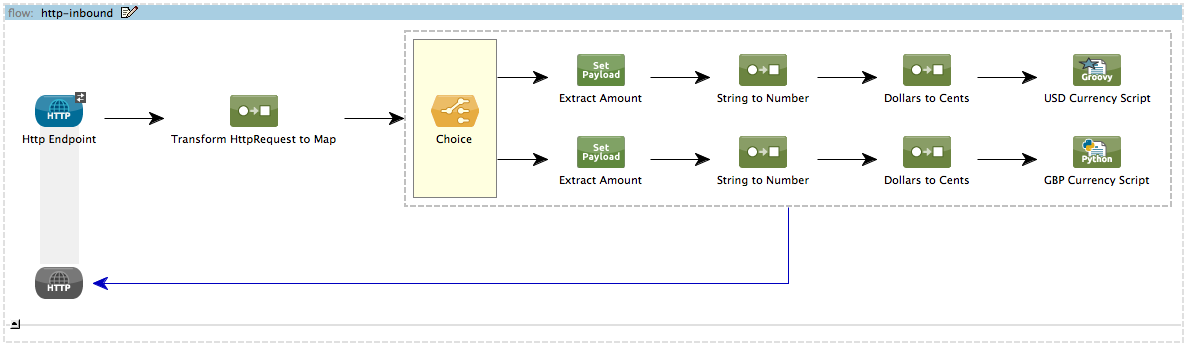
The HTTP-inbound flow makes use of several building blocks to process and respond to an end user request.
Endpoint and Transformer
When an end user request encounters the Scripting application, the first building block it encounters is the request-response HTTP Inbound Endpoint. Because it has a two-way message exchange pattern, this HTTP endpoint is responsible for both receiving and returning messages. Note that this endpoint receives end user requests from both the USD and the GDP URLs; Mule makes a decision about how to process the different types of messages later in the HTTP-inbound flow.
|
Two-Way vs. One-Way Notice that the HTTP endpoint has a two-way message exchange pattern (as indicated by the small double-arrow icon — below, left). Because it must respond to the requester, the HTTP endpoint in this example has a request-response message exchange pattern. If an HTTP endpoint has only to input information into an application, it requires a one-way message exchange pattern (below, right). 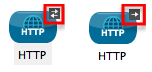
|
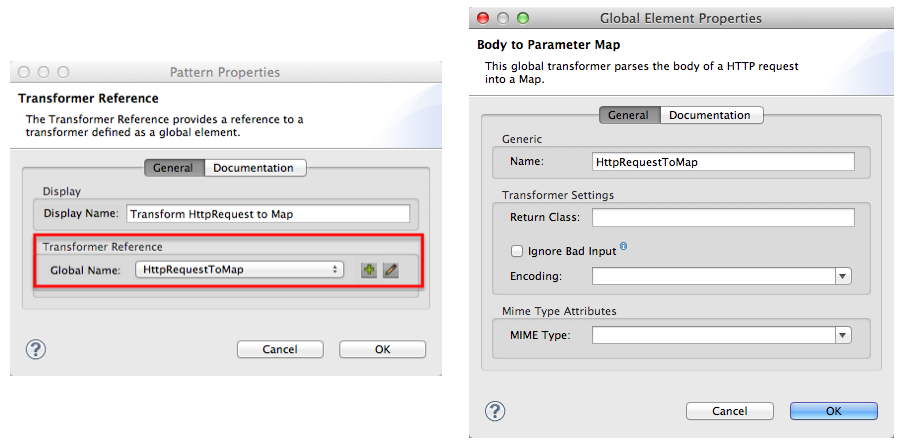
Next, the HTTP-inbound flow moves the message to a Transformer to convert the data format of the message from an HTTP-request to Java map objects. To access specific instructions on how to perform this conversion, the transformer references a Global Body to Parameter Map Transformer. The image below, left, displays the Transform HttpRequest to Map transformer’s properties panel in Studio; note the section outlined in red in which the transformer references the global transformer. The image below, right, displays the Global Body to Parameter Map transformer’s properties panel in Studio.
|
What is a Global Element? Mule ESB supports Global Elements within applications, such as the Body to Parameter Map Transformer and the Rather than repeatedly writing the code in different flows for elements or connectors that behave exactly the same way, you can create one global element that details your desired behavior or configuration, then reference that global element any number of times in the flows or subflows in your Mule application. Read more… For example, the code that describes the configuration of the The |
Choice Flow Control (Content-Based Message Router)
With its newly transformed content, the message next encounters the Choice Flow Control. This content-based router checks the payload of the message to discover the currency of the content, then makes a decision about where to route it:
-
if the currency is USD, the choice flow control routes the message to the first
Extract AmountSet Payload Transformer -
if the currency is GBP, the choice flow control routes the message to the second
Extract Amountset payload transformer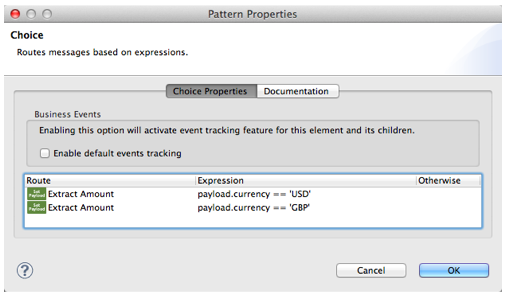
Form this point forward, messages follow one of two paths towards a script component:
-
the USD path that ends with a Groovy Script Component
-
the GBP path that ends with a Python Script Component
The transformers that sit between the choice flow control and the script components in each path perform the same tasks; the only difference is their final destination.
Transformers
From the message payload, each of the Extract Amount set payload transformers obtain the amount of money the end user entered in the client-side URL. They set data on the payload to specify the amount of money the rest of the flow will process.
The pair of String to Number transformers reference a global StringToNumber Java component which converts the amount of money from a string to an integer. This transformation is important because the next message processors, the Dollars To Cents transformers, need an integer in order to be able to perform a simple mathematical operation.
Referencing the global DollarsToCents Java component, the Dollars To Cents transformers multiply the amount of money by 100 so as to convert the amount to a whole number (i.e. pennies).
Scripts
Lastly, a message reaches one of two script components: Groovy or Python.
The Groovy script component accesses a script file, greedy.groovy, that converts a whole number into the USD coins it would take to represent a specific amount of money. Adapted from the Groovy Cookbook, this simple script resides in the application’s src/main/resources folder. Note that the groovy script can process a request in either currency, but in this flow it will process only USD requests.
Adapted from a greedy coin changer algorithm the Python script component completes exactly the same task as the Groovy script component, except it uses Python to convert pounds, instead of Groovy to convert dollars. Note that the python script can process a request in either currency, but in this flow it will process only GBP requests. This script also resides in the application’s src/main/resources folder.
|
Examine the Scripts In Mule Studio, you can open a script file and view the contents of the Groovy or Python scripts.
|
When Mule finishes processing a message, the request-response HTTP endpoint returns the response to the end user via her Web browser.
Drill Down
Both the StringToNumber and DollarsToCents global Java components in this Scripting example application reference Java classes, which detail what Mule must do with messages that encounter these components. If you want to examine the Java classes more closely, you can access the files in Mule ESB.
Related Topics
-
For more information on using the Choice Flow Control, see Choice Flow Control Reference.
-
For more information on transformers, see Studio Transformers.
-
For more information on scripts, see Studio Components.